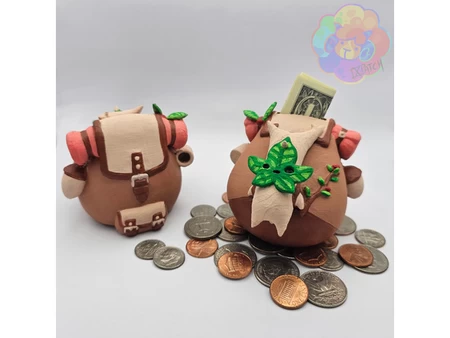
Apple coin bank 3D for print


12854 Views 1 Likes 0 Downloads Download the piece here from 3dforprint
It's never to early to develop a money saving habit, so I designed this 3D printed coin bank for the grandkids!
...
The coin bank mechanics are based on the Hoeken mechanism. The design consists of 20 unique 3D printed parts and uses a single gear motor and two micro lever switches for operation.
As usual, I probably forgot a file or two or who knows what else, so if you have any questions, please do not hesitate to ask as I do make mistakes in plenty.
Designed using Autodesk Fusion 360, sliced using Cura 3.2.1, and printed in PLA on both an Ultimaker 2+ Extended and an Ultimaker 3 Extended.
Apple Coin Bank is a challenge to print and assemble. The design incorporates threaded assembly (by 4mm and ...6mm), small parts and confined spaces. Study all the steps before decided whether to make your own Apple Coin Bank.
Apple Coin Bank requires a 100 to 300 rpm gear motor (I used "33x12mm 300RPM Metal Mini DC 6V Gearbox Gearwheel Motor Mini Reduce Speed Geared Electric Motor"), a 4.5 VDC power supply, a coaxial panel mount power jack for a 9mm hole, two micro lever switches (CYT1073), four 2mm by 12mm screws, four 2mm washers and four 2mm nuts, and two rubber bands (70mm in length).
I printed all parts at .15mm layer height and 20% infill. I printed both "Apple Top.stl" and "Apple Face.stl" with supports, and the remaining parts with no supports. I printed five "Bolt, 6mm.stl", three "Bolt, 4mm by .7, 4.2mm Shoulder.stl", two "Apple Eyes Black.stl", "Apple Eyes White.stl", and one each of the remaining parts. I printed "Apple Top.stl" on an Ultimaker 3 Extended using the dual extrusion file "Apple Top.3mf", but I've also included "Apple Top.stl" for single extrusion printers.
Prior to starting assembly, test fit and trim, file, sand, etc. all parts as necessary for smooth movement of moving surfaces, and tight fit for non moving surfaces. Depending on the colors you chose and your printer settings, more or less trimming, filing and/or sanding may be required. Carefully file all edges that contacted the build plate to make absolutely sure that all build plate "ooze" is removed and that all edges are smooth. I used small jewelers files and plenty of patience to perform this step.
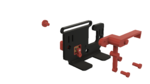
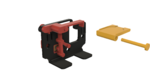
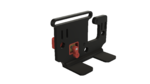
Install the Motor.
Press the gear motor into "Mount Motor.stl".
Press the assembly into "Base.stl".
Press "Arm, 8mm.stl" onto the motor shaft.
Carefully adjust the motor position in the motor housing such that the motor side of the arm is about a business card thickness away from the surface of the base.
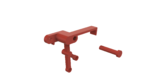
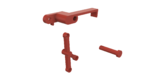
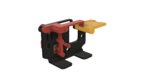
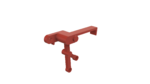
Assemble the Coin Arm Mechanism.
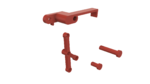
Attach "Arm, 20mm.stl" to the center hole in "Arm, 40mm.stl" using one "Bold, 4mm by .7, 4.2mm Shoulder.stl" as shown.
Attach "Arm.stl" to the assembly using "Axle Arm.stl".
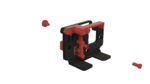
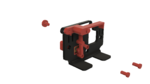
Complete the Base Assembly.
Attach the arm assembly to the base assembly using two "Bolt, 4mm by .7, 4.2mm Shoulder.stl" and "Bolt Arm.stl". Do not over tighten the bolts.
Attach "Platform Coin.stl" to the base assembly using "Axle Platform Coin.stl". Do not over tighten the axle.
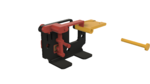
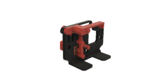
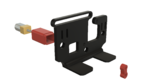
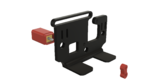
Wire and Adjust the Base Assembly.
https://www.youtube.com/watch?v=hFDqw4SanJU
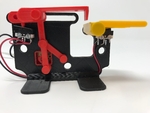
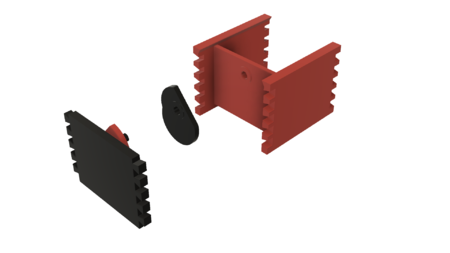
In the photo, the micro lever switch on the left is the arm switch, and the micro lever switch on the right is the coin platform switch. The coin platform switch is used to start the coin capture cycle, and the arm switch is used to stop the coin capture cycle. Orient and attach the two micro lever switches to the base assembly using four 2mm by 12mm screws, 2mm washers and 2mm nuts.
Solder a wire between the coin platform switch common ("C") terminal to the arm switch common terminal. Solder a wire between the coin platform switch normally opened ("NO") to the arm switch normally closed ("NC") terminal. Solder a wire between the arm switch normally closed terminal to the motor positive ("+") terminal. Solder a 100mm length of wire to the arm switch common terminal and leave the remaining end free. Solder a 100mm length of wire to the motor negative (-") terminal and leave the remaining end free.
Adjust the position and orientation of the coin platform switch such that with minimal downward pressure on the coin platform causes the switch to activate (listen for the "click" sound).
Apply power to the free wires, press the coin platform, and make sure the arm moves as shown in the video.
Adjust the position and orientation of the arm switch such that the arm stops after one cycle in the position shown in the video.
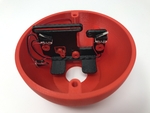
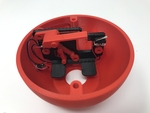
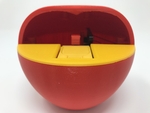
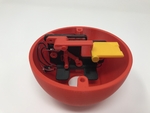
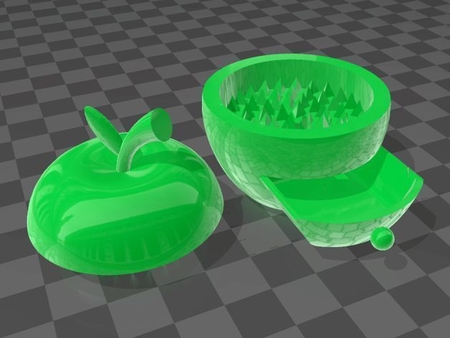
Install the Base Assembly in the Apple.
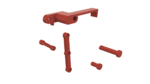
Attach the base assembly to "Apple Bottom.stl" using three "Bolt, 6mm.stl".
As shown in the images, I removed both the arm and coin platform assemblies, attached the base assembly to the bottom, then re-installed the arm and coin mechanisms.
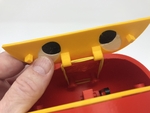
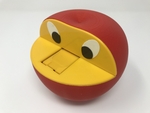
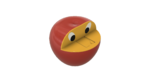
Assemble the Apple Face.
Press "Apple Eyes Black.stl" and "Apple Eyes White.stl" into "Apple Face.stl". I applied small dots of thick cyanoacrylate glue to secure them in place.
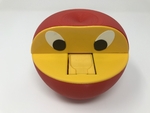
Final Assembly.
Attach "Apple Top.stl" to the the apple assembly using two "Bolt, 6mm.stl".
Attach the face assembly to the apple assembly using two rubber bands as shown.
Thread "Knob.stl" into the bottom of the apple.
That's how I printed and assembled Apple Coin Bank.
Hope you enjoy it!
Designer
Greg Zumwalt3d model description
An Apple Coin Bank for my grandkids.It's never to early to develop a money saving habit, so I designed this 3D printed coin bank for the grandkids!
...
The coin bank mechanics are based on the Hoeken mechanism. The design consists of 20 unique 3D printed parts and uses a single gear motor and two micro lever switches for operation.
As usual, I probably forgot a file or two or who knows what else, so if you have any questions, please do not hesitate to ask as I do make mistakes in plenty.
Designed using Autodesk Fusion 360, sliced using Cura 3.2.1, and printed in PLA on both an Ultimaker 2+ Extended and an Ultimaker 3 Extended.
3d model print parameters
Purchase, Print and Prepare the Parts.Apple Coin Bank is a challenge to print and assemble. The design incorporates threaded assembly (by 4mm and ...6mm), small parts and confined spaces. Study all the steps before decided whether to make your own Apple Coin Bank.
Apple Coin Bank requires a 100 to 300 rpm gear motor (I used "33x12mm 300RPM Metal Mini DC 6V Gearbox Gearwheel Motor Mini Reduce Speed Geared Electric Motor"), a 4.5 VDC power supply, a coaxial panel mount power jack for a 9mm hole, two micro lever switches (CYT1073), four 2mm by 12mm screws, four 2mm washers and four 2mm nuts, and two rubber bands (70mm in length).
I printed all parts at .15mm layer height and 20% infill. I printed both "Apple Top.stl" and "Apple Face.stl" with supports, and the remaining parts with no supports. I printed five "Bolt, 6mm.stl", three "Bolt, 4mm by .7, 4.2mm Shoulder.stl", two "Apple Eyes Black.stl", "Apple Eyes White.stl", and one each of the remaining parts. I printed "Apple Top.stl" on an Ultimaker 3 Extended using the dual extrusion file "Apple Top.3mf", but I've also included "Apple Top.stl" for single extrusion printers.
Prior to starting assembly, test fit and trim, file, sand, etc. all parts as necessary for smooth movement of moving surfaces, and tight fit for non moving surfaces. Depending on the colors you chose and your printer settings, more or less trimming, filing and/or sanding may be required. Carefully file all edges that contacted the build plate to make absolutely sure that all build plate "ooze" is removed and that all edges are smooth. I used small jewelers files and plenty of patience to perform this step.
Install the Motor.
Press the gear motor into "Mount Motor.stl".
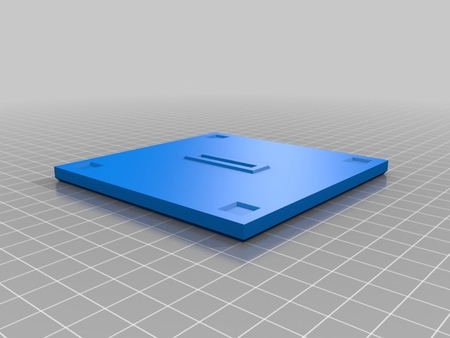
Press the assembly into "Base.stl".
Press "Arm, 8mm.stl" onto the motor shaft.
Carefully adjust the motor position in the motor housing such that the motor side of the arm is about a business card thickness away from the surface of the base.
Assemble the Coin Arm Mechanism.
Attach "Arm, 20mm.stl" to the center hole in "Arm, 40mm.stl" using one "Bold, 4mm by .7, 4.2mm Shoulder.stl" as shown.
Attach "Arm.stl" to the assembly using "Axle Arm.stl".
Complete the Base Assembly.
Attach the arm assembly to the base assembly using two "Bolt, 4mm by .7, 4.2mm Shoulder.stl" and "Bolt Arm.stl". Do not over tighten the bolts.
Attach "Platform Coin.stl" to the base assembly using "Axle Platform Coin.stl". Do not over tighten the axle.
Wire and Adjust the Base Assembly.
https://www.youtube.com/watch?v=hFDqw4SanJU
In the photo, the micro lever switch on the left is the arm switch, and the micro lever switch on the right is the coin platform switch. The coin platform switch is used to start the coin capture cycle, and the arm switch is used to stop the coin capture cycle. Orient and attach the two micro lever switches to the base assembly using four 2mm by 12mm screws, 2mm washers and 2mm nuts.
Solder a wire between the coin platform switch common ("C") terminal to the arm switch common terminal. Solder a wire between the coin platform switch normally opened ("NO") to the arm switch normally closed ("NC") terminal. Solder a wire between the arm switch normally closed terminal to the motor positive ("+") terminal. Solder a 100mm length of wire to the arm switch common terminal and leave the remaining end free. Solder a 100mm length of wire to the motor negative (-") terminal and leave the remaining end free.
Adjust the position and orientation of the coin platform switch such that with minimal downward pressure on the coin platform causes the switch to activate (listen for the "click" sound).
Apply power to the free wires, press the coin platform, and make sure the arm moves as shown in the video.
Adjust the position and orientation of the arm switch such that the arm stops after one cycle in the position shown in the video.
Install the Base Assembly in the Apple.
Attach the base assembly to "Apple Bottom.stl" using three "Bolt, 6mm.stl".
As shown in the images, I removed both the arm and coin platform assemblies, attached the base assembly to the bottom, then re-installed the arm and coin mechanisms.
Assemble the Apple Face.
Press "Apple Eyes Black.stl" and "Apple Eyes White.stl" into "Apple Face.stl". I applied small dots of thick cyanoacrylate glue to secure them in place.
Final Assembly.
Attach "Apple Top.stl" to the the apple assembly using two "Bolt, 6mm.stl".
Attach the face assembly to the apple assembly using two rubber bands as shown.
Thread "Knob.stl" into the bottom of the apple.
That's how I printed and assembled Apple Coin Bank.
Hope you enjoy it!


![Apple Watch Band [Ninjaflex]](https://www.3dforprint.com/modelos/5341/apple-watch-band-ninjaflex1_medium.jpg)