Arduino powered portal gun - modification and shopping list 3D for print

3309 Views 1 Likes 0 Downloads Download the piece here from 3dforprint
https://www.thingiverse.com/thing:3579224
and here
https://www.thingiverse.com/thing:4641037
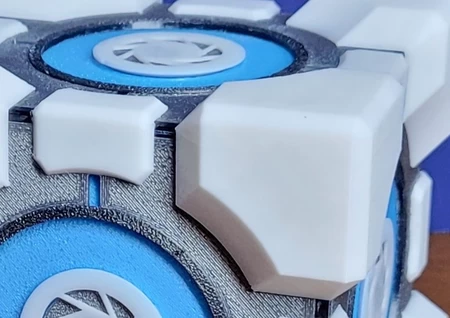
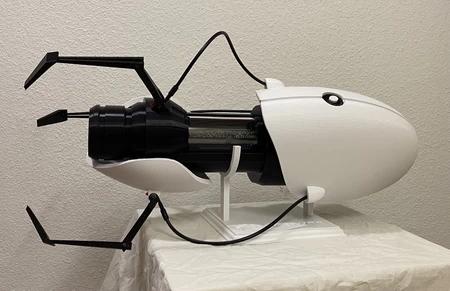
I ...printed the white parts of the case each "in one piece" on a Flsun QQ-S Pro. This worked great and so I didn't have to worry about gluing it all together.
The designer of the Arduino Portal Gun used a 2.5 inch tube because he lives in the USA. I had overlooked that when I printed the "modified_collector.stl" part. So I needed an adapter to be able to use a 60mm acrylic tube.
So get the right tube and print the right part before you print ;-)
Otherwise you can use my adapter "PG Acryl Rod Adapter.stl".
Or you print the right part from Lunchbox7985: "modified_collector_larger_center_hole_original_outer_size.stl".
The last modification is for the Generator Hatch.
I modified the case cover to fit a total of 3 arcade switches. The white button is for "Cancel Portal" and only lights up when there is a portal to cancel. (You need a slight modification of the software for the Arduino, I attached the source code file, and you have to connect the LED from the white arcade button to port "A3" of the Arduino (right next to the connectors for the two portal buttons)
The Cancel button can be operated comfortably with the little finger.
The power-up switch (in the middle) can be operated with the knuckle of the ring finger.
You can use PG-Grip_R.stl and PG-Grip_L.stl from the original Portal Gun Design from Evarate (https://www.thingiverse.com/thing:3579224)
I used the following parts:
Arcade buttons
https://www.amazon.de/gp/product/B08RC2DB3H/ref=ppx_yo_dt_b_asin_title_o00_s03?ie=UTF8&psc=1
Acrylic tube
https://www.amazon.de/gp/product/B09F68PSPJ/ref=ppx_yo_dt_b_asin_title_o02_s00?ie=UTF8&psc=1
Use painter's masking tape and with an angle sign in rows the measure (146mm) and saw carefully with a hacksaw piece by piece.
Acrylic rod
https://www.amazon.de/gp/product/B07JLFBQVV/ref=ppx_yo_dt_b_asin_title_o03_s00?ie=UTF8&th=1
No need to shorten. The ends of the rod should be polished so that the light shines through better.
Other components:
Loudspeaker
https://www.amazon.de/gp/product/B07M98D9GZ/ref=ppx_yo_dt_b_asin_title_o04_s00?ie=UTF8&psc=1
Arduino clone
https://www.amazon.de/gp/product/B078SBBST6/ref=ppx_yo_dt_b_asin_title_o01_s00?ie=UTF8&psc=1
Sound board
https://www.amazon.de/gp/product/B010M8UOR8/ref=ppx_yo_dt_b_asin_title_o09_s00?ie=UTF8&psc=1
Neopixel ring
https://www.amazon.de/gp/product/B08PBPT4LH/ref=ppx_yo_dt_b_asin_title_o01_s00?ie=UTF8&psc=1
Neopixel Jewel 2x
https://www.amazon.de/gp/product/B07WPCQ9NY/ref=ppx_yo_dt_b_asin_title_o09_s00?ie=UTF8&psc=1
Power-Up / Power-Switch
https://www.amazon.de/gp/product/B087PYW9BS/ref=ppx_yo_dt_b_asin_title_o00_s03?ie=UTF8&psc=1
Neopixel for status
https://www.amazon.de/gp/product/B01D1FFVOA/ref=ppx_yo_dt_b_asin_title_o00_s02?ie=UTF8&psc=1
Amplifier
https://www.amazon.de/gp/product/B07KQCKWF8/ref=ppx_yo_dt_b_asin_title_o00_s01?ie=UTF8&psc=1
Battery pack
https://www.amazon.de/gp/product/B088BTYSLX/ref=ppx_yo_dt_b_asin_title_o00_s02?ie=UTF8&psc=1
I didn't feel like soldering the components onto a board, so I used a breadboard and jumper cables:
https://www.amazon.de/gp/product/B078JGQKWP/ref=ppx_yo_dt_b_asin_title_o00_s00?ie=UTF8&th=1
The three black cables are each 32cm long and come from the hardware store (Home Depot): H03VV-F 2×0,75mm² and mounting with hot glue in their mounting points to the big white part.
Glue for connecting the main parts:
https://www.amazon.de/Pattex-PSE6N-Stability-Express-Adhesive/dp/B01N4UZT34/ref=sr_1_6?keywords=pattex+stabilit+express&qid=1661358039&sprefix=pattex+sta%2Caps%2C80&sr=8-6
Small parts with UHU Hartkunstsoffkleber
https://www.amazon.de/UHU-Spezialkleber-HART-KUNSTSTOFF-Infokarte/dp/B01HJG9FR6/ref=sr_1_5?keywords=uhu+hart+kunststoff&qid=1661358246&sprefix=uhu+hart%2Caps%2C75&sr=8-5
For the connection to the Arduino and the amplifier I used DuPont connectors:
https://www.amazon.de/gp/product/B07QX51F3B/ref=ppx_yo_dt_b_search_asin_title?ie=UTF8&psc=1
The cable from the sound module to the amplifier is an old headphone cable.
FLSUN QQ-S Pro
Rafts:
Doesn't Matter
Supports:
Yes
Resolution:
0,2mm
Infill:
10%
Filament brand:
Material4Pint
Fi...lament color:
white, black
Filament material:
PLA
Notes:
The white parts can be printed with 10% Infill.
Hatch-Part with 25%
Designer
Timo Schlich3d model description
To make the Portal Gun you need parts from here:https://www.thingiverse.com/thing:3579224
and here
https://www.thingiverse.com/thing:4641037
I ...printed the white parts of the case each "in one piece" on a Flsun QQ-S Pro. This worked great and so I didn't have to worry about gluing it all together.
The designer of the Arduino Portal Gun used a 2.5 inch tube because he lives in the USA. I had overlooked that when I printed the "modified_collector.stl" part. So I needed an adapter to be able to use a 60mm acrylic tube.
So get the right tube and print the right part before you print ;-)
Otherwise you can use my adapter "PG Acryl Rod Adapter.stl".
Or you print the right part from Lunchbox7985: "modified_collector_larger_center_hole_original_outer_size.stl".
The last modification is for the Generator Hatch.
I modified the case cover to fit a total of 3 arcade switches. The white button is for "Cancel Portal" and only lights up when there is a portal to cancel. (You need a slight modification of the software for the Arduino, I attached the source code file, and you have to connect the LED from the white arcade button to port "A3" of the Arduino (right next to the connectors for the two portal buttons)
The Cancel button can be operated comfortably with the little finger.
The power-up switch (in the middle) can be operated with the knuckle of the ring finger.
You can use PG-Grip_R.stl and PG-Grip_L.stl from the original Portal Gun Design from Evarate (https://www.thingiverse.com/thing:3579224)
I used the following parts:
Arcade buttons
https://www.amazon.de/gp/product/B08RC2DB3H/ref=ppx_yo_dt_b_asin_title_o00_s03?ie=UTF8&psc=1
Acrylic tube
https://www.amazon.de/gp/product/B09F68PSPJ/ref=ppx_yo_dt_b_asin_title_o02_s00?ie=UTF8&psc=1
Use painter's masking tape and with an angle sign in rows the measure (146mm) and saw carefully with a hacksaw piece by piece.
Acrylic rod
https://www.amazon.de/gp/product/B07JLFBQVV/ref=ppx_yo_dt_b_asin_title_o03_s00?ie=UTF8&th=1
No need to shorten. The ends of the rod should be polished so that the light shines through better.
Other components:
Loudspeaker
https://www.amazon.de/gp/product/B07M98D9GZ/ref=ppx_yo_dt_b_asin_title_o04_s00?ie=UTF8&psc=1
Arduino clone
https://www.amazon.de/gp/product/B078SBBST6/ref=ppx_yo_dt_b_asin_title_o01_s00?ie=UTF8&psc=1
Sound board
https://www.amazon.de/gp/product/B010M8UOR8/ref=ppx_yo_dt_b_asin_title_o09_s00?ie=UTF8&psc=1
Neopixel ring
https://www.amazon.de/gp/product/B08PBPT4LH/ref=ppx_yo_dt_b_asin_title_o01_s00?ie=UTF8&psc=1
Neopixel Jewel 2x
https://www.amazon.de/gp/product/B07WPCQ9NY/ref=ppx_yo_dt_b_asin_title_o09_s00?ie=UTF8&psc=1
Power-Up / Power-Switch
https://www.amazon.de/gp/product/B087PYW9BS/ref=ppx_yo_dt_b_asin_title_o00_s03?ie=UTF8&psc=1
Neopixel for status
https://www.amazon.de/gp/product/B01D1FFVOA/ref=ppx_yo_dt_b_asin_title_o00_s02?ie=UTF8&psc=1
Amplifier
https://www.amazon.de/gp/product/B07KQCKWF8/ref=ppx_yo_dt_b_asin_title_o00_s01?ie=UTF8&psc=1
Battery pack
https://www.amazon.de/gp/product/B088BTYSLX/ref=ppx_yo_dt_b_asin_title_o00_s02?ie=UTF8&psc=1
I didn't feel like soldering the components onto a board, so I used a breadboard and jumper cables:
https://www.amazon.de/gp/product/B078JGQKWP/ref=ppx_yo_dt_b_asin_title_o00_s00?ie=UTF8&th=1
The three black cables are each 32cm long and come from the hardware store (Home Depot): H03VV-F 2×0,75mm² and mounting with hot glue in their mounting points to the big white part.
Glue for connecting the main parts:
https://www.amazon.de/Pattex-PSE6N-Stability-Express-Adhesive/dp/B01N4UZT34/ref=sr_1_6?keywords=pattex+stabilit+express&qid=1661358039&sprefix=pattex+sta%2Caps%2C80&sr=8-6
Small parts with UHU Hartkunstsoffkleber
https://www.amazon.de/UHU-Spezialkleber-HART-KUNSTSTOFF-Infokarte/dp/B01HJG9FR6/ref=sr_1_5?keywords=uhu+hart+kunststoff&qid=1661358246&sprefix=uhu+hart%2Caps%2C75&sr=8-5
For the connection to the Arduino and the amplifier I used DuPont connectors:
https://www.amazon.de/gp/product/B07QX51F3B/ref=ppx_yo_dt_b_search_asin_title?ie=UTF8&psc=1
The cable from the sound module to the amplifier is an old headphone cable.
3d model print parameters
Printer:FLSUN QQ-S Pro
Rafts:
Doesn't Matter
Supports:
Yes
Resolution:
0,2mm
Infill:
10%
Filament brand:
Material4Pint
Fi...lament color:
white, black
Filament material:
PLA
Notes:
The white parts can be printed with 10% Infill.
Hatch-Part with 25%