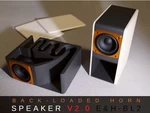
后置喇叭 v2.0 bl2 - 蓝牙,有源,无源 3D打印

3063 视图 1 喜欢 0 下载 下载
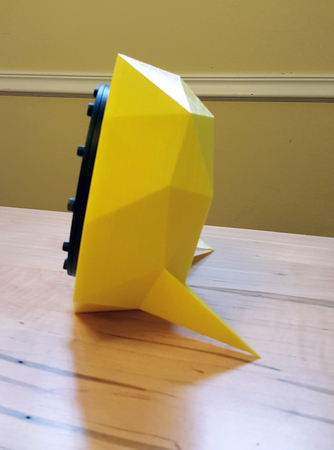
此版本经过彻底重新设计,仍然时尚、超级便宜、完全可打印,但音质好得多。这款后置�...�叭蓝牙扬声器使用 3.3 英寸(而不是原来的 2 1/2 英寸)驱动器和 1 美元的蓝牙板和 3.5 美元的放大器。总成本约为 20 美元。带有后置喇叭的外壳(如果您不熟悉该概念,请阅读下文)也是经过彻底重新设计的。
但是,概念保持不变。这就像亲吻青蛙。你亲吻那个小扬声器,希望它变成王子。是的,它确实会变成王子……这些超便宜的组件能发出如此大的声音,真是令人惊讶。
外壳适用于 3.3 英寸(6.5 厘米)驱动器。您可以将其用作蓝牙(我就是这么做的)、有源或无源扬声器。后面有一个用于放置电子设备(蓝牙板 + 放大器)的腔室。
我正在使用这款 MP3 蓝牙解码板(约 1 美元)
加上便宜的 TPA3116 D2 双通道 50Wx2 放大器模块 - 这是立体声,所以我将来自蓝牙板的 L 和 R 通道短接
加上任何 12V/2A+ 电源
加上小型 AMS1117/LM1117 降压转换器 - 这个是用于蓝牙模块的,需要 5V
我使用的驱动器是 Visaton FRS 8 M - 8 欧姆 8 厘米(3.3 英寸)全频扬声器(约 12 美元),可能有点难找。但是,https://www.amazon.com/s?k=3+full+range+speaker&crid=10S5BS828TTCK&sprefix=3"+full,aps,248&linkCode=sl2&tag=hthingsn08-20&linkId=2c8d992ffadcc95a3f5d8207f65fc6c5&language=en_US&ref_=as_li_ss_tl">大多数 3 - 3.5 英寸驱动器应该可以使用(注意,安装孔可能有所不同)。本质上,驱动器越好,从这种设计中获得的声音就越好。
但是,如果您愿意多花一点钱,例如 Aiyima 有几个有趣的 3-4 英寸驱动器可供选择。
您可以在我的 Instructable 中找到更详细的供应清单,网址为 https://www.instructables.com/Kissing-the-Frog-V20-Back-Horn-Bluetooth-Speaker-F/
基本上任何组合都可以(只要驱动器为 3.3 英寸或更小,以便适合外壳 - 如果您使用不同的驱动器,则可能需要稍微调整安装孔或缩放模型)。这种设计和组件旨在非常经济。您的组件(特别是驱动器)越好,声音就越好。换句话说,在亲吻青蛙之前,请确保它有一颗王子的心。xD
。选项 2。基本上所有电子元件都是可选的。您也可以将 V2.0 用作无源扬声器。只需连接到您最喜欢的放大器即可。我目前正在根据此放大器制作一个与扬声器设计相匹配的外壳:2x50W TPA3116D2 蓝牙 5.0 立体声放大器板。对此非常满意电路板。它使用与我在 V2.0 中使用的放大器相同的芯片 (TPA3116D2),但电路板设计得更好,没有噪音,具有高音和低音控制,音质出色。如果您正在寻找,请继续关注。我将在外壳完成后立即发布(预计在 1 月初左右)。更新 08Jan21:放大器现已上线:https://www.thingiverse.com/thing:4713469
我使用一些超级便宜、易于打印的碳纤维 PLA 打印主体,这会产生漂亮的表面,但当然任何 PLA/颜色都可以。
侧面板可以例如用木质 PLA 打印 - 与碳和丝铜搭配看起来很棒,
前环用丝铜/青铜 PLA 打印。
侧面板:注意事项。本质上,这是一个完全可打印的扬声器外壳。但是,根据我的经验,印刷表面往往非常轻,并且反射声音出奇的好,我使用木质侧面板建造的外壳似乎比印刷侧面板的外壳听起来好得多。
更新 08Dec20:根据多个请求 - 我刚刚添加了接线图!希望这有帮助。
接线。根据要求,这里简要介绍如何连接扬声器(请记住,您始终可以将外壳用作无源扬声器,这样就省去了所有焊接工作!)。您需要具备基本的电子和焊接技能!确保您知道自己在做什么(尤其是处理高压)。一切风险自负,不提供任何担保!
这是上述供应品清单,如果您使用不同的组件,可能会有所不同。将 12V 电源适配器的输出连接到放大器板上的 POWER IN(标记为 VCC 和 GND)PLUS 连接到小型 LM1117 板(VIN 和 GND)- LM1117 板的 5V 输出(VOUT 和 GND)连接到 BT 板上的电源输入。
如果(像我一样)您将其用作单个 MONO 扬声器,请桥接来自 BT 板的 L 和 R 输出(这很重要,它会给您单声道信号,而不是半立体声!)。现在,您将 BT 板上的桥接 L/R 和 GND 连接到放大器的线路输入(IN-L 或 IN-R 和 GND)(如果您使用的是立体声放大器,请连接到左声道或右声道)。最后将放大器的输出(L+ 和 L- 或 R+ 和 R-)连接到扬声器上的 + 和 -。在安装到外壳中之前,请尝试所有这些(这对故障排除非常有帮助)。
理论。这里有一个小理论:什么是后置喇叭扬声器?可以将其视为反向扩音器或留声机。(前)喇叭扬声器使用声学喇叭来提高驱动元件的整体效率(即从前面发出的声音)。后置喇叭扬声器的作用几乎相同。但是,这里的喇叭安装在扬声器的背面。因此,您可以从驱动器的正面获得直接输出,再加上来自背面喇叭的输出。哪些频率被放大以及放大程度取决于气室、喉部(狭窄部分)以及喇叭的长度、设计和直径。特别是对于小型(且便宜)的驱动器,这可以大大改善音质。
我真的希望你喜欢它,如果你喜欢它,请喜欢它!谢谢!
尽情享受吧!
设计师
e&h Design3D 模型描述
这就是亲吻青蛙 V2.0。此版本经过彻底重新设计,仍然时尚、超级便宜、完全可打印,但音质好得多。这款后置�...�叭蓝牙扬声器使用 3.3 英寸(而不是原来的 2 1/2 英寸)驱动器和 1 美元的蓝牙板和 3.5 美元的放大器。总成本约为 20 美元。带有后置喇叭的外壳(如果您不熟悉该概念,请阅读下文)也是经过彻底重新设计的。
但是,概念保持不变。这就像亲吻青蛙。你亲吻那个小扬声器,希望它变成王子。是的,它确实会变成王子……这些超便宜的组件能发出如此大的声音,真是令人惊讶。
外壳适用于 3.3 英寸(6.5 厘米)驱动器。您可以将其用作蓝牙(我就是这么做的)、有源或无源扬声器。后面有一个用于放置电子设备(蓝牙板 + 放大器)的腔室。
我正在使用这款 MP3 蓝牙解码板(约 1 美元)
加上便宜的 TPA3116 D2 双通道 50Wx2 放大器模块 - 这是立体声,所以我将来自蓝牙板的 L 和 R 通道短接
加上任何 12V/2A+ 电源
加上小型 AMS1117/LM1117 降压转换器 - 这个是用于蓝牙模块的,需要 5V
我使用的驱动器是 Visaton FRS 8 M - 8 欧姆 8 厘米(3.3 英寸)全频扬声器(约 12 美元),可能有点难找。但是,https://www.amazon.com/s?k=3+full+range+speaker&crid=10S5BS828TTCK&sprefix=3"+full,aps,248&linkCode=sl2&tag=hthingsn08-20&linkId=2c8d992ffadcc95a3f5d8207f65fc6c5&language=en_US&ref_=as_li_ss_tl">大多数 3 - 3.5 英寸驱动器应该可以使用(注意,安装孔可能有所不同)。本质上,驱动器越好,从这种设计中获得的声音就越好。
但是,如果您愿意多花一点钱,例如 Aiyima 有几个有趣的 3-4 英寸驱动器可供选择。
您可以在我的 Instructable 中找到更详细的供应清单,网址为 https://www.instructables.com/Kissing-the-Frog-V20-Back-Horn-Bluetooth-Speaker-F/
基本上任何组合都可以(只要驱动器为 3.3 英寸或更小,以便适合外壳 - 如果您使用不同的驱动器,则可能需要稍微调整安装孔或缩放模型)。这种设计和组件旨在非常经济。您的组件(特别是驱动器)越好,声音就越好。换句话说,在亲吻青蛙之前,请确保它有一颗王子的心。xD
。选项 2。基本上所有电子元件都是可选的。您也可以将 V2.0 用作无源扬声器。只需连接到您最喜欢的放大器即可。我目前正在根据此放大器制作一个与扬声器设计相匹配的外壳:2x50W TPA3116D2 蓝牙 5.0 立体声放大器板。对此非常满意电路板。它使用与我在 V2.0 中使用的放大器相同的芯片 (TPA3116D2),但电路板设计得更好,没有噪音,具有高音和低音控制,音质出色。如果您正在寻找,请继续关注。我将在外壳完成后立即发布(预计在 1 月初左右)。更新 08Jan21:放大器现已上线:https://www.thingiverse.com/thing:4713469
3D模型打印参数
打印。这应该是一个简单的打印。您会注意到机身一侧有一个 1 毫米的盖子(如果您不想要这个,例如因为您使用...的是透明侧面板,我添加了一个添加了“无底部”的机身版本,否则请使用带有 1 毫米盖子的标准机身!)。这是为了使其更加稳定,并且更容易打印和从打印机中取出。无需支撑或附件。以 0.28 毫米分辨率和(大约)15% 填充率在 PLA(或 ABS、PETG...)中打印。侧面板可以打印或从 6-8 毫米胶合板(我使用山毛榉)切割(15 x 20 厘米)。使用 M3 螺钉连接前部和扬声器(最初驱动器应该从内部安装,但您也可以从外部安装,这使得以后更容易进行更改)以及覆盖电子隔间的后面板。将侧面板粘在机身上。支脚(我用 TPU 打印)是可选的。如果您喜欢从木头上切割它们(就像我一样),我附上了侧面板的 1:2 PDF 图纸。我使用一些超级便宜、易于打印的碳纤维 PLA 打印主体,这会产生漂亮的表面,但当然任何 PLA/颜色都可以。
侧面板可以例如用木质 PLA 打印 - 与碳和丝铜搭配看起来很棒,
前环用丝铜/青铜 PLA 打印。
侧面板:注意事项。本质上,这是一个完全可打印的扬声器外壳。但是,根据我的经验,印刷表面往往非常轻,并且反射声音出奇的好,我使用木质侧面板建造的外壳似乎比印刷侧面板的外壳听起来好得多。
更新 08Dec20:根据多个请求 - 我刚刚添加了接线图!希望这有帮助。
接线。根据要求,这里简要介绍如何连接扬声器(请记住,您始终可以将外壳用作无源扬声器,这样就省去了所有焊接工作!)。您需要具备基本的电子和焊接技能!确保您知道自己在做什么(尤其是处理高压)。一切风险自负,不提供任何担保!
这是上述供应品清单,如果您使用不同的组件,可能会有所不同。将 12V 电源适配器的输出连接到放大器板上的 POWER IN(标记为 VCC 和 GND)PLUS 连接到小型 LM1117 板(VIN 和 GND)- LM1117 板的 5V 输出(VOUT 和 GND)连接到 BT 板上的电源输入。
如果(像我一样)您将其用作单个 MONO 扬声器,请桥接来自 BT 板的 L 和 R 输出(这很重要,它会给您单声道信号,而不是半立体声!)。现在,您将 BT 板上的桥接 L/R 和 GND 连接到放大器的线路输入(IN-L 或 IN-R 和 GND)(如果您使用的是立体声放大器,请连接到左声道或右声道)。最后将放大器的输出(L+ 和 L- 或 R+ 和 R-)连接到扬声器上的 + 和 -。在安装到外壳中之前,请尝试所有这些(这对故障排除非常有帮助)。
理论。这里有一个小理论:什么是后置喇叭扬声器?可以将其视为反向扩音器或留声机。(前)喇叭扬声器使用声学喇叭来提高驱动元件的整体效率(即从前面发出的声音)。后置喇叭扬声器的作用几乎相同。但是,这里的喇叭安装在扬声器的背面。因此,您可以从驱动器的正面获得直接输出,再加上来自背面喇叭的输出。哪些频率被放大以及放大程度取决于气室、喉部(狭窄部分)以及喇叭的长度、设计和直径。特别是对于小型(且便宜)的驱动器,这可以大大改善音质。
我真的希望你喜欢它,如果你喜欢它,请喜欢它!谢谢!
尽情享受吧!