A (mostly) 3d printed air pump. 3D for print
1204 Views 0 Likes 0 Downloads Download
https://youtu.be/BxWekzEilPU
I recently purchased a reel of Ultimaker TPU95A filament for experimenting as... this filament is advertised as both durable and flexible and I was looking for a filament with these features to 3D print the gaskets, valves and bellow of an air pump design I'd been working on as part of an upcoming project.
During testing of my air pump design, I determined the valves and gaskets worked great, however the 3D printed bellow required more energy to compress than I was willing to accept in the upcoming project, so it was back to the drawing board, or better yet as I accidentally discovered, the kitchen...
My wife Lora loves to bake and last weekend she was in the kitchen with the grandkids baking one of their favorite snacks, cake balls. As I casually strolled by, I just happened to notice she was baking the cake balls in "silicone baking molds", and as I so keenly observed (at my age, that is a stretch), one of the baking molds had hemispheres that were the exact diameter and thickness I needed for a bellow, go figure!
So, long after the kitchen was closed, I returned for the baking mold with the hemispheres having the diameter and thickness I needed, took it to the basement, and placed it under the modeling knife to free a silicone hemisphere from its baking mold and repurpose it as the bellow in this model. Needless to say, my wife discovered my diabolical scheme when she recognized the bellow in this model as being the remnants of one of her silicone baking molds, whereupon which I quickly took a trip to a local baking supply shop to replace her mold.
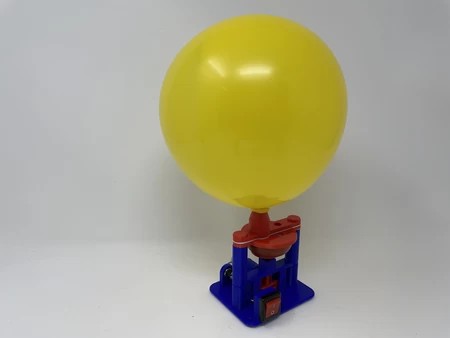
Anyway, the grandkids love this model as it involves inflating balloons, releasing the inflated balloons and watch as they careen around our home, it is easy to operate, and has an on / off button they love to push! And again, this model was a test for an upcoming project and yet as an intermediate step ended up being a balloon inflator that they enjoy, which I enjoy!
As usual I probably forgot a file or two or who knows what else, so if you have any questions, please do not hesitate to comment as I do make plenty of mistakes.
Designed using Autodesk Fusion 360, sliced using Ultimaker Cura 4.8.0, and 3D printed in Ultimaker PLA and Ultimaker TPU95A on an Ultimaker 3 Extended and Ultimaker S5s.
To build this model, I acquired the following parts:
• One coaxial power jack (uxcell a14103100ux0223 2.1 mm x 5.5 mm DC Power Jack Pan...el Mount Female Socket, on line).
• One 12VDC power supply with plug compatible with the coaxial power jack.
• One 1000RPM 12VDC gear motor (uxcell DC 12V 1000RPM Powerful High Torque Magnetic Electric Gear Box Motor, on line).
• One SPST On/Off switch (Radio Shack 2750694, local hobby shop).
• One silicon baking mold (48mm ID, 1mm thick, local baking supply shop).
and 3D printed the following parts:
• One "Base.stl", 20% infill, .15mm layer height, PLA.
• One "Bellow, Base", 48mm.stl, 100% infill, .1mm layer height, PLA.
• Two "Bolt, Bellow, Base.stl", 20% infill, .15mm layer height, PLA.
• One "Exhaust, Gasket.stl", 100% infill, .1mm layer height, TPU95A.
• One "Exhaust, Valve.stl", 100% infill, .1mm layer height, TPU95A.
• One "Intake, Gasket.stl", 100% infill, .1mm layer height, TPU95A.
• One "Intake, Valves.stl", 100% infill, .1mm layer heigh, TPU95A.
• One "Manifold.stl", 100% infill, .1mm layer height, PLA.
• One "Wheel, Motor.stl", 100% infill, .1mm layer height, PLA.
• One "Yoke, Disk.stl", 100% infill, .1mm layer height, PLA.
• One "Yoke, Guide.stl", 20% infill, .1mm layer height, PLA.
• One "Yoke.stl", 100% infill, .1mm layer height, PLA.
I 3D printed all PLA parts using the Ultimaker Cura 4.8.0 "Engineering Profile" on my Ultimaker S5s which provides a highly accurate tolerance requiring minimal if any trimming, filing, drilling or sanding. However, prior to assembly, I still test fitted and trimmed, filed, drilled, sanded, etc. all parts as necessary for smooth movement of moving surfaces, and tight fit for non moving surfaces. Depending on your slicer, printer, printer settings and the colors you chose, more or less trimming, filing, drilling and/or sanding may be required to successfully recreate this model. I carefully filed all edges that contacted the build plate to make absolutely certain that all build plate "ooze" is removed and that all edges are smooth using small jewelers files and plenty of patience.
This mechanism also uses threaded assembly, so I used a tap and die set (8mm by 1.25) as required for thread cleaning.
Bellow.
To assemble the bellow:
• I carefully positioned "Exhaust, Valve.stl" onto "Exhaust, Gasket.stl" such that the build plate sides of each contacted each other, the valve disk was centered over the exhaust hole in the gasket and the valve flap pointed directly to the intake hole in the gasket.
• I carefully lifted the tip of the valve flap and placed a very small dot of thick cyanoacrylate glue under the tip, then pressed the flap back into position.
• Once the glue had cured, I made sure the valve opened and closed with ease.
• Using silicone adhesive, I carefully glued "Intake, Gasket.stl" into "Bellow, base, 48mm.stl" such that the non-build plate side of the gasket was in contact with the bellow base and the three valve holes in the gasket were centered over the three valve holes in the bellow base.
• Once the silicone adhesive had cured, I carefully positioned "Intake, Valves.stl" over the intake valves gasket such that the build plate side of the valves was in contact with the build plate side of the intake valves gasket and each valve disk was centered over the respective valve holes in the bellow base.
• I carefully lifted the valve flap disk, placed a small dot of thick cyanoacrylate glue on the center of the valve flap disk, then pressed the valve flap disk back into position.
• I carefully cut one 48mm diameter hemisphere from the silicone baking mold sheet using a sharp modeling knife, making certain the cut was vertical.
• Applied a heavy bead of silicone adhesive to the circular channel in the bellow assembly.
• Pressed the hemisphere into the circular channel with a slow twisting motion to make certain the silicone was evenly spread around the bellow channel and hemisphere.
Assembly.
To assemble the air pump, I :
• Pressed the motor, switch and coaxial power jack into "Base.stl", securing the coaxial power jack using the provided nut.
• Soldered a wire between the motor "-" terminal and one of the switch terminals.
• Soldered a wire between the remaining switch terminal to the coaxial power jack "sleeve" terminal.
• Soldered a wire between the coaxial power jack "tip" terminal to the motor "+" terminal.
• Pressed "Wheel, Motor.stl" onto the motor shaft.
• Slide "Yoke.stl" up through the center hole in "Yoke, Guide.stl".
• Secured "Yoke, Disk.stl" to the end of the yoke using small dots of thick cyanoacrylate glue, making sure the disk was perpendicular to the yoke.
• Positioned the bellow assembly over the bellow tower threaded holes in the base assembly.
• Positioned the exhaust gasket assembly over the bellow.
• Positioned "Manifold.stl" over the exhaust gasket assembly.
• Secured the bellow, gasket and manifold to the base assembly using two "Bold, Bellow, Base.stl".
At this point, I plugged the 12VDC 500mm power supply into the coaxial power jack, slid a balloon onto the manifold exhaust tower, turned on the power switch, and inflated some balloons!
And that is how I 3D printed and assembled "A (mostly) 3D Printed Air Pump".
I hope you enjoyed it!
Designer
Greg Zumwalt3d model description
Creating an air pump for 3D printing.https://youtu.be/BxWekzEilPU
I recently purchased a reel of Ultimaker TPU95A filament for experimenting as... this filament is advertised as both durable and flexible and I was looking for a filament with these features to 3D print the gaskets, valves and bellow of an air pump design I'd been working on as part of an upcoming project.
During testing of my air pump design, I determined the valves and gaskets worked great, however the 3D printed bellow required more energy to compress than I was willing to accept in the upcoming project, so it was back to the drawing board, or better yet as I accidentally discovered, the kitchen...
My wife Lora loves to bake and last weekend she was in the kitchen with the grandkids baking one of their favorite snacks, cake balls. As I casually strolled by, I just happened to notice she was baking the cake balls in "silicone baking molds", and as I so keenly observed (at my age, that is a stretch), one of the baking molds had hemispheres that were the exact diameter and thickness I needed for a bellow, go figure!
So, long after the kitchen was closed, I returned for the baking mold with the hemispheres having the diameter and thickness I needed, took it to the basement, and placed it under the modeling knife to free a silicone hemisphere from its baking mold and repurpose it as the bellow in this model. Needless to say, my wife discovered my diabolical scheme when she recognized the bellow in this model as being the remnants of one of her silicone baking molds, whereupon which I quickly took a trip to a local baking supply shop to replace her mold.
Anyway, the grandkids love this model as it involves inflating balloons, releasing the inflated balloons and watch as they careen around our home, it is easy to operate, and has an on / off button they love to push! And again, this model was a test for an upcoming project and yet as an intermediate step ended up being a balloon inflator that they enjoy, which I enjoy!
As usual I probably forgot a file or two or who knows what else, so if you have any questions, please do not hesitate to comment as I do make plenty of mistakes.
Designed using Autodesk Fusion 360, sliced using Ultimaker Cura 4.8.0, and 3D printed in Ultimaker PLA and Ultimaker TPU95A on an Ultimaker 3 Extended and Ultimaker S5s.
3d model print parameters
Parts.To build this model, I acquired the following parts:
• One coaxial power jack (uxcell a14103100ux0223 2.1 mm x 5.5 mm DC Power Jack Pan...el Mount Female Socket, on line).
• One 12VDC power supply with plug compatible with the coaxial power jack.
• One 1000RPM 12VDC gear motor (uxcell DC 12V 1000RPM Powerful High Torque Magnetic Electric Gear Box Motor, on line).
• One SPST On/Off switch (Radio Shack 2750694, local hobby shop).
• One silicon baking mold (48mm ID, 1mm thick, local baking supply shop).
and 3D printed the following parts:
• One "Base.stl", 20% infill, .15mm layer height, PLA.
• One "Bellow, Base", 48mm.stl, 100% infill, .1mm layer height, PLA.
• Two "Bolt, Bellow, Base.stl", 20% infill, .15mm layer height, PLA.
• One "Exhaust, Gasket.stl", 100% infill, .1mm layer height, TPU95A.
• One "Exhaust, Valve.stl", 100% infill, .1mm layer height, TPU95A.
• One "Intake, Gasket.stl", 100% infill, .1mm layer height, TPU95A.
• One "Intake, Valves.stl", 100% infill, .1mm layer heigh, TPU95A.
• One "Manifold.stl", 100% infill, .1mm layer height, PLA.
• One "Wheel, Motor.stl", 100% infill, .1mm layer height, PLA.
• One "Yoke, Disk.stl", 100% infill, .1mm layer height, PLA.
• One "Yoke, Guide.stl", 20% infill, .1mm layer height, PLA.
• One "Yoke.stl", 100% infill, .1mm layer height, PLA.
I 3D printed all PLA parts using the Ultimaker Cura 4.8.0 "Engineering Profile" on my Ultimaker S5s which provides a highly accurate tolerance requiring minimal if any trimming, filing, drilling or sanding. However, prior to assembly, I still test fitted and trimmed, filed, drilled, sanded, etc. all parts as necessary for smooth movement of moving surfaces, and tight fit for non moving surfaces. Depending on your slicer, printer, printer settings and the colors you chose, more or less trimming, filing, drilling and/or sanding may be required to successfully recreate this model. I carefully filed all edges that contacted the build plate to make absolutely certain that all build plate "ooze" is removed and that all edges are smooth using small jewelers files and plenty of patience.
This mechanism also uses threaded assembly, so I used a tap and die set (8mm by 1.25) as required for thread cleaning.
Bellow.
To assemble the bellow:
• I carefully positioned "Exhaust, Valve.stl" onto "Exhaust, Gasket.stl" such that the build plate sides of each contacted each other, the valve disk was centered over the exhaust hole in the gasket and the valve flap pointed directly to the intake hole in the gasket.
• I carefully lifted the tip of the valve flap and placed a very small dot of thick cyanoacrylate glue under the tip, then pressed the flap back into position.
• Once the glue had cured, I made sure the valve opened and closed with ease.
• Using silicone adhesive, I carefully glued "Intake, Gasket.stl" into "Bellow, base, 48mm.stl" such that the non-build plate side of the gasket was in contact with the bellow base and the three valve holes in the gasket were centered over the three valve holes in the bellow base.
• Once the silicone adhesive had cured, I carefully positioned "Intake, Valves.stl" over the intake valves gasket such that the build plate side of the valves was in contact with the build plate side of the intake valves gasket and each valve disk was centered over the respective valve holes in the bellow base.
• I carefully lifted the valve flap disk, placed a small dot of thick cyanoacrylate glue on the center of the valve flap disk, then pressed the valve flap disk back into position.
• I carefully cut one 48mm diameter hemisphere from the silicone baking mold sheet using a sharp modeling knife, making certain the cut was vertical.
• Applied a heavy bead of silicone adhesive to the circular channel in the bellow assembly.
• Pressed the hemisphere into the circular channel with a slow twisting motion to make certain the silicone was evenly spread around the bellow channel and hemisphere.
Assembly.
To assemble the air pump, I :
• Pressed the motor, switch and coaxial power jack into "Base.stl", securing the coaxial power jack using the provided nut.
• Soldered a wire between the motor "-" terminal and one of the switch terminals.
• Soldered a wire between the remaining switch terminal to the coaxial power jack "sleeve" terminal.
• Soldered a wire between the coaxial power jack "tip" terminal to the motor "+" terminal.
• Pressed "Wheel, Motor.stl" onto the motor shaft.
• Slide "Yoke.stl" up through the center hole in "Yoke, Guide.stl".
• Secured "Yoke, Disk.stl" to the end of the yoke using small dots of thick cyanoacrylate glue, making sure the disk was perpendicular to the yoke.
• Positioned the bellow assembly over the bellow tower threaded holes in the base assembly.
• Positioned the exhaust gasket assembly over the bellow.
• Positioned "Manifold.stl" over the exhaust gasket assembly.
• Secured the bellow, gasket and manifold to the base assembly using two "Bold, Bellow, Base.stl".
At this point, I plugged the 12VDC 500mm power supply into the coaxial power jack, slid a balloon onto the manifold exhaust tower, turned on the power switch, and inflated some balloons!
And that is how I 3D printed and assembled "A (mostly) 3D Printed Air Pump".
I hope you enjoyed it!
