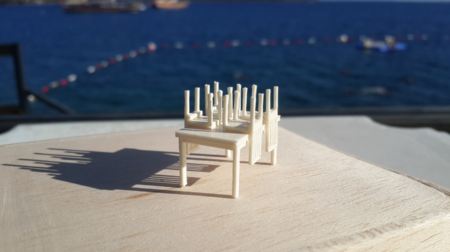
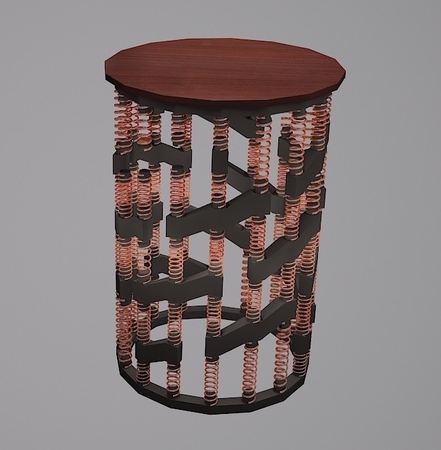
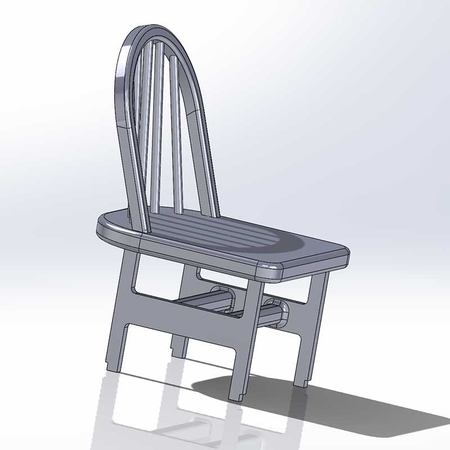
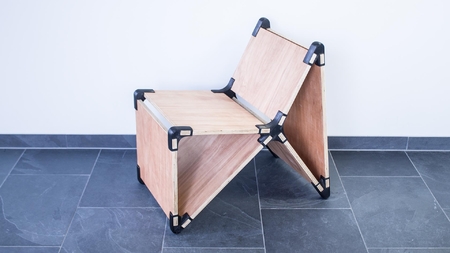
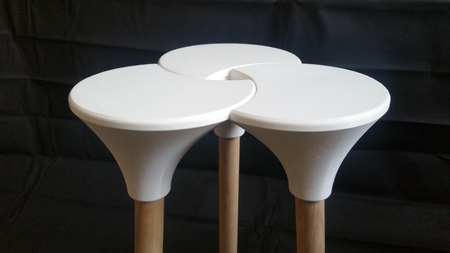
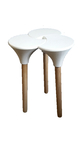
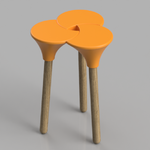
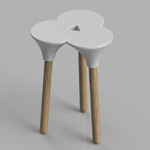
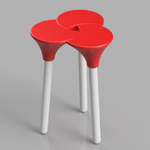
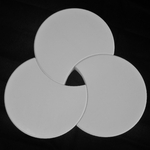
Cluster - the full sized stool 3D for print

5698 Views 1 Likes 0 Downloads Download the piece here from 3dforprint
An elegant and minimalist stool that would not look ...out of place in the most modern of interior.
That's right this is a full sized stool for printing on your desktop 3D printer!
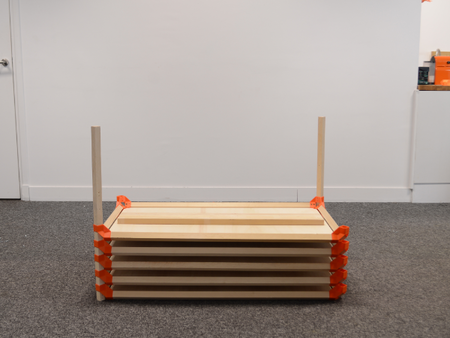
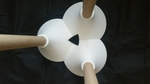
Simply choose your printing material, repeat the print 3 times, apply a generous coating of Pongo PLA Gel adhesive* to all joint faces. Other adhesives can of course be used if you know of a suitable one for the purpose, but we do not recommend sitting on this without it being properly glued together.
Once the adhesive is applied simply snap the parts together ensuring the top joints are sitting nice and flat. Place the assembly upside down on a flat surface (being sure to use a mat or newspaper) and simply leave overnight with some weight applied to the top, maybe a few thick books or 4 or 5 KG reels of Pongo filament ;)
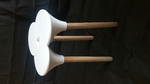
Legs in unfinished oak or ash are available from G&S Specialist timber and for our stool we ordered lengths of 500mm. The diameter required is 35mm.
Please note that both your leg socket (created by your printer) and the timber leg diameter may vary slightly.
The design as created, is done so to create a tight fit of a 35mm leg, avoiding the need for screw fixings, but you may find that you need to sand or plane the end of the legs to get them to a snug fit. Alternatively you could wait until we upload the revised edition which will have a slightly larger socket size and some screw fixing holes. Other variations also to follow!
We will also be creating other stools for those of you with slightly narrower print beds. The current design requires a bed width (printable width) of 200mm but we are going to continue to develop and create a number of stools and many other products that will cater for those of you with printers that have a width of as low as 145mm. Please follow us on the social media channels for updates on other upcoming product launches.
*Please note that we do not recommend the use of the Pongo Activator that comes with the adhesive for this assembly, as such the adhesive may require a full 24 hours to achieve maximum strength.
Printing settings and tips:
Use a raft for a consistent top finish and also to minimise the chance of the print pulling away from the bed.
Supports are obviously needed due to the top overhang and for good measure we simply had supports all over. Keep the density to a minimum though.
Fill density to not be less than 5% but we would recommend at least 10% to give a good amount of support between the leg and the top of the seat.
For good measure we also used a glue stick on the print bed to increase adhesion as our first test print did peal away 3 hours in to the print, and with large prints you really don't want to take any chances. Seat belts and crash helmets required for this print if you want to leave it on autopilot overnight :)
Layer height - We think this looks just fine at a resolution of 0.3.
Not specifically related to this product print but a good tip non the less; If you do not yet have a pair then we would recommend you invest in a pair of cut resistant gloves (available from a number of vendors on Amazon) they really do help when you have those little slips cleaning off your stubborn support material.
Any other questions then please do message us here or on any of the social media sites.
Happy printing :)
The three printed parts will snap together quite easily and would make an excellent side table as such, but if you want to sit on this you then so...me extra strength is required.
For this we use our very own Pongo PLA Gel Adhesive available from [the Pongo Store](www.pongostore.com) Apply liberally to one face of all joint surfaces.
Designer
The Pongo Team3d model description
A full sized stool comrising of only one part repeated 3 times with simple inserted wooden legs.An elegant and minimalist stool that would not look ...out of place in the most modern of interior.
That's right this is a full sized stool for printing on your desktop 3D printer!
Simply choose your printing material, repeat the print 3 times, apply a generous coating of Pongo PLA Gel adhesive* to all joint faces. Other adhesives can of course be used if you know of a suitable one for the purpose, but we do not recommend sitting on this without it being properly glued together.
Once the adhesive is applied simply snap the parts together ensuring the top joints are sitting nice and flat. Place the assembly upside down on a flat surface (being sure to use a mat or newspaper) and simply leave overnight with some weight applied to the top, maybe a few thick books or 4 or 5 KG reels of Pongo filament ;)
Legs in unfinished oak or ash are available from G&S Specialist timber and for our stool we ordered lengths of 500mm. The diameter required is 35mm.
Please note that both your leg socket (created by your printer) and the timber leg diameter may vary slightly.
The design as created, is done so to create a tight fit of a 35mm leg, avoiding the need for screw fixings, but you may find that you need to sand or plane the end of the legs to get them to a snug fit. Alternatively you could wait until we upload the revised edition which will have a slightly larger socket size and some screw fixing holes. Other variations also to follow!
We will also be creating other stools for those of you with slightly narrower print beds. The current design requires a bed width (printable width) of 200mm but we are going to continue to develop and create a number of stools and many other products that will cater for those of you with printers that have a width of as low as 145mm. Please follow us on the social media channels for updates on other upcoming product launches.
*Please note that we do not recommend the use of the Pongo Activator that comes with the adhesive for this assembly, as such the adhesive may require a full 24 hours to achieve maximum strength.
Printing settings and tips:
Use a raft for a consistent top finish and also to minimise the chance of the print pulling away from the bed.
Supports are obviously needed due to the top overhang and for good measure we simply had supports all over. Keep the density to a minimum though.
Fill density to not be less than 5% but we would recommend at least 10% to give a good amount of support between the leg and the top of the seat.
For good measure we also used a glue stick on the print bed to increase adhesion as our first test print did peal away 3 hours in to the print, and with large prints you really don't want to take any chances. Seat belts and crash helmets required for this print if you want to leave it on autopilot overnight :)
Layer height - We think this looks just fine at a resolution of 0.3.
Not specifically related to this product print but a good tip non the less; If you do not yet have a pair then we would recommend you invest in a pair of cut resistant gloves (available from a number of vendors on Amazon) they really do help when you have those little slips cleaning off your stubborn support material.
Any other questions then please do message us here or on any of the social media sites.
Happy printing :)
3d model print parameters
The three printed parts will snap together quite easily and would make an excellent side table as such, but if you want to sit on this you then so...me extra strength is required.
For this we use our very own Pongo PLA Gel Adhesive available from [the Pongo Store](www.pongostore.com) Apply liberally to one face of all joint surfaces.