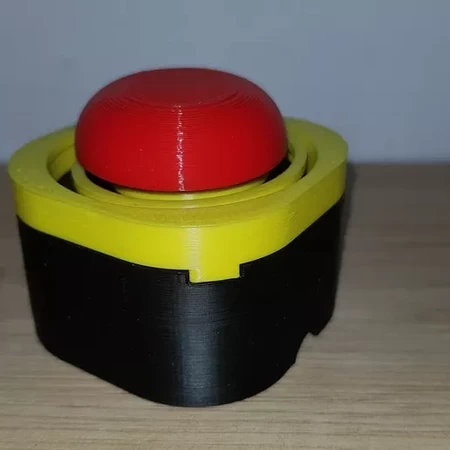
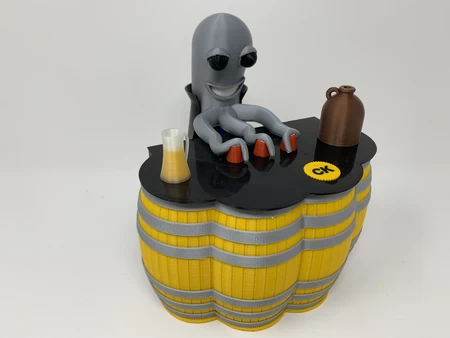
Complaint button 3D for print


4569 Views 1 Likes 0 Downloads Download the piece here from 3dforprint
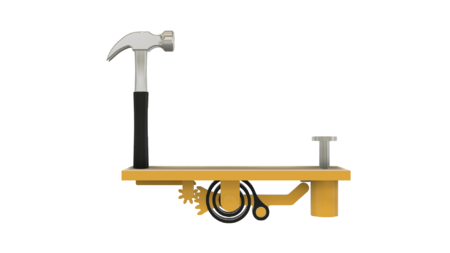
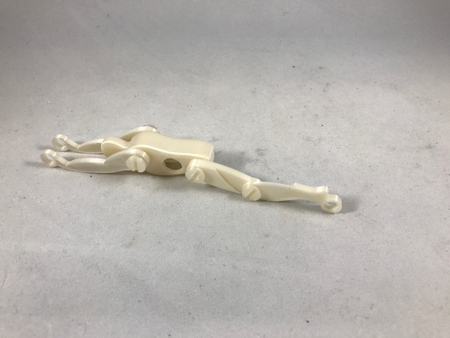
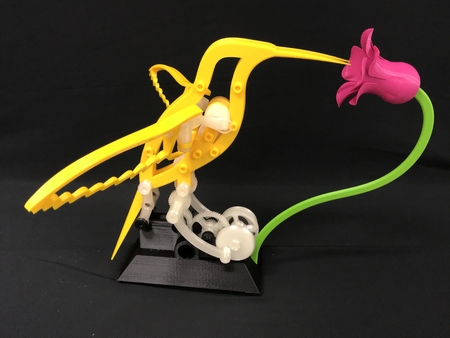
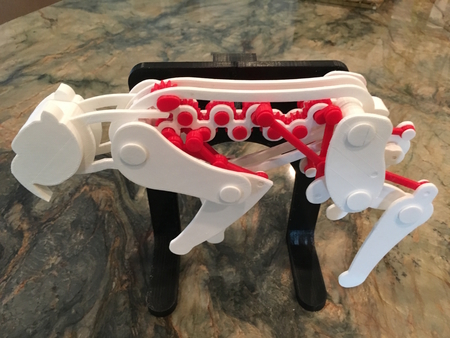
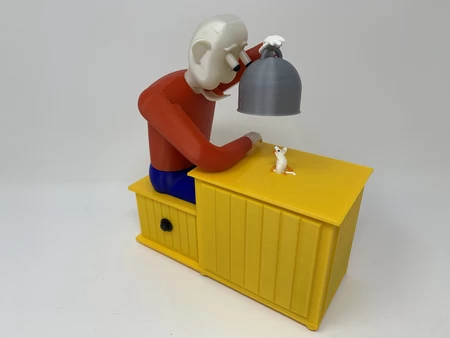
"Complaint Button" is a simple automata designed to discourage complaining. Pressing the button reinforces th...e unofficial "no complaining in my office" rule, in a "forceful" yet whimsical manner. This model is not recommended at all for the youngsters!
Inspiration for Complaint Button occurred awhile back when my wife and I visited the Paul Boyer Museum of Animated Carvings (http://www.kansastravel.org/boyergallery.htm). Mr. Boyer has created some absolutely stunning and complex automata. Yet sitting on the counter by the entrance to the museum was a simple automata, casually inviting anyone to press the button located on the top. I couldn't resist so I pressed the button, and that's why I designed Complaint Button. We thoroughly enjoyed our visit to the museum, and highly recommend taking the slight detour north of I-70 in Kansas to visit this small yet wonderful museum displaying his extraordinary craftsmanship.
As usual, I probably forgot a file or two or who knows what else, so if you have any questions, please do not hesitate to ask as I do make mistakes in plenty.
Designed using Autodesk Fusion 360, sliced using Cura 3.3.1 and printed in PLA on both an Ultimaker 2+ Extended and an Ultimaker 3 Extended.
The design provides a few printing options. The file "Base.stl" is a simple no frills base. If you wish to attach 3D printed side ...plaques to this base (using glue, double sided tape, etc.), I've included the files "Base Plaque Left.3mf" and "Base Plaque Right.3mf", the dual extrusion versions of the side plaques, and the files "Base Plaque Left.stl" and "Base Plaque Right.stl", the single extrusion versions of the side plaques. To print the single extrusion versions in two colors, begin printing in the color you choose for the background, then pause the printer at Z = .8 mm (the thickness of the plaque), change the filament to the color you desire for the letters, and resume printing. Finally, for dual extrusion printers the file "Base.3mf" is a dual extrusion version of the base with the side plaques imbedded in the sides of the base.
I printed the files "Base Plaque Left.3mf" and "Base Plaque Right.3mf" at .1mm layer height as they are quite thin. I also used the Ultimaker Cura 3.3.1 "Ironing" feature to provide a smooth top surface for these parts. I printed the remaining parts at .15 mm layer height, and printed both "Spring Left.stl" and "Spring Right.stl" at 100% infill, the remaining parts at 20% infill.
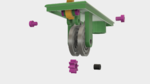
Print 2 of "Axle Short.stl", 4 of "Bolt, 6mm by 7mm.stl", 2 of "Bolt, 6mm by 8mm.stl", and one each of the remaining parts.
Prior to starting assembly, test fit and trim, file, sand, etc. all parts as necessary for smooth movement of moving surfaces, and tight fit for non moving surfaces. Depending on the colors you chose and your printer settings, more or less trimming, filing and/or sanding may be required. Carefully file all edges that contacted the build plate to make absolutely sure that all build plate "ooze" is removed and that all edges are smooth. I used small jewelers files and plenty of patience to perform this step.
Complaint Button uses threaded assembly, so a 6mm by 1 tap and die may be needed to clean the threads.
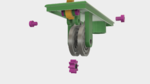
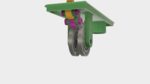
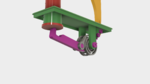
Attach the Woodpecker to the Top.
Place 1 "Axle Short.stl" into the hole in "Woodpecker.stl" as shown, then position the assembly between the rear most towers in "Top.stl". Secure in place with 2 "Bolt, 6mm by 7mm.stl" as shown.
When completed, the woodpecker should rotate easily on the axle.
Attach the Springs to the Top Assembly.
Press "Spring Right.stl" and "Spring Left.stl" into their respective right and left towers in the top assembly.
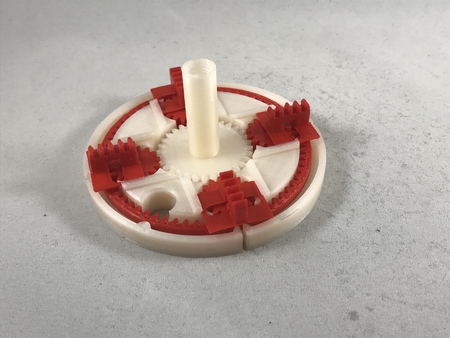
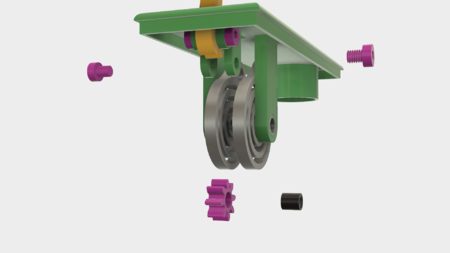
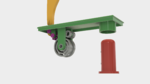
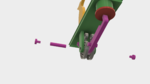
Attach the Idler Gear to the Top Assembly.
Position the remaining "Axle Short.st" in the hole in "Gear (2, 8, 16).stl".
Position this assembly between the center two towers as shown, then secure in place with the remaining 2 "Bolt, 6mm by 7mm.stl".
When completed, the woodpecker and idler gear should rotate easily on their axles.
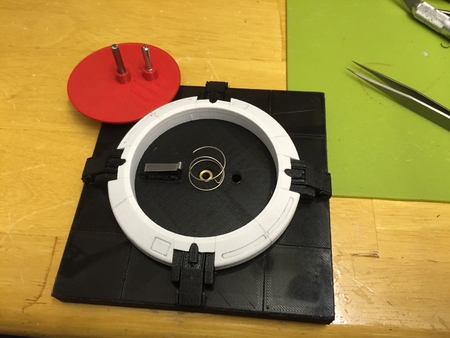
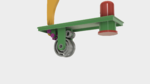
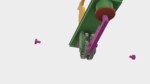
Add the Button to the Top Assembly.
Slide "Button.stl" into the cylinder in the Top Assembly.
The button should easily slide in the cylinder.
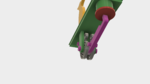
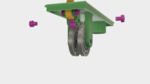
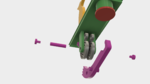
Attach the Geared Arm to the Top Assembly.
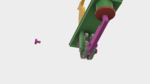
Press "Pin Spring.stl" into "Gear (2, 32, 64).stl" (the geared arm).
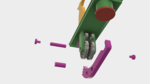
Position the geared arm assembly between the springs as shown, slide "Axle Long.stl" through the right base tower, spring right, geared arm, spring left and finally the left base tower as shown, then secure in place with the 2 "Bolt, 6mm by 8mm.stl".
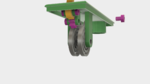
Carefully rotate "Spring Right.stl" clockwise and place the hole in spring right on the spring pin as shown.
Carefully rotate "Spring Left.stl" counter clockwise and place the hole in spring left on the spring pin as shown.
Test the assembly by pressing the button (watch you finger!).
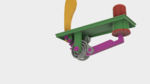
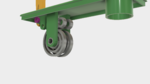
Final Assembly.
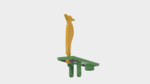
Press the top assembly into the base you chose.
That's how I printed and assembled Complaint Button!
Hope you enjoy it!
Designer
Greg Zumwalt3d model description
A simple Complaint Button automata."Complaint Button" is a simple automata designed to discourage complaining. Pressing the button reinforces th...e unofficial "no complaining in my office" rule, in a "forceful" yet whimsical manner. This model is not recommended at all for the youngsters!
Inspiration for Complaint Button occurred awhile back when my wife and I visited the Paul Boyer Museum of Animated Carvings (http://www.kansastravel.org/boyergallery.htm). Mr. Boyer has created some absolutely stunning and complex automata. Yet sitting on the counter by the entrance to the museum was a simple automata, casually inviting anyone to press the button located on the top. I couldn't resist so I pressed the button, and that's why I designed Complaint Button. We thoroughly enjoyed our visit to the museum, and highly recommend taking the slight detour north of I-70 in Kansas to visit this small yet wonderful museum displaying his extraordinary craftsmanship.
As usual, I probably forgot a file or two or who knows what else, so if you have any questions, please do not hesitate to ask as I do make mistakes in plenty.
Designed using Autodesk Fusion 360, sliced using Cura 3.3.1 and printed in PLA on both an Ultimaker 2+ Extended and an Ultimaker 3 Extended.
3d model print parameters
Print the Parts.The design provides a few printing options. The file "Base.stl" is a simple no frills base. If you wish to attach 3D printed side ...plaques to this base (using glue, double sided tape, etc.), I've included the files "Base Plaque Left.3mf" and "Base Plaque Right.3mf", the dual extrusion versions of the side plaques, and the files "Base Plaque Left.stl" and "Base Plaque Right.stl", the single extrusion versions of the side plaques. To print the single extrusion versions in two colors, begin printing in the color you choose for the background, then pause the printer at Z = .8 mm (the thickness of the plaque), change the filament to the color you desire for the letters, and resume printing. Finally, for dual extrusion printers the file "Base.3mf" is a dual extrusion version of the base with the side plaques imbedded in the sides of the base.
I printed the files "Base Plaque Left.3mf" and "Base Plaque Right.3mf" at .1mm layer height as they are quite thin. I also used the Ultimaker Cura 3.3.1 "Ironing" feature to provide a smooth top surface for these parts. I printed the remaining parts at .15 mm layer height, and printed both "Spring Left.stl" and "Spring Right.stl" at 100% infill, the remaining parts at 20% infill.
Print 2 of "Axle Short.stl", 4 of "Bolt, 6mm by 7mm.stl", 2 of "Bolt, 6mm by 8mm.stl", and one each of the remaining parts.
Prior to starting assembly, test fit and trim, file, sand, etc. all parts as necessary for smooth movement of moving surfaces, and tight fit for non moving surfaces. Depending on the colors you chose and your printer settings, more or less trimming, filing and/or sanding may be required. Carefully file all edges that contacted the build plate to make absolutely sure that all build plate "ooze" is removed and that all edges are smooth. I used small jewelers files and plenty of patience to perform this step.
Complaint Button uses threaded assembly, so a 6mm by 1 tap and die may be needed to clean the threads.
Attach the Woodpecker to the Top.
Place 1 "Axle Short.stl" into the hole in "Woodpecker.stl" as shown, then position the assembly between the rear most towers in "Top.stl". Secure in place with 2 "Bolt, 6mm by 7mm.stl" as shown.
When completed, the woodpecker should rotate easily on the axle.
Attach the Springs to the Top Assembly.
Press "Spring Right.stl" and "Spring Left.stl" into their respective right and left towers in the top assembly.
Attach the Idler Gear to the Top Assembly.
Position the remaining "Axle Short.st" in the hole in "Gear (2, 8, 16).stl".
Position this assembly between the center two towers as shown, then secure in place with the remaining 2 "Bolt, 6mm by 7mm.stl".
When completed, the woodpecker and idler gear should rotate easily on their axles.
Add the Button to the Top Assembly.
Slide "Button.stl" into the cylinder in the Top Assembly.
The button should easily slide in the cylinder.
Attach the Geared Arm to the Top Assembly.
Press "Pin Spring.stl" into "Gear (2, 32, 64).stl" (the geared arm).
Position the geared arm assembly between the springs as shown, slide "Axle Long.stl" through the right base tower, spring right, geared arm, spring left and finally the left base tower as shown, then secure in place with the 2 "Bolt, 6mm by 8mm.stl".
Carefully rotate "Spring Right.stl" clockwise and place the hole in spring right on the spring pin as shown.
Carefully rotate "Spring Left.stl" counter clockwise and place the hole in spring left on the spring pin as shown.
Test the assembly by pressing the button (watch you finger!).
Final Assembly.
Press the top assembly into the base you chose.
That's how I printed and assembled Complaint Button!
Hope you enjoy it!