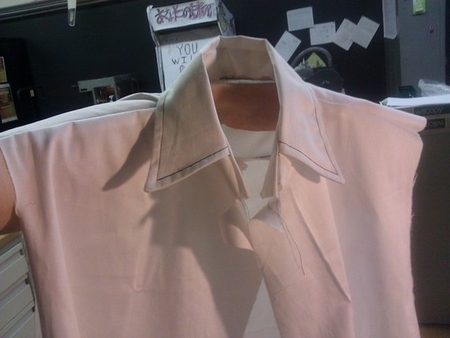
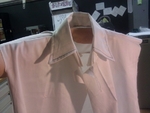
Dress shirt (collared long sleeve) 3D for print
6444 Views 2 Likes 0 Downloads Download the piece here from 3dforprint
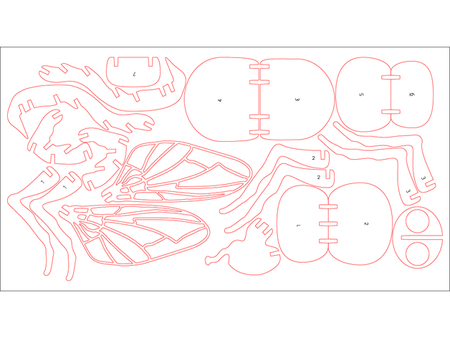
This is possibly the first free & open-source long-sleeved collared shirt available online! Normally you'd have to buy a paper pattern, trace it, and cut it out... now you can download this file, cut it out on a laser cutter, and start stitching! Some people claim that a laser cutter is overengineering, but I say nay! Furthermore, the design can now be crowdsourced and improved.
TODO: Sizing, align collar notches, pocket, better photos.
Firstly, this shirt is for someone with an approximately 15 inch (38cm) neck -- the collar itself is 16.2 inches (41 cm) buttonhole-to-button. The arms and girth are somewhat generous, so anyone who wears a US "Medium" should feel alright (35 inch / 90cm bust & girth up to perhaps 40 inches / 100cm.) I am not a tailor, I just digitized a shirt that fit me! Modifications to make this a more universal shirt are welcome!
Start by downloading the cut single and cut mirrored files below. Your laser program should be able to handle DXF files.
The other two files aren't separated out into single and mirrored bits. Basically you only need one of the big backpiece, but you need two mirrored copies of all the other pieces. So separate them out when cutting. If you have CorelDraw you can try the CDR file but it's the same as the DXF file.
Open the files in your laser or other cutting program. The "cut mirrored" file has every piece that must have a mirrored twin, so fold your fabric in half and iron flat before cutting it-- you'll get two of each piece, back-to-back. The "cut single" file has the backpiece, which you only need one of, so keep that fabric unfolded for that cut.
Experiment with your cutter for the right settings to cut through both layers of fabric. Good ironing will greatly help with the cut quality, not to mention accurate dimensions. You may want to prewash and preshrink the fabric before cutting/ironing so that you can wash your shirt without shrinkage. Again, I'm not a tailor or sewer.
Having a premade collared shirt handy will help you figure out how to sew the pieces together nicely but I'll do my best to walk you through it. This isn't a beginner sewing project; if this is your first time, try a quilting and applique tutorial somewhere first; even then your first shirt may not come out very nice. This shirt is in beta! Mine came out good enough for costumewear.
Now you've got a bunch of pieces! I started with the collar and ended with the cuffs. Collars and cuffs usually have fusable webbing ironed on the outer piece of fabric (on the inside) to make them stiff. Then a standard inside-out quilting technique with 1/4" seams should work fine for most pieces. Start by sewing the collar itself (right sides together!), fold right-side-out, iron, then topstitch at 1/4" to get a nice flat collar. Sandwich the collar inside the collar stand pieces, nice sides together and upside down... I think my notches are off a bit so worry more about the edges lining up. Sew 1/4" from the bottom, starting and ending at the little crevices at either end of the collar stands. Fold the collar right side out-- it should be looking like a collar!
Next, assemble the shirt part. You basically make a poncho-vest-thing first, then attach the sleeves, and then sew up the sides. There are two shoulder pieces, a back piece, and two front pieces (left and right.) Attach the front pieces to the shoulder pieces (remember, you're sewing inside out and then flipping and ironing-- quilting technique) at the tops of the shoulders. Then attach the outer shoulder piece to the back piece. You'll need to pleat the back piece by folding the two pairs of notches back on themselves. I suggest pinning the left and right edges of the back piece to the outer shoulder piece (nice sides together!) and working towards the middle until it's obvious where to pleat. Once that's sewn, use some precision folding/ironing and a top stitch to tack down the last stitch of the inner shoulder piece. (Alternatively, with some creative twisting and pinning, you can sew both shoulder pieces to the back piece at the same time.)
Next, attach the arms to the arm holes. Pay attention to which is left and right. The four tiny notches go towards the front, and the big notch goes towards the back -- you'll cut down the big notch at the back to form the placket-buttony-thing which won't look so hot if it's visible from the front. Now you've got a big poncho thing!
Sew the button areas up-- they just get folded under at the crevice and topstitched about 1/8" - 1/4" away from the edges so that they lay flat.
Take this opportunity to attach the collar to the neck hole. Similar to how you did the shoulder pieces but harder this time; I suggest sewing the outer collar stand to the shoulder pieces quilting-style (nice sides together) and then iron the inside collar stand to shape and do a top stitch all the way around the collar stand, inside and outside, all at once. This bit can be tricky around the button area, you'll need to be really handy with the iron and tweezers to get a nice rounded folded-together shape. Feel free to practice this technique on scrap fabric. You'll likely need to top-stitch really close to the edges in order to catch the folded-under fabric, but be careful not to stitch outside the fabric and miss the whole thing on one side. Really easy to do, pins will help here. Make sure they line up with the button areas on your shirt front; if not, try tightening up the seams a bit in the shoulder area.
Who knew collars were so hard?? I think you're ready to sew up the sides, so flip the whole shirt inside-out and sew up the arm, to the armpit, and down the side.
To make a nice placket, extend the slit by cutting a V shape at the base. Each cut should be about 1/4" and at 30-degree angles-- this will make a way for the placket pieces to hide later. Fold the V shape topside and iron. Take the placket pieces (little rectangular pieces) and top-stitch them to the slit you cut. The smaller piece goes on the side of the slit towards your back, so sew that first. It gets folded in half lengthwise and then 1/4" seams are folded under and ironed. It gets wrapped around the slit, stitched down and the excess will be hidden topside by going thru the V-cut. The big 5-sided piece gets folded in half, folded/ironed again 1/4" from the sides to hide the seams, and a point is folded in the base. Then wrap it around the slit, stitch along the raw edges, and then finish by going around the point, back up the other side until the slit begins, and back across the slit. This basically stitches a pocket on the top side of the sleeve that hides the raw edges of the V and the small placket piece all at the same time.
Phew! If you don't want to go to all that work for a few slits in your sleeves, then just fold the slit under on each side and sew it down to hide the raw edge. Throw the placket pieces in a fire and just think of all the time you saved! Just remember that the frontside of the slit should overlap the backside by about an inch, so your cuff will have to do the same-- it'll kinda hang in the air with no placket to support it. Who cares, right?
Cuffs work just like the collar; sew three sides together quilt-style, flip inside out, and then iron the raw edges underneath. Prepare the sleeves by cutting about 5.5 inches or 14 cm from the big notch (backside) of each sleeve inwards toward the shoulder -- this forms the placket (button-slit thingy.) Keep it more or less parallel with the other stitches you've made. Pleat the sleeve by folding at the 4 small notches-- the pleats go towards the placket, so from the front of the shirt towards the placket you'll pinch the first two notches and bring the frontmost notch backwards until it's taut. Likewise with the third and fourth notches. Basically, the notches just mark where the inward and outward creases will be. Pin the pleats down.
Lay your cuffs down with the edges lining up with each edge of the placket. If you're super lucky, the pleats and placket will line up perfectly. Put the outside right sides together and stitch, then iron/fold/topstitch the inside of the cuff.
You're almost done! Fold under / iron the bottom edge of your shirt and stitch. And lastly, use your sewing machine's buttonhole feature, a bunch of buttons, and a hand needle to do all of your buttons. Don't mess up now! Congratulations, you now have your own shirt!
Designer
willbradley3d model description
This is possibly the first free & open-source long-sleeved collared shirt available online! Normally you'd have to buy a paper pattern, trace it, ...and cut it out... now you can download this file, cut it out on a laser cutter, and start stitching! Some people claim that a laser cutter is overe...This is possibly the first free & open-source long-sleeved collared shirt available online! Normally you'd have to buy a paper pattern, trace it, and cut it out... now you can download this file, cut it out on a laser cutter, and start stitching! Some people claim that a laser cutter is overengineering, but I say nay! Furthermore, the design can now be crowdsourced and improved.
TODO: Sizing, align collar notches, pocket, better photos.
Firstly, this shirt is for someone with an approximately 15 inch (38cm) neck -- the collar itself is 16.2 inches (41 cm) buttonhole-to-button. The arms and girth are somewhat generous, so anyone who wears a US "Medium" should feel alright (35 inch / 90cm bust & girth up to perhaps 40 inches / 100cm.) I am not a tailor, I just digitized a shirt that fit me! Modifications to make this a more universal shirt are welcome!
Start by downloading the cut single and cut mirrored files below. Your laser program should be able to handle DXF files.
The other two files aren't separated out into single and mirrored bits. Basically you only need one of the big backpiece, but you need two mirrored copies of all the other pieces. So separate them out when cutting. If you have CorelDraw you can try the CDR file but it's the same as the DXF file.
Open the files in your laser or other cutting program. The "cut mirrored" file has every piece that must have a mirrored twin, so fold your fabric in half and iron flat before cutting it-- you'll get two of each piece, back-to-back. The "cut single" file has the backpiece, which you only need one of, so keep that fabric unfolded for that cut.
Experiment with your cutter for the right settings to cut through both layers of fabric. Good ironing will greatly help with the cut quality, not to mention accurate dimensions. You may want to prewash and preshrink the fabric before cutting/ironing so that you can wash your shirt without shrinkage. Again, I'm not a tailor or sewer.
Having a premade collared shirt handy will help you figure out how to sew the pieces together nicely but I'll do my best to walk you through it. This isn't a beginner sewing project; if this is your first time, try a quilting and applique tutorial somewhere first; even then your first shirt may not come out very nice. This shirt is in beta! Mine came out good enough for costumewear.
Now you've got a bunch of pieces! I started with the collar and ended with the cuffs. Collars and cuffs usually have fusable webbing ironed on the outer piece of fabric (on the inside) to make them stiff. Then a standard inside-out quilting technique with 1/4" seams should work fine for most pieces. Start by sewing the collar itself (right sides together!), fold right-side-out, iron, then topstitch at 1/4" to get a nice flat collar. Sandwich the collar inside the collar stand pieces, nice sides together and upside down... I think my notches are off a bit so worry more about the edges lining up. Sew 1/4" from the bottom, starting and ending at the little crevices at either end of the collar stands. Fold the collar right side out-- it should be looking like a collar!
Next, assemble the shirt part. You basically make a poncho-vest-thing first, then attach the sleeves, and then sew up the sides. There are two shoulder pieces, a back piece, and two front pieces (left and right.) Attach the front pieces to the shoulder pieces (remember, you're sewing inside out and then flipping and ironing-- quilting technique) at the tops of the shoulders. Then attach the outer shoulder piece to the back piece. You'll need to pleat the back piece by folding the two pairs of notches back on themselves. I suggest pinning the left and right edges of the back piece to the outer shoulder piece (nice sides together!) and working towards the middle until it's obvious where to pleat. Once that's sewn, use some precision folding/ironing and a top stitch to tack down the last stitch of the inner shoulder piece. (Alternatively, with some creative twisting and pinning, you can sew both shoulder pieces to the back piece at the same time.)
Next, attach the arms to the arm holes. Pay attention to which is left and right. The four tiny notches go towards the front, and the big notch goes towards the back -- you'll cut down the big notch at the back to form the placket-buttony-thing which won't look so hot if it's visible from the front. Now you've got a big poncho thing!
Sew the button areas up-- they just get folded under at the crevice and topstitched about 1/8" - 1/4" away from the edges so that they lay flat.
Take this opportunity to attach the collar to the neck hole. Similar to how you did the shoulder pieces but harder this time; I suggest sewing the outer collar stand to the shoulder pieces quilting-style (nice sides together) and then iron the inside collar stand to shape and do a top stitch all the way around the collar stand, inside and outside, all at once. This bit can be tricky around the button area, you'll need to be really handy with the iron and tweezers to get a nice rounded folded-together shape. Feel free to practice this technique on scrap fabric. You'll likely need to top-stitch really close to the edges in order to catch the folded-under fabric, but be careful not to stitch outside the fabric and miss the whole thing on one side. Really easy to do, pins will help here. Make sure they line up with the button areas on your shirt front; if not, try tightening up the seams a bit in the shoulder area.
Who knew collars were so hard?? I think you're ready to sew up the sides, so flip the whole shirt inside-out and sew up the arm, to the armpit, and down the side.
To make a nice placket, extend the slit by cutting a V shape at the base. Each cut should be about 1/4" and at 30-degree angles-- this will make a way for the placket pieces to hide later. Fold the V shape topside and iron. Take the placket pieces (little rectangular pieces) and top-stitch them to the slit you cut. The smaller piece goes on the side of the slit towards your back, so sew that first. It gets folded in half lengthwise and then 1/4" seams are folded under and ironed. It gets wrapped around the slit, stitched down and the excess will be hidden topside by going thru the V-cut. The big 5-sided piece gets folded in half, folded/ironed again 1/4" from the sides to hide the seams, and a point is folded in the base. Then wrap it around the slit, stitch along the raw edges, and then finish by going around the point, back up the other side until the slit begins, and back across the slit. This basically stitches a pocket on the top side of the sleeve that hides the raw edges of the V and the small placket piece all at the same time.
Phew! If you don't want to go to all that work for a few slits in your sleeves, then just fold the slit under on each side and sew it down to hide the raw edge. Throw the placket pieces in a fire and just think of all the time you saved! Just remember that the frontside of the slit should overlap the backside by about an inch, so your cuff will have to do the same-- it'll kinda hang in the air with no placket to support it. Who cares, right?
Cuffs work just like the collar; sew three sides together quilt-style, flip inside out, and then iron the raw edges underneath. Prepare the sleeves by cutting about 5.5 inches or 14 cm from the big notch (backside) of each sleeve inwards toward the shoulder -- this forms the placket (button-slit thingy.) Keep it more or less parallel with the other stitches you've made. Pleat the sleeve by folding at the 4 small notches-- the pleats go towards the placket, so from the front of the shirt towards the placket you'll pinch the first two notches and bring the frontmost notch backwards until it's taut. Likewise with the third and fourth notches. Basically, the notches just mark where the inward and outward creases will be. Pin the pleats down.
Lay your cuffs down with the edges lining up with each edge of the placket. If you're super lucky, the pleats and placket will line up perfectly. Put the outside right sides together and stitch, then iron/fold/topstitch the inside of the cuff.
You're almost done! Fold under / iron the bottom edge of your shirt and stitch. And lastly, use your sewing machine's buttonhole feature, a bunch of buttons, and a hand needle to do all of your buttons. Don't mess up now! Congratulations, you now have your own shirt!