Flying pumpkin (balloon) 3D for print


13182 Views 1 Likes 0 Downloads Download the piece here from 3dforprint
Flying Pumpkin (Balloon) is a Halloween themed toy / game using a motorized fan, mechanical controls and aerodynamics ...to "fly" a pumpkin (balloon).
When I was around 6 years old, I saw this concept in the vacuum cleaner department at a Sears store which used vacuum cleaner exhaust to "fly" a small beach ball. After months of pleading, my mother stood her ground and refused to allow me to use her vacuum cleaner in this manner. Fortunately, only a few years later the "Johnny Astro" toy was introduced and she presented me with one for my birthday. I really enjoyed this toy, and I had fun designing, printing, building and testing this version. Even with the availability of miniature helicopters and quad copters, the kids and grandkids truly enjoy the take off, flight and landing of their own pumpkin balloons. And, unlike the helicopters and quad copters, you simply can't "crash" a pumpkin balloon!
As usual, I probably forgot a file or two or who knows what else, so if you have any questions, please do not hesitate to ask as I do make mistakes in plenty.
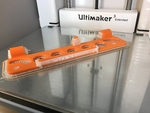
Designed using Autodesk Fusion 360, sliced using Cura 2.7.0, and printed in PLA on an Ultimaker 2+ Extended and a dual extrusion Ultimaker 3 Extended.
In order to complete this model, you will need to purchase the motor (Uxcell DC 3-9V 6402-22767RPM Speed ...2 Terminal Electric Magnetic Micro Motor), and speed controller (Yeeco DC Motor Speed Control Driver Board 3V-35V 5A PWM Controller Stepless DC 3V 6V 12V 24V 35V Variable Voltage Regulator Dimmer Governor Switching Build with LED Indicator and Switch Function) I used. I found my online. You will also need a 6-9 VDC power supply, appropriate connector, 18 gauge red and black stranded wire, and maybe a 120mm diameter 2mm center hole "press on" propeller (see "Regarding the propeller" below).
I have attached a PDF file containing the list of printed parts which includes the part names, part counts, print settings and colors I used.
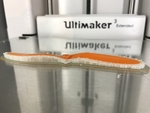
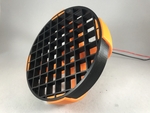
Regarding the propeller, as can be seen in the photograph, I printed mine on an Ultimaker 3 using dual extrusion with orange PLA and natural PVA. The propeller in this design spins at a high rate of speed and as such needs to be strong. If you have any doubt whatsoever regarding your printers ability to print the propeller, do not print it; purchase one from your local hobby supply store or online. I've attached a photograph of the results of 2 of 5 destructive tests of the 2 bladed propeller. These tests consisting of running the propeller and high speed then slipping a screw driver through the vanes at various distances and into the propeller path. In all cases the propeller separated into two pieces as shown, struck the vane outer wall, and dropped out of the fan assembly. However, even with the vane outer wall, I strongly urge that you wear safety glasses or a face shield when operating this model. I've included both a 2 and 3 bladed propeller. While the 3 bladed propeller was a little quieter, the 2 bladed propeller seemed to perform better. Again, make absolutely certain your printer is able to print a solid, strong propeller.
I've also included two vane files, one with .8mm vanes and one with 1.2mm vanes. If your printer has difficulty printing the .8mm thick vanes, then try the 1.2mm version.
Prior to assembly, test fit and trim, file, sand, etc. all parts as necessary for smooth movement of moving surfaces, and tight fit for non moving surfaces. Depending on the colors you chose and your printer settings, more or less trimming, filing and/or sanding may be required. Carefully file all edges that contacted the build plate to make absolutely sure that all build plate "ooze" is removed and that all edges are smooth. I used small jewelers files and plenty of patience to perform this step.
This model uses M8 by1 threaded assembly and may require a M8 by 1 tap and/or die to clean the threaded components.
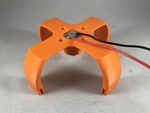
2) Assemble the Fan Assembly.
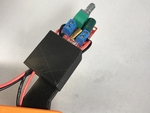
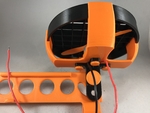
Press the motor into "Motor Frame.stl" as shown noting the orientation of the motor vents.
Flip the assembly over then press the motor wiring tabs flat against the motor. Tin the tabs with solder.
Cut two 13" (approximately 34cm) lengths of 18 gauge stranded wire; one red and one black.
Strip about 1/4" (approximately 6mm) of insulation from each end of each wire. Tin the ends of each wire with solder.
Solder one end of the red wire to the motor positive ("+") terminal noting the orientation of the wire. Solder one end of the black wire to the motor negative ("-") terminal noting the orientation of the wire.
Flip the assembly over then attach "Motor Frame Mount.stl" to the assembly using the 4 "Bolt Motor Frame Mount.stl" as shown, carefully noting the orientation of the motor frame mount and the wires.
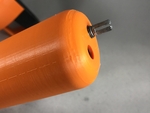
Flip the assembly over then carefully press "Propeller 2 Blade.stl" on the motor shaft as shown, very carefully note the propeller orientation is backwards such that when the motor spins, air is blown away from the motor.
Press "Vanes .8.stl" onto the assembly as shown. Once pressed into position, carefully rotate the propeller making certain it does not make contact with any surface.
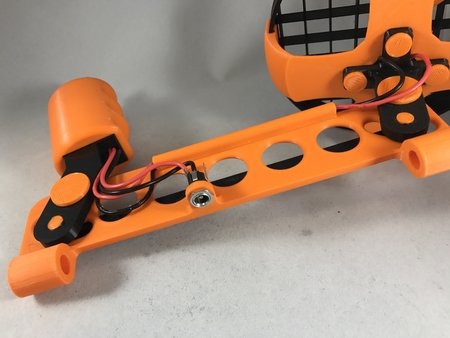
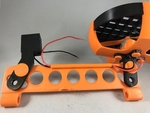
3) Chassis Assembly and Test.
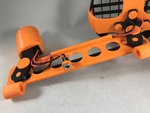
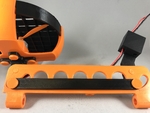
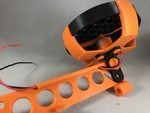
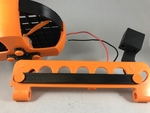
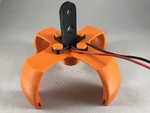
Attach the fan assembly to "Chassis Frame.stl" using one "Bolt Chassis Frame.stl" as shown, carefully noting the position and orientation of the fan assembly and the wires. The fan assembly should pivot easily.
Carefully thread the wires through the wire tunnel on the chassis frame as shown.
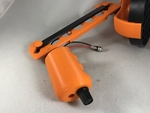
Attach "Handle.stl" to the assembly using the remaining "Bolt Chassis Frame.stl" as shown, carefully noting the position and orientation of the handle. The handle should pivot easily.
Attach "Bar.stl" between the fan assembly and handle using two "Bolt Bar.stl" as shown. Once attached, the handle should move back and forth with ease and the fan assembly should follow the position of the handle.
Carefully slide the fan assembly wires into the hole in the bottom of the handle that is nearest the fan assembly as shown.
Cut two 8" (approximately 203mm) lengths of 18 gauge stranded wire; one red and one black.
Strip about 1/4" (approximately 6mm) of insulation from each end of each wire. Tin the ends of each wire with solder.
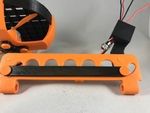
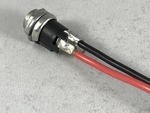
Tin the "tip" and "ring" solder tabs on the power connector. Solder one end of the red wire to the connector "tip" terminal. Solder one end of the black wire to the connect "ring" terminal. Carefully insert these wires into the same hole as the fan assembly wires as shown.
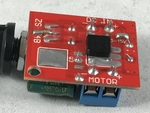
Referencing the motor speed controller instructions, bridge the solder pads on the solder side of the motor speed controller for "3-15" volt operation.
Attach the fan assembly wires to the motor speed controller "motor" terminals, red to "+" and black to "-".
Attach the connector wires to the motor speed controller "dc in" terminals, red to "+" and black to "-".
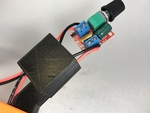
Remove the knob and nut from the motor speed controller, then slide the speed controller into "Grip.stl", shaft end first with the shaft aligned with the hole in "Grip.stl" that will be closest to the fan assembly. Secure the motor speed controller into the grip using the nut. Press the motor speed controller knob back onto the shaft.
Press the grip onto the handle while sliding the excess fan assembly and connector wires out of the handle.
Attach the connector to the chassis frame as shown.
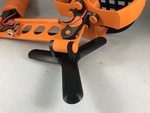
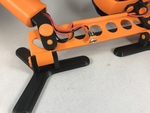
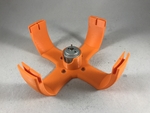
Attach one "Base.stl" to the chassis assembly using one "Bolt Base.stl", carefully noting the orientation of the base on the chassis. Repeat this step with the remaining "Base.stl" and "Bolt Base.stl".
When complete, set the assembly on a smooth surface and check to make sure the grip will move the fan assembly forward and backward, and the chassis assembly side to side, without binding or pinching any of the wiring.
Apply power to the completed assembly and rotate the speed controller knob slowly clockwise until the motor just starts spinning. Slowly increase the speed and hold a balloon over the fan then let go. Increase the speed to increase the distance between the balloon and the fan, decrease the speed to decrease the distance between the balloon and the fan. Move the grip forward and backward, then left and right to adjust the angle of balloon in relation to the assembly. Smooth movements of both the speed controller knob and grip result in better flights.
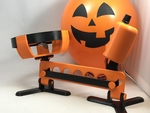
For a game, we position two large Halloween themed cups half filled with sand or water 12" from both sides of the fan, place a balloon in one of the cups, then see who can take off from the first cup and land in the second cup in the shortest amount of time. My record is 19 seconds. We've had lots of fun with Flying Pumpkin (Balloon), and hope you do to!
That's how I made Flying Pumpkin (Balloon).
Hope you like it!
Designer
Greg Zumwalt3d model description
A Halloween themed toy / game.Flying Pumpkin (Balloon) is a Halloween themed toy / game using a motorized fan, mechanical controls and aerodynamics ...to "fly" a pumpkin (balloon).
When I was around 6 years old, I saw this concept in the vacuum cleaner department at a Sears store which used vacuum cleaner exhaust to "fly" a small beach ball. After months of pleading, my mother stood her ground and refused to allow me to use her vacuum cleaner in this manner. Fortunately, only a few years later the "Johnny Astro" toy was introduced and she presented me with one for my birthday. I really enjoyed this toy, and I had fun designing, printing, building and testing this version. Even with the availability of miniature helicopters and quad copters, the kids and grandkids truly enjoy the take off, flight and landing of their own pumpkin balloons. And, unlike the helicopters and quad copters, you simply can't "crash" a pumpkin balloon!
As usual, I probably forgot a file or two or who knows what else, so if you have any questions, please do not hesitate to ask as I do make mistakes in plenty.
Designed using Autodesk Fusion 360, sliced using Cura 2.7.0, and printed in PLA on an Ultimaker 2+ Extended and a dual extrusion Ultimaker 3 Extended.
3d model print parameters
1) Purchase, Print and Prepare the Parts.In order to complete this model, you will need to purchase the motor (Uxcell DC 3-9V 6402-22767RPM Speed ...2 Terminal Electric Magnetic Micro Motor), and speed controller (Yeeco DC Motor Speed Control Driver Board 3V-35V 5A PWM Controller Stepless DC 3V 6V 12V 24V 35V Variable Voltage Regulator Dimmer Governor Switching Build with LED Indicator and Switch Function) I used. I found my online. You will also need a 6-9 VDC power supply, appropriate connector, 18 gauge red and black stranded wire, and maybe a 120mm diameter 2mm center hole "press on" propeller (see "Regarding the propeller" below).
I have attached a PDF file containing the list of printed parts which includes the part names, part counts, print settings and colors I used.
Regarding the propeller, as can be seen in the photograph, I printed mine on an Ultimaker 3 using dual extrusion with orange PLA and natural PVA. The propeller in this design spins at a high rate of speed and as such needs to be strong. If you have any doubt whatsoever regarding your printers ability to print the propeller, do not print it; purchase one from your local hobby supply store or online. I've attached a photograph of the results of 2 of 5 destructive tests of the 2 bladed propeller. These tests consisting of running the propeller and high speed then slipping a screw driver through the vanes at various distances and into the propeller path. In all cases the propeller separated into two pieces as shown, struck the vane outer wall, and dropped out of the fan assembly. However, even with the vane outer wall, I strongly urge that you wear safety glasses or a face shield when operating this model. I've included both a 2 and 3 bladed propeller. While the 3 bladed propeller was a little quieter, the 2 bladed propeller seemed to perform better. Again, make absolutely certain your printer is able to print a solid, strong propeller.
I've also included two vane files, one with .8mm vanes and one with 1.2mm vanes. If your printer has difficulty printing the .8mm thick vanes, then try the 1.2mm version.
Prior to assembly, test fit and trim, file, sand, etc. all parts as necessary for smooth movement of moving surfaces, and tight fit for non moving surfaces. Depending on the colors you chose and your printer settings, more or less trimming, filing and/or sanding may be required. Carefully file all edges that contacted the build plate to make absolutely sure that all build plate "ooze" is removed and that all edges are smooth. I used small jewelers files and plenty of patience to perform this step.
This model uses M8 by1 threaded assembly and may require a M8 by 1 tap and/or die to clean the threaded components.
2) Assemble the Fan Assembly.
Press the motor into "Motor Frame.stl" as shown noting the orientation of the motor vents.
Flip the assembly over then press the motor wiring tabs flat against the motor. Tin the tabs with solder.
Cut two 13" (approximately 34cm) lengths of 18 gauge stranded wire; one red and one black.
Strip about 1/4" (approximately 6mm) of insulation from each end of each wire. Tin the ends of each wire with solder.
Solder one end of the red wire to the motor positive ("+") terminal noting the orientation of the wire. Solder one end of the black wire to the motor negative ("-") terminal noting the orientation of the wire.
Flip the assembly over then attach "Motor Frame Mount.stl" to the assembly using the 4 "Bolt Motor Frame Mount.stl" as shown, carefully noting the orientation of the motor frame mount and the wires.
Flip the assembly over then carefully press "Propeller 2 Blade.stl" on the motor shaft as shown, very carefully note the propeller orientation is backwards such that when the motor spins, air is blown away from the motor.
Press "Vanes .8.stl" onto the assembly as shown. Once pressed into position, carefully rotate the propeller making certain it does not make contact with any surface.
3) Chassis Assembly and Test.
Attach the fan assembly to "Chassis Frame.stl" using one "Bolt Chassis Frame.stl" as shown, carefully noting the position and orientation of the fan assembly and the wires. The fan assembly should pivot easily.
Carefully thread the wires through the wire tunnel on the chassis frame as shown.
Attach "Handle.stl" to the assembly using the remaining "Bolt Chassis Frame.stl" as shown, carefully noting the position and orientation of the handle. The handle should pivot easily.
Attach "Bar.stl" between the fan assembly and handle using two "Bolt Bar.stl" as shown. Once attached, the handle should move back and forth with ease and the fan assembly should follow the position of the handle.
Carefully slide the fan assembly wires into the hole in the bottom of the handle that is nearest the fan assembly as shown.
Cut two 8" (approximately 203mm) lengths of 18 gauge stranded wire; one red and one black.
Strip about 1/4" (approximately 6mm) of insulation from each end of each wire. Tin the ends of each wire with solder.
Tin the "tip" and "ring" solder tabs on the power connector. Solder one end of the red wire to the connector "tip" terminal. Solder one end of the black wire to the connect "ring" terminal. Carefully insert these wires into the same hole as the fan assembly wires as shown.
Referencing the motor speed controller instructions, bridge the solder pads on the solder side of the motor speed controller for "3-15" volt operation.
Attach the fan assembly wires to the motor speed controller "motor" terminals, red to "+" and black to "-".
Attach the connector wires to the motor speed controller "dc in" terminals, red to "+" and black to "-".
Remove the knob and nut from the motor speed controller, then slide the speed controller into "Grip.stl", shaft end first with the shaft aligned with the hole in "Grip.stl" that will be closest to the fan assembly. Secure the motor speed controller into the grip using the nut. Press the motor speed controller knob back onto the shaft.
Press the grip onto the handle while sliding the excess fan assembly and connector wires out of the handle.
Attach the connector to the chassis frame as shown.
Attach one "Base.stl" to the chassis assembly using one "Bolt Base.stl", carefully noting the orientation of the base on the chassis. Repeat this step with the remaining "Base.stl" and "Bolt Base.stl".
When complete, set the assembly on a smooth surface and check to make sure the grip will move the fan assembly forward and backward, and the chassis assembly side to side, without binding or pinching any of the wiring.
Apply power to the completed assembly and rotate the speed controller knob slowly clockwise until the motor just starts spinning. Slowly increase the speed and hold a balloon over the fan then let go. Increase the speed to increase the distance between the balloon and the fan, decrease the speed to decrease the distance between the balloon and the fan. Move the grip forward and backward, then left and right to adjust the angle of balloon in relation to the assembly. Smooth movements of both the speed controller knob and grip result in better flights.
For a game, we position two large Halloween themed cups half filled with sand or water 12" from both sides of the fan, place a balloon in one of the cups, then see who can take off from the first cup and land in the second cup in the shortest amount of time. My record is 19 seconds. We've had lots of fun with Flying Pumpkin (Balloon), and hope you do to!
That's how I made Flying Pumpkin (Balloon).
Hope you like it!