Hummingbirds. 3D for print


977 Views 0 Likes 0 Downloads Download
https://youtu.be/2vsFSrN2SaA
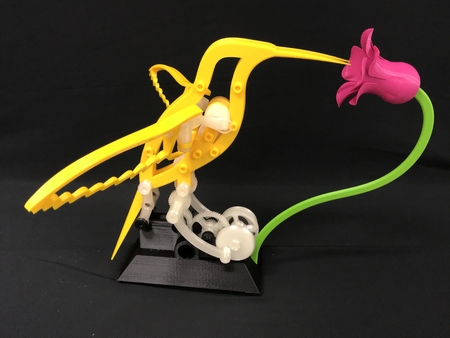
My wife loves hummingbirds which is why I designed my first hummingbird automata "Hummingbird" (https://w...ww.youmagine.com/designs/hummingbird) . So what could possibly be better than having a hummingbird automata? Why this dual hummingbird automata, "Hummingbirds", of course!
Assembled with over one hundred 3D printed parts and three purchased parts, "Hummingbirds" is quite definitely a challenge to print and assemble.
And as usual, I probably forgot a file or two or who knows what else, so if you have any questions, please do not hesitate to ask as I do make plenty of mistakes.
Designed using Autodesk Fusion 360, sliced using Cura 4.2, and printed in PLA on an Ultimaker 2+ Extended and an Ultimaker 3 Extended.
I purchased the following parts:
○ 150rpm Gear Motor (search for "uxcell DC 3V 150RPM Micro Speed Reduc...tion Motor Mini Gear Box with 2 Terminals for RC Car Robot Model DIY Engine Toy").
○ One 3vdc power supply.
○ One coaxial connector that fit the power supply connector (optional).
The included file "Hummingbirds Part List" contains the part names, quantities, layer heights and infill settings of the 3D printed parts required for this model.
"Hummingbirds" is a high precision print and assembly model. Prior to assembly, test fit and trim, file, sand, etc. all parts as necessary for smooth movement of moving surfaces, and tight fit for non moving surfaces. Depending on you printer, your printer settings and the colors you chose, more or less trimming, filing and/or sanding may be required. Carefully file all edges that contacted the build plate to make absolutely sure that all build plate "ooze" is removed and that all edges are smooth. I used small jewelers files and plenty of patience to perform this step.
"Hummingbirds" also uses threaded assembly, so I used a 6mm by1 tap and die for thread cleaning.
Assemble the Hummingbirds.
https://www.youtube.com/watch?v=AWzwdxY4i3w
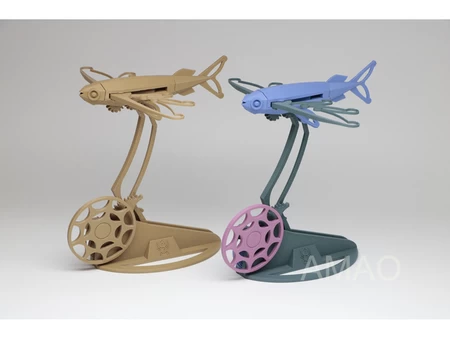
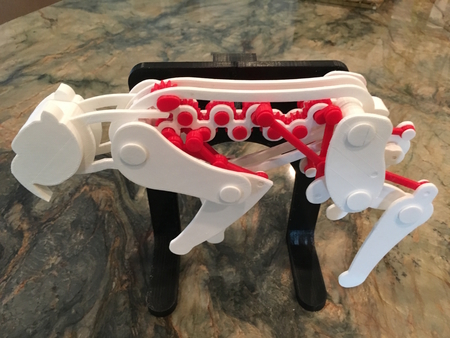
I assembled the right (magenta in the cover image) hummingbird as follows:
○ Assembled the six universal joints as shown in the included video (five as shown in the video, the sixth using "Gear, Yoke, Drive (Module 1.1, Teeth 20.stl").
○ Pressed one "Bolt, Gear, Crown.stl" into one "Gear, Crown (Module 1.5, teeth 12).stl".
○ Slid the bolt and crown gear assembly into one "Spacer, Flat.stl", then secured in place with one yoke assembly making sure the assembly rotated freely.
○ Pressed one "Gear, Crown (Module 1.5, teeth 12).stl" onto one "Axle, Wheels.stl" carefully aligning the gear with the axle spline.
○ Positioned the axle and crown gear assembly into one "Body, Right.stl", with the gear adjacent to the body.
○ Pressed the yoke assembly into the body.
○ Pressed "Body, Left.stl" onto the assembly.
○ Threaded two "Wheel, RHT.stl" onto the axle and crown gear assembly threads and aligned the ball joints.
○ Positioned and secured in place four "Spacer, Round.stl" into the body assembly using eight "Bolt, 6mm, 3.8mm Shoulder.stl".
○ Placed one ""Pivot, Shoulder.stl" into one "Pivot, Wing.stl" then secured in place with one "Bolt Pivot Wing.stl" making sure the assembly rotated freely.
○ Secured one "Wing, Right.stl" onto the shoulder assembly using one "Bolt, 6mm, 2.8mm Shoulder.stl".
○ Snapped one end of "Rod Connecting 6.3mm Hole.stl" onto the ball of the wing assembly.
○ Positioned the wing assembly onto the shoulder of the right body side then secured in place with one "Bolt, 6mm, 4.4mm Shoulder.stl".
○ Snapped the remaining end of the connecting rod onto the ball on wheel right then made sure the assembly rotated freely.
○ Repeated the wing assembly steps for the left wing.
○ Threaded one "Axle, Drive.stl" into the free end of the universal joint.
○ Threaded one universal joint assembly onto the free end of the drive axle.
○ Positioned one "Tail.stl" between the frames and secured in place with two "Bold, 6mm, 4.4mm Shoulder.stl".
I assembled the left (yellow in the cover image) hummingbird as I did the right with the exception of reversing the orientation of the axle and crown assembly such that the gear is adjacent to the left body (e.g. a "beak to beak" mirror image).
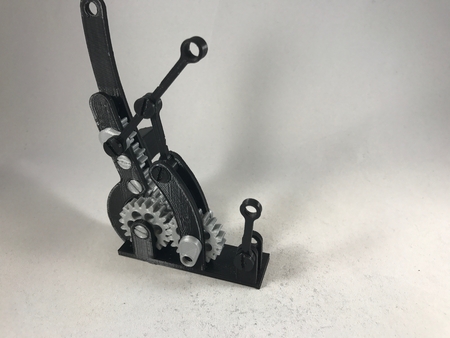
Assemble the Base.
I assembled the base as follows:
○ Wired the motor to the coaxial connector (optional) such that the motor shaft rotates clockwise when viewed from the motor shaft end of the motor.
○ Pressed the motor into "Base.stl".
○ Secured the coaxial cable to the base assembly using the included nut.
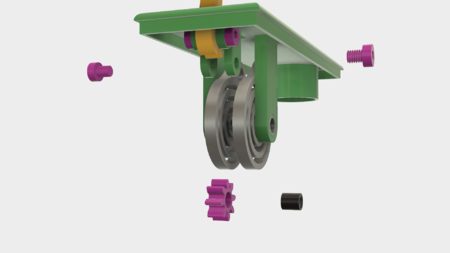
○ Pressed "Gear, Motor (Module 1.1, Teeth 10).stl" onto the motor shaft.
○ Positioned one "Gear, Yoke, Drive (Module 1.1, Teeth 20).stl" assembly (assembled in the previous step) in the base assembly and threaded one "Coupler, 18mm.stl" into the gear threads.
○ Threaded "Gear, Worm.stl" onto the coupler.
○ Threaded one "Coupler, 4.4mm.stl" into the free end of the geared yoke assembly.
○ Threaded the remaining "Coupler.stl" into the worm gear.
○ Threaded one yoke assembly onto the coupler.
○ Threaded one "Coupler, 4mm.stl into the free end of the yoke assembly.
○ Positioned "Gear.stl" in the base assembly then secured in place with one "Bolt, 6mm, 4.4mm Shoulder.stl".
○ Secured one "Arm, Gear.stl" onto "Arm.stl" using one "Bolt, 6mm, 4.4mm Shoulder.stl".
○ Secured this arm assembly into the left end of the base assembly using two "Bolt, 6mm, 4.4mm Shoulder.stl" making sure the arm pivoted freely.
○ Secured the remaining "Arm, Gear.stl" onto "Arm, Offset.stl" (on the outer face of the offset arm) using one "Bolt, 6mm, 4.4mm Shoulder.stl".
○ Secured this arm assembly into the right end of the base assembly using two "Bolt, 6mm, 4.4mm Shoulder.stl" making sure the arm pivoted freely.
○ Secured the free ends of each gear arm to the gear using one "Axle, Arm, Gear.stl".
○ Applied power to the motor and allowed the left arm to travel to the lowest limit, then removed power.
○ Slid "Cover, Left.stl" over the free end of the left arm, slid it into position, then secured in place with four "Bolt, 6mm, 3.8mm Shoulder.stl".
○ Applied power to the motor and allowed the right arm to travel to the lowest limit, then removed power.
○ Slid "Cover, Right.stl" over the free end of the right arm, slid it into position, then secured in place with four "Bolt, 6mm, 3.8mm Shoulder.stl".
○ Slid "Cover, Left.stl" over the free end of the left arm, slid it into position, then secured in place with four "Bolt, 6mm, 3.8mm Shoulder.stl".
Final Assembly.
For final assembly, I performed the following steps.
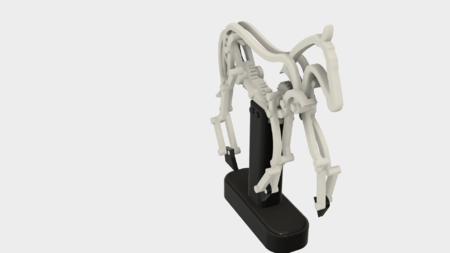
○ Positioned the left bird assembly (yellow in the cover image) on the left arm and secured in place with two "Bolt, 6mm, 4.4mm Shoulder.stl".
○ Threaded the left bird yoke onto the left base coupler.
○ Positioned the right bird assembly (magenta in the cover image) on the right arm and secured in place with two "Bolt, 6mm, 4.4mm Shoulder.stl".
○ Threaded the right bird yoke onto the right base coupler.
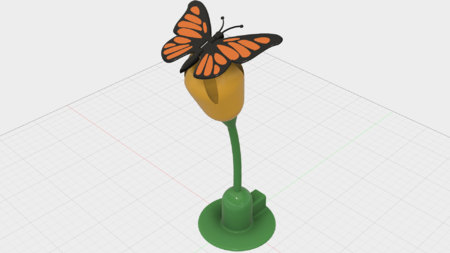
○ Pressed the two "Flower.stl" onto "Stems.stl" such that the longer petals were aligned vertically.
○ Pressed the flower and stem assembly into the base.
And that is how I printed and assembled "Hummingbirds".
I hope you enjoyed it!
Designer
Greg Zumwalt3d model description
Hummingbirds.https://youtu.be/2vsFSrN2SaA
My wife loves hummingbirds which is why I designed my first hummingbird automata "Hummingbird" (https://w...ww.youmagine.com/designs/hummingbird) . So what could possibly be better than having a hummingbird automata? Why this dual hummingbird automata, "Hummingbirds", of course!
Assembled with over one hundred 3D printed parts and three purchased parts, "Hummingbirds" is quite definitely a challenge to print and assemble.
And as usual, I probably forgot a file or two or who knows what else, so if you have any questions, please do not hesitate to ask as I do make plenty of mistakes.
Designed using Autodesk Fusion 360, sliced using Cura 4.2, and printed in PLA on an Ultimaker 2+ Extended and an Ultimaker 3 Extended.
3d model print parameters
Purchase, Print and Prepare the Parts.I purchased the following parts:
○ 150rpm Gear Motor (search for "uxcell DC 3V 150RPM Micro Speed Reduc...tion Motor Mini Gear Box with 2 Terminals for RC Car Robot Model DIY Engine Toy").
○ One 3vdc power supply.
○ One coaxial connector that fit the power supply connector (optional).
The included file "Hummingbirds Part List" contains the part names, quantities, layer heights and infill settings of the 3D printed parts required for this model.
"Hummingbirds" is a high precision print and assembly model. Prior to assembly, test fit and trim, file, sand, etc. all parts as necessary for smooth movement of moving surfaces, and tight fit for non moving surfaces. Depending on you printer, your printer settings and the colors you chose, more or less trimming, filing and/or sanding may be required. Carefully file all edges that contacted the build plate to make absolutely sure that all build plate "ooze" is removed and that all edges are smooth. I used small jewelers files and plenty of patience to perform this step.
"Hummingbirds" also uses threaded assembly, so I used a 6mm by1 tap and die for thread cleaning.
Assemble the Hummingbirds.
https://www.youtube.com/watch?v=AWzwdxY4i3w
I assembled the right (magenta in the cover image) hummingbird as follows:
○ Assembled the six universal joints as shown in the included video (five as shown in the video, the sixth using "Gear, Yoke, Drive (Module 1.1, Teeth 20.stl").
○ Pressed one "Bolt, Gear, Crown.stl" into one "Gear, Crown (Module 1.5, teeth 12).stl".
○ Slid the bolt and crown gear assembly into one "Spacer, Flat.stl", then secured in place with one yoke assembly making sure the assembly rotated freely.
○ Pressed one "Gear, Crown (Module 1.5, teeth 12).stl" onto one "Axle, Wheels.stl" carefully aligning the gear with the axle spline.
○ Positioned the axle and crown gear assembly into one "Body, Right.stl", with the gear adjacent to the body.
○ Pressed the yoke assembly into the body.
○ Pressed "Body, Left.stl" onto the assembly.
○ Threaded two "Wheel, RHT.stl" onto the axle and crown gear assembly threads and aligned the ball joints.
○ Positioned and secured in place four "Spacer, Round.stl" into the body assembly using eight "Bolt, 6mm, 3.8mm Shoulder.stl".
○ Placed one ""Pivot, Shoulder.stl" into one "Pivot, Wing.stl" then secured in place with one "Bolt Pivot Wing.stl" making sure the assembly rotated freely.
○ Secured one "Wing, Right.stl" onto the shoulder assembly using one "Bolt, 6mm, 2.8mm Shoulder.stl".
○ Snapped one end of "Rod Connecting 6.3mm Hole.stl" onto the ball of the wing assembly.
○ Positioned the wing assembly onto the shoulder of the right body side then secured in place with one "Bolt, 6mm, 4.4mm Shoulder.stl".
○ Snapped the remaining end of the connecting rod onto the ball on wheel right then made sure the assembly rotated freely.
○ Repeated the wing assembly steps for the left wing.
○ Threaded one "Axle, Drive.stl" into the free end of the universal joint.
○ Threaded one universal joint assembly onto the free end of the drive axle.
○ Positioned one "Tail.stl" between the frames and secured in place with two "Bold, 6mm, 4.4mm Shoulder.stl".
I assembled the left (yellow in the cover image) hummingbird as I did the right with the exception of reversing the orientation of the axle and crown assembly such that the gear is adjacent to the left body (e.g. a "beak to beak" mirror image).
Assemble the Base.
I assembled the base as follows:
○ Wired the motor to the coaxial connector (optional) such that the motor shaft rotates clockwise when viewed from the motor shaft end of the motor.
○ Pressed the motor into "Base.stl".
○ Secured the coaxial cable to the base assembly using the included nut.
○ Pressed "Gear, Motor (Module 1.1, Teeth 10).stl" onto the motor shaft.
○ Positioned one "Gear, Yoke, Drive (Module 1.1, Teeth 20).stl" assembly (assembled in the previous step) in the base assembly and threaded one "Coupler, 18mm.stl" into the gear threads.
○ Threaded "Gear, Worm.stl" onto the coupler.
○ Threaded one "Coupler, 4.4mm.stl" into the free end of the geared yoke assembly.
○ Threaded the remaining "Coupler.stl" into the worm gear.
○ Threaded one yoke assembly onto the coupler.
○ Threaded one "Coupler, 4mm.stl into the free end of the yoke assembly.
○ Positioned "Gear.stl" in the base assembly then secured in place with one "Bolt, 6mm, 4.4mm Shoulder.stl".
○ Secured one "Arm, Gear.stl" onto "Arm.stl" using one "Bolt, 6mm, 4.4mm Shoulder.stl".
○ Secured this arm assembly into the left end of the base assembly using two "Bolt, 6mm, 4.4mm Shoulder.stl" making sure the arm pivoted freely.
○ Secured the remaining "Arm, Gear.stl" onto "Arm, Offset.stl" (on the outer face of the offset arm) using one "Bolt, 6mm, 4.4mm Shoulder.stl".
○ Secured this arm assembly into the right end of the base assembly using two "Bolt, 6mm, 4.4mm Shoulder.stl" making sure the arm pivoted freely.
○ Secured the free ends of each gear arm to the gear using one "Axle, Arm, Gear.stl".
○ Applied power to the motor and allowed the left arm to travel to the lowest limit, then removed power.
○ Slid "Cover, Left.stl" over the free end of the left arm, slid it into position, then secured in place with four "Bolt, 6mm, 3.8mm Shoulder.stl".
○ Applied power to the motor and allowed the right arm to travel to the lowest limit, then removed power.
○ Slid "Cover, Right.stl" over the free end of the right arm, slid it into position, then secured in place with four "Bolt, 6mm, 3.8mm Shoulder.stl".
○ Slid "Cover, Left.stl" over the free end of the left arm, slid it into position, then secured in place with four "Bolt, 6mm, 3.8mm Shoulder.stl".
Final Assembly.
For final assembly, I performed the following steps.
○ Positioned the left bird assembly (yellow in the cover image) on the left arm and secured in place with two "Bolt, 6mm, 4.4mm Shoulder.stl".
○ Threaded the left bird yoke onto the left base coupler.
○ Positioned the right bird assembly (magenta in the cover image) on the right arm and secured in place with two "Bolt, 6mm, 4.4mm Shoulder.stl".
○ Threaded the right bird yoke onto the right base coupler.
○ Pressed the two "Flower.stl" onto "Stems.stl" such that the longer petals were aligned vertically.
○ Pressed the flower and stem assembly into the base.
And that is how I printed and assembled "Hummingbirds".
I hope you enjoyed it!