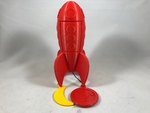
From the earth to the moon 3D for print


7269 Views 1 Likes 0 Downloads Download the piece here from 3dforprint
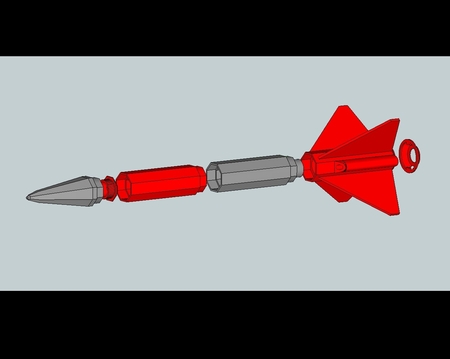
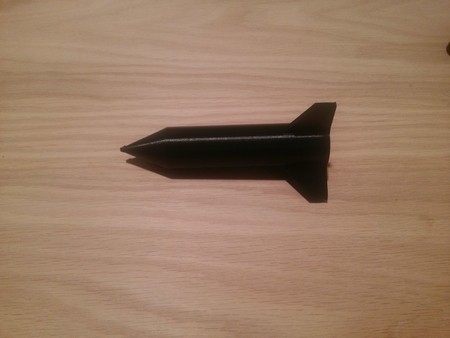
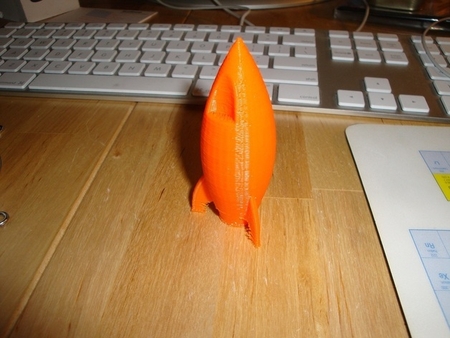
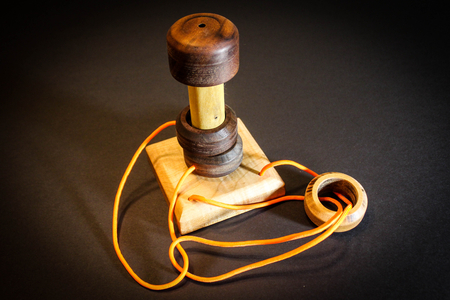
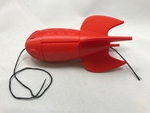
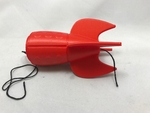
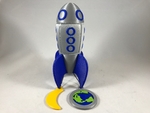
From the Earth to the Moon was designed as a dual function model, fir...st as a simple "string climbing" toy, and second as a ceiling fan light switch pull chain extender for my grandkids. The design incorporates a "dual spool mechanism" to produce the string climbing illusion. Toys utilizing a dual spool string climbing mechanism have been around for many years, and in my younger days I disassembled more than one of these trying to figure out the "magic" of how the toy climbed the string.
This model uses press fit assembly for the dual spool, and threaded assembly for the body. You will need to purchase some string or heavy thread that minimizes fraying and glue.
As usual, I probably forgot a file or two or who knows what else, so if you have any questions, please do not hesitate to ask as I do make mistakes in plenty.
Designed using Autodesk Fusion 360, sliced using Cura 2.3.1, and printed in PLA on an Ultimaker 2+ Extended and an Ultimaker 3 Extended.
As mentioned, you will need to purchase some string or heavy thread that minimizes fraying (I used "embro...idery floss" that can be found at super centers, sewing shops, and online) and glue (I used thick cyanoacrylate, available at hobby shops and online).
I printed all parts on an Ultimaker 2+ Extended and an Ultimaker 3 Extended at .1mm vertical resolution and 50% infill, with support for the nose, body and tail parts. I've also included ".3mf" files that are the dual extrusion pre-combined parts in the printing orientation I used. While I've positioned the body halves for vertical printing, I've successfully printed them horizontally, and both provide similar finishes (printing the body half vertically matches the print path orientation of the nose and tail parts).
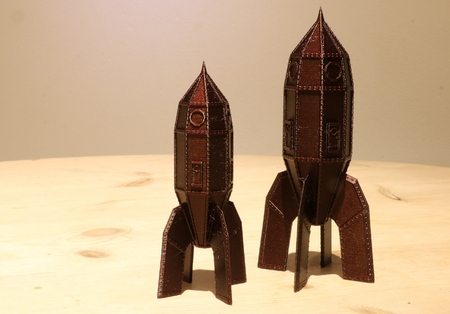
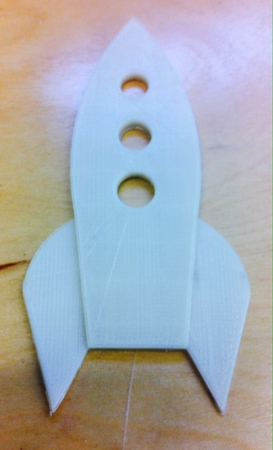
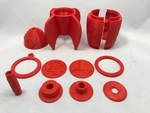
There are many printing options; single or dual extrusion, windows or no windows, unique part colors, etc. All models require the spool parts. The remaining parts are only printed for the configuration you choose. For example, printing the nose with windows but the body without windows, or the nose without windows and the body with windows, no windows at all, etc.
Prior to assembly, test fit and trim, file, sand, etc. all parts as necessary for smooth movement of moving surfaces, and tight fit for non moving surfaces. Depending on the colors you chose and your printer settings, more or less trimming, filing and/or sanding may be required. Carefully file all edges that contacted the build plate to make absolutely sure that all build plate "ooze" is removed and that all edges are smooth. I used a flat jewelers file and plenty of patience to perform this step.
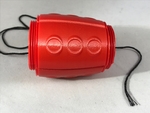
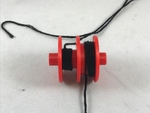
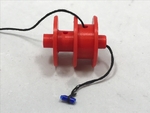
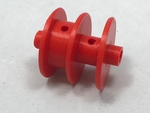
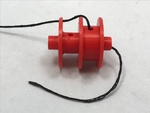
2) Assemble and Wind the Spool.
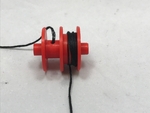
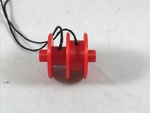
Begin the spool assembly by pressing "Spool Part 2.stl" onto "Spool Axle.stl" into position as shown. Make sure the hole in the spool aligns with the hole in the axle. This is the start of the spool assembly.
Press "Spool Part 1.stl" onto the spool assembly into position as shown, again checking the hole alignments.
Press "Spool Part 3.stl" onto the spool assembly into position as shown.
Make sure all spool parts are tight on the axle. If not, secure with a dot of cyanoacrylate glue.
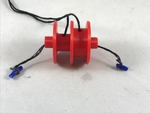
Cut two pieces of string, each 28" in length.
Thread one end of the first string into the holes in "Spool Part 2.stl" and "Spool Axle.stl" then out the end of "Spool Axle.stl" closest to "Spool Part 2.stl" as shown. Next, tie the string onto a short length (10mm) of filament, toothpick, etc. (this will keep the string from pulling out of the spool assembly), and secure it in the middle of the piece with a small dot of glue as shown. Repeat this process with the second string for "Spool Part 1.stl", then tuck both pieces fully into their respecting axle ends.
Wind the first string around "Spool Part 2.stl" leaving about 4" remaining.
Wind the second string around "Spool Part 1.stl" in the opposite direction of the first string (this is very important), leaving about 10" of string remaining.
This completes the spool assembly.
3) Assemble the Body.
Place the spool assembly into one of the body halves with the 4" length of string from the large spool towards the smaller threads of the body half, and the 10" length of string from the small spool towards the larger threads of the body half as shown.
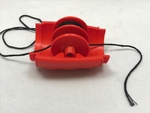
Place the second body half into position onto the first body half as shown.
Thread the 4" length of string from the large spool through the hole in the tail, carefully align the two body halves, then thread the tail into position as shown.
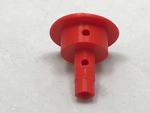
Thread the 10" length of string from the small spool through the hole in the nose, then thread the nose into position as shown.
4) Assemble the Earth Ring.
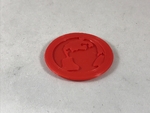
Place one of the earth hemispheres into "Earth Ring Male.stl" as shown.
Place the second of the earth hemisphere into "Earth Ring Male.stl" on the opposite side as shown.
Thread this assembly into "Earth Ring Female.stl".
This is the earth ring assembly.
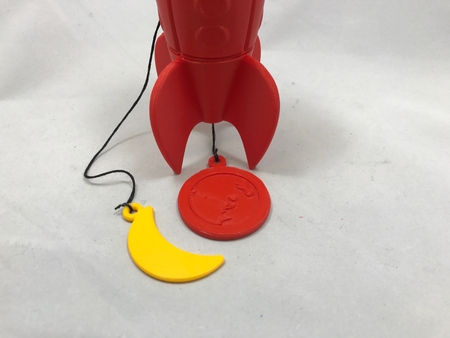
5) Attach the Earth Ring and Moon.
Tie the 4" length of string onto the earth ring assembly. I used a double knot then placed a small dot of cyanoacrylate glue on the double knot to secure it.
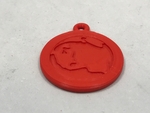
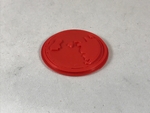
Tie the 10" length of string onto "Moon.stl". Again, a double knot and glue secures it in place.
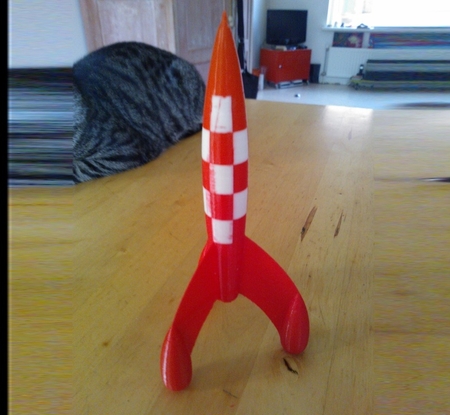
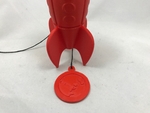
While holding the moon above the rocket, pull the earth downward and the rocket will climb the string. And as shown in the video, holding the earth below the rocket and pulling the moon upward provides the same results. To attach From the Earth to the Moon to a ceiling fan light switch chain, remove the joiner from the chain, slide the chain through the eyelet in the moon, then replace the joiner.
Congratulations, you're done!
Hope you like it!
Designer
Greg Zumwalt3d model description
A dual spool string climbing rocket toy / ceiling fan light pull chain extenderFrom the Earth to the Moon was designed as a dual function model, fir...st as a simple "string climbing" toy, and second as a ceiling fan light switch pull chain extender for my grandkids. The design incorporates a "dual spool mechanism" to produce the string climbing illusion. Toys utilizing a dual spool string climbing mechanism have been around for many years, and in my younger days I disassembled more than one of these trying to figure out the "magic" of how the toy climbed the string.
This model uses press fit assembly for the dual spool, and threaded assembly for the body. You will need to purchase some string or heavy thread that minimizes fraying and glue.
As usual, I probably forgot a file or two or who knows what else, so if you have any questions, please do not hesitate to ask as I do make mistakes in plenty.
Designed using Autodesk Fusion 360, sliced using Cura 2.3.1, and printed in PLA on an Ultimaker 2+ Extended and an Ultimaker 3 Extended.
3d model print parameters
1) Purchase, Print and Prepare the Parts.As mentioned, you will need to purchase some string or heavy thread that minimizes fraying (I used "embro...idery floss" that can be found at super centers, sewing shops, and online) and glue (I used thick cyanoacrylate, available at hobby shops and online).
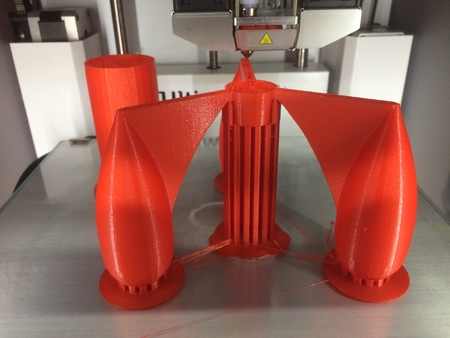
I printed all parts on an Ultimaker 2+ Extended and an Ultimaker 3 Extended at .1mm vertical resolution and 50% infill, with support for the nose, body and tail parts. I've also included ".3mf" files that are the dual extrusion pre-combined parts in the printing orientation I used. While I've positioned the body halves for vertical printing, I've successfully printed them horizontally, and both provide similar finishes (printing the body half vertically matches the print path orientation of the nose and tail parts).
There are many printing options; single or dual extrusion, windows or no windows, unique part colors, etc. All models require the spool parts. The remaining parts are only printed for the configuration you choose. For example, printing the nose with windows but the body without windows, or the nose without windows and the body with windows, no windows at all, etc.
Prior to assembly, test fit and trim, file, sand, etc. all parts as necessary for smooth movement of moving surfaces, and tight fit for non moving surfaces. Depending on the colors you chose and your printer settings, more or less trimming, filing and/or sanding may be required. Carefully file all edges that contacted the build plate to make absolutely sure that all build plate "ooze" is removed and that all edges are smooth. I used a flat jewelers file and plenty of patience to perform this step.
2) Assemble and Wind the Spool.
Begin the spool assembly by pressing "Spool Part 2.stl" onto "Spool Axle.stl" into position as shown. Make sure the hole in the spool aligns with the hole in the axle. This is the start of the spool assembly.
Press "Spool Part 1.stl" onto the spool assembly into position as shown, again checking the hole alignments.
Press "Spool Part 3.stl" onto the spool assembly into position as shown.
Make sure all spool parts are tight on the axle. If not, secure with a dot of cyanoacrylate glue.
Cut two pieces of string, each 28" in length.
Thread one end of the first string into the holes in "Spool Part 2.stl" and "Spool Axle.stl" then out the end of "Spool Axle.stl" closest to "Spool Part 2.stl" as shown. Next, tie the string onto a short length (10mm) of filament, toothpick, etc. (this will keep the string from pulling out of the spool assembly), and secure it in the middle of the piece with a small dot of glue as shown. Repeat this process with the second string for "Spool Part 1.stl", then tuck both pieces fully into their respecting axle ends.
Wind the first string around "Spool Part 2.stl" leaving about 4" remaining.
Wind the second string around "Spool Part 1.stl" in the opposite direction of the first string (this is very important), leaving about 10" of string remaining.
This completes the spool assembly.
3) Assemble the Body.
Place the spool assembly into one of the body halves with the 4" length of string from the large spool towards the smaller threads of the body half, and the 10" length of string from the small spool towards the larger threads of the body half as shown.
Place the second body half into position onto the first body half as shown.
Thread the 4" length of string from the large spool through the hole in the tail, carefully align the two body halves, then thread the tail into position as shown.
Thread the 10" length of string from the small spool through the hole in the nose, then thread the nose into position as shown.
4) Assemble the Earth Ring.
Place one of the earth hemispheres into "Earth Ring Male.stl" as shown.
Place the second of the earth hemisphere into "Earth Ring Male.stl" on the opposite side as shown.
Thread this assembly into "Earth Ring Female.stl".
This is the earth ring assembly.
5) Attach the Earth Ring and Moon.
Tie the 4" length of string onto the earth ring assembly. I used a double knot then placed a small dot of cyanoacrylate glue on the double knot to secure it.
Tie the 10" length of string onto "Moon.stl". Again, a double knot and glue secures it in place.
While holding the moon above the rocket, pull the earth downward and the rocket will climb the string. And as shown in the video, holding the earth below the rocket and pulling the moon upward provides the same results. To attach From the Earth to the Moon to a ceiling fan light switch chain, remove the joiner from the chain, slide the chain through the eyelet in the moon, then replace the joiner.
Congratulations, you're done!
Hope you like it!