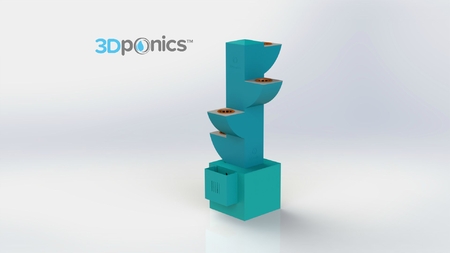
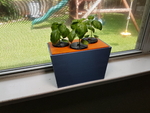
Hydroponic planter box (dwc all-in-one) 3D for print

5868 Views 1 Likes 0 Downloads Download the piece here from 3dforprint
Summary:
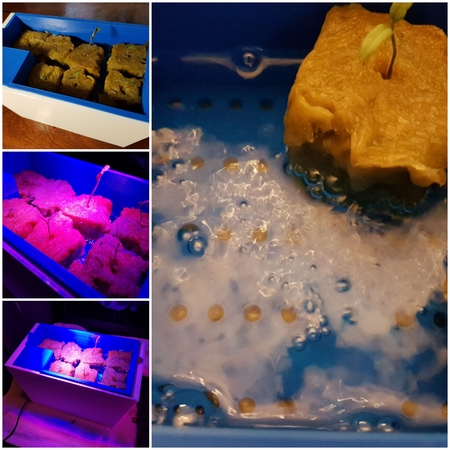
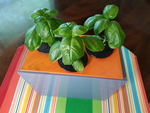
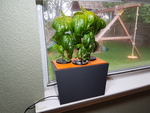
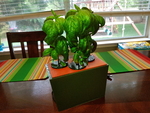
Hydroponics i...s a hobby of mine and I created this DWC planter box for something fun and educational to enjoy with my son during lockdown. Its intended for use with the mini-pump mentioned below and will still work at 90% scale to fit on Rep2 style printers. This system is far from perfect, but it works well enough to grow lettuce and herbs and maybe more. The variety of lids, baskets and netpots make this an all-in-one solution that can sprout seeds and take them all the way to adult plants. The propagator lid is also a great for cloning. Please post your makes, especially if you get some nice plants!
Disclosure:
The amazon links below are through my affiliate account. I’m hoping to make a small commission if you buy anything through my links.
Required Materials:
Pump -
https://amzn.to/2XHt43a
Non-Toxic Epoxy -
https://amzn.to/3djBog3
Better Air Stone -
https://amzn.to/2MfRUBO
Rockwool Starter Plugs -
https://amzn.to/2XhoQQP
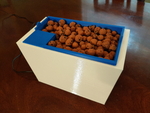
Hydroton Clay Pebbles -
https://amzn.to/36KCW...gz
PH Control Kit -
https://amzn.to/2XMGx9U
Fertilizer -
https://amzn.to/3gCImPs
UV Sterilizer -
https://amzn.to/3gCImPs
LED Grow Light -
https://amzn.to/3ck5ZsK
Instructions:
Print one planter box base.
o Use 2 or 3 perimeter shells.
o Don’t worry about using a lot of infill because you’ll be sealing the box later.
o I recommend using a brim because the print time on this box is around 26 hours.
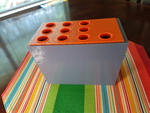
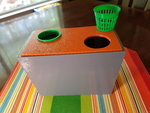
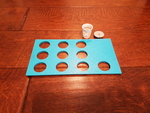
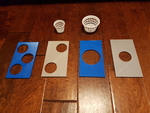
Print a lid and however many (matching) netpots you need.
o Germination tray and seedling basket don’t need lids.
o If you’re starting from seeds or seedlings, I recommend the propagator lid and 10 small propagator netpots.
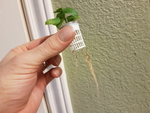
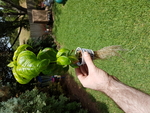
Fill your netpots with media, or print ‘plugs’ and ‘caps’ for the netpots like I have in the photos.
o Plugs and caps should be printed in NinjaFlex or TPU.
o Some kind of media is recommended for anything larger than the tiny propagator netpots.
Apply at least 2 coats of a non-toxic epoxy like Art Resin to the inside of the planter box.
o This is to seal it. It probably won’t hold water without this step.
o Coating the lid will make it easier to clean.
Give the epoxy a full 72 hours to cure.
o Curing in a warmer place will reduce the off gassing faster.
o If you use the planter box before the epoxy is fully cured, it may hurt your plants.
Fill the planter box with water.
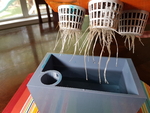
o If using the propagator lid (small plants) fill the water until it touches the bottom of the netpots.
o But once you have roots coming down, keep the water level lower. You want the bottom of the roots in water, but the top of your root systems in air.
Drop in the air pump and stone and you’re all ready to go.
Growing Tips:
Use good water! If you need to use tap water, consider the UV sterilizer mentioned in the materials list. You can fill a 5-gallon bucket with water, drop in the sterilizer and let it recirculate for a couple of days. This will clean it and give time for the chlorine to evaporate.
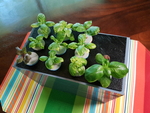
‘Top off’ your water regularly and clean the planter box every 2-3 weeks. Expect herb plants to take about 30 days to mature with good light and nutrients.
Plants need light and darkness both. If your growing indoors with artificial light, your plant leaves may curl upwards if they’re getting too much light.
If your young plants are yellow, they may be getting too much water.
If adolescent or adult plants are yellow, they may need fertilizer.
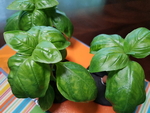
Research the PH and PPM recommendations for your specific plants. I try to keep my PH around 6 for basil plants, but if I have both basil and cilantro, I target 6.5.
Keep an eye on your water’s PH. It will rise over time as your plants consume nutrients.
Research the best nutrients for your plants. The fertilizer in my list a general option with even NPK distribution. It should work for plants that aren’t picky, like lettuce and basil, but your plants may benefit from a different mix.
Designer
John Bishop3d model description
Print your own hydroponics system. This all-in-one DWC solution can sprout seeds and take them all the way to adult plants.Summary:
Hydroponics i...s a hobby of mine and I created this DWC planter box for something fun and educational to enjoy with my son during lockdown. Its intended for use with the mini-pump mentioned below and will still work at 90% scale to fit on Rep2 style printers. This system is far from perfect, but it works well enough to grow lettuce and herbs and maybe more. The variety of lids, baskets and netpots make this an all-in-one solution that can sprout seeds and take them all the way to adult plants. The propagator lid is also a great for cloning. Please post your makes, especially if you get some nice plants!
Disclosure:
The amazon links below are through my affiliate account. I’m hoping to make a small commission if you buy anything through my links.
Required Materials:
Pump -
https://amzn.to/2XHt43a
Non-Toxic Epoxy -
https://amzn.to/3djBog3
3d model print parameters
Better Air Stone -
https://amzn.to/2MfRUBO
Rockwool Starter Plugs -
https://amzn.to/2XhoQQP
Hydroton Clay Pebbles -
https://amzn.to/36KCW...gz
PH Control Kit -
https://amzn.to/2XMGx9U
Fertilizer -
https://amzn.to/3gCImPs
UV Sterilizer -
https://amzn.to/3gCImPs
LED Grow Light -
https://amzn.to/3ck5ZsK
Instructions:
Print one planter box base.
o Use 2 or 3 perimeter shells.
o Don’t worry about using a lot of infill because you’ll be sealing the box later.
o I recommend using a brim because the print time on this box is around 26 hours.
Print a lid and however many (matching) netpots you need.
o Germination tray and seedling basket don’t need lids.
o If you’re starting from seeds or seedlings, I recommend the propagator lid and 10 small propagator netpots.
Fill your netpots with media, or print ‘plugs’ and ‘caps’ for the netpots like I have in the photos.
o Plugs and caps should be printed in NinjaFlex or TPU.
o Some kind of media is recommended for anything larger than the tiny propagator netpots.
Apply at least 2 coats of a non-toxic epoxy like Art Resin to the inside of the planter box.
o This is to seal it. It probably won’t hold water without this step.
o Coating the lid will make it easier to clean.
Give the epoxy a full 72 hours to cure.
o Curing in a warmer place will reduce the off gassing faster.
o If you use the planter box before the epoxy is fully cured, it may hurt your plants.
Fill the planter box with water.
o If using the propagator lid (small plants) fill the water until it touches the bottom of the netpots.
o But once you have roots coming down, keep the water level lower. You want the bottom of the roots in water, but the top of your root systems in air.
Drop in the air pump and stone and you’re all ready to go.
Growing Tips:
Use good water! If you need to use tap water, consider the UV sterilizer mentioned in the materials list. You can fill a 5-gallon bucket with water, drop in the sterilizer and let it recirculate for a couple of days. This will clean it and give time for the chlorine to evaporate.
‘Top off’ your water regularly and clean the planter box every 2-3 weeks. Expect herb plants to take about 30 days to mature with good light and nutrients.
Plants need light and darkness both. If your growing indoors with artificial light, your plant leaves may curl upwards if they’re getting too much light.
If your young plants are yellow, they may be getting too much water.
If adolescent or adult plants are yellow, they may need fertilizer.
Research the PH and PPM recommendations for your specific plants. I try to keep my PH around 6 for basil plants, but if I have both basil and cilantro, I target 6.5.
Keep an eye on your water’s PH. It will rise over time as your plants consume nutrients.
Research the best nutrients for your plants. The fertilizer in my list a general option with even NPK distribution. It should work for plants that aren’t picky, like lettuce and basil, but your plants may benefit from a different mix.