Abs slurry puck/mallet 3D for print

728 Views 0 Likes 0 Downloads Download
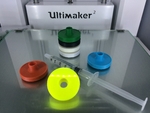
Inspired by Ultimaker forum member Solid Print 3D's post about acetone & ABS slurry pucks, I modeled up one based on the air hockey "mallets" you hold while playing. They are 35mm wide across the base and have thin walls around the stem to hold onto. Print it with 100% fill as you want the base to have the most surface area when swirling the acetone around. The bottom hole is slightly larger than the top post, allowing them to stack onto one another. They also have an 8mm hole through the center for stacking onto an 8mm bolt. In hindsight, I suppose making the base 6mm tall was a bit overkill. So little of the ABS is deposited onto the glass per use that these should last a very long time.
Rather than use a spoon to get the acetone onto the glass, I keep a syringe full sitting close by at all times. Depositing the acetone this way minimizes the day to day acetone fumes. In fact, Whereas I obviously smell the acetone whenever I load up a syringe (maybe once every 5 days, depending on use), I never smell the acetone when using the syringe to deposit drops onto the glass. The amount of acetone to use on the glass depends on the bottom area of the print. You want to make it wet so the mallet slides around, not create a lake. For printing these mallets, for example, I used 4 drops of acetone each. Swirl the mallet around for a few seconds, not pressing too hard. Stop as soon as the slurry starts to gum up a bit. You want a thin layer of ABS/acetone left behind where the color is barely noticeable. If you have clumps, you've swirled too long or used too much acetone. Scrape it off with a razor blade and try again. Since you will be using the same color ABS mallet as you will be printing, your print will have NO swirl marks and a perfect, mirror finish.
Note: Cool use of acetone in the syringe. I have been trying my hand at creating my own support areas in Solidworks vs. using Cura's lines, which always tip over for me after a cm or two. I had three supports, approximately 80mm long by 1.2mm wide, that fanned out to around 12mm wide at the top via 45 degree angle. I didn't think I needed a wide base, that the length and initial width would keep the supports upright. I was wrong. When all three tipped over, I paused the printer, pulled them out and dribbled some acetone down the bottom edge and pressed them back into place. Since the bed was 104c, the acetone instantly boiled and vaporized, but left my supports successfully glued back to the glass! :) For one other small support end that popped up, I simply squirted the acetone down between the cracks in my print to boil around the base as I gently pressed down from above and that worked instantly as well. I'm going to redesign the long supports to have a wider base, but knowing I can pause and re-attach something to the glass if needed is a good feeling!
Designer
Randy Walker3d model description
An easy, clean way to spread acetone around the heated build plate glass to make ABS prints stick better. Print up one for each roll/color of ABS fila...ment you use.Inspired by Ultimaker forum member Solid Print 3D's post about acetone & ABS slurry pucks, I modeled up one based on the air hockey "mallets" you hold while playing. They are 35mm wide across the base and have thin walls around the stem to hold onto. Print it with 100% fill as you want the base to have the most surface area when swirling the acetone around. The bottom hole is slightly larger than the top post, allowing them to stack onto one another. They also have an 8mm hole through the center for stacking onto an 8mm bolt. In hindsight, I suppose making the base 6mm tall was a bit overkill. So little of the ABS is deposited onto the glass per use that these should last a very long time.
Rather than use a spoon to get the acetone onto the glass, I keep a syringe full sitting close by at all times. Depositing the acetone this way minimizes the day to day acetone fumes. In fact, Whereas I obviously smell the acetone whenever I load up a syringe (maybe once every 5 days, depending on use), I never smell the acetone when using the syringe to deposit drops onto the glass. The amount of acetone to use on the glass depends on the bottom area of the print. You want to make it wet so the mallet slides around, not create a lake. For printing these mallets, for example, I used 4 drops of acetone each. Swirl the mallet around for a few seconds, not pressing too hard. Stop as soon as the slurry starts to gum up a bit. You want a thin layer of ABS/acetone left behind where the color is barely noticeable. If you have clumps, you've swirled too long or used too much acetone. Scrape it off with a razor blade and try again. Since you will be using the same color ABS mallet as you will be printing, your print will have NO swirl marks and a perfect, mirror finish.
Note: Cool use of acetone in the syringe. I have been trying my hand at creating my own support areas in Solidworks vs. using Cura's lines, which always tip over for me after a cm or two. I had three supports, approximately 80mm long by 1.2mm wide, that fanned out to around 12mm wide at the top via 45 degree angle. I didn't think I needed a wide base, that the length and initial width would keep the supports upright. I was wrong. When all three tipped over, I paused the printer, pulled them out and dribbled some acetone down the bottom edge and pressed them back into place. Since the bed was 104c, the acetone instantly boiled and vaporized, but left my supports successfully glued back to the glass! :) For one other small support end that popped up, I simply squirted the acetone down between the cracks in my print to boil around the base as I gently pressed down from above and that worked instantly as well. I'm going to redesign the long supports to have a wider base, but knowing I can pause and re-attach something to the glass if needed is a good feeling!