warbotron/machine boy vortex to idw rotorstorm kit 3D for print


1319 Views 2 Likes 1 Downloads Download
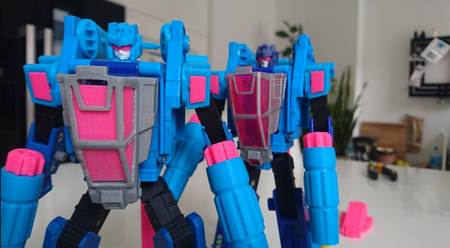
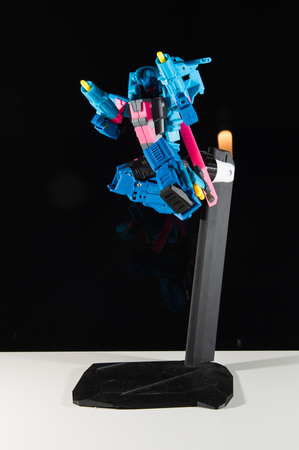
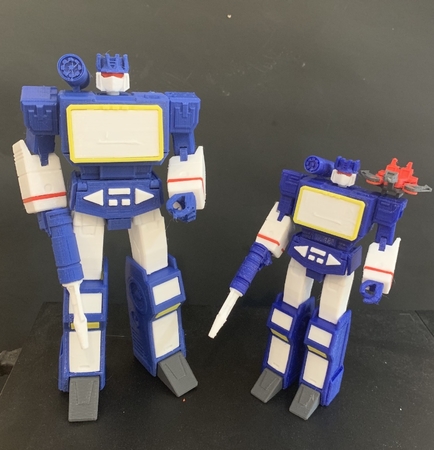
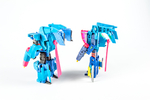
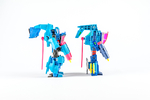
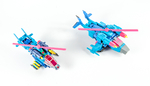
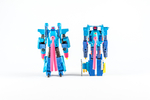
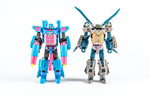
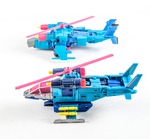
This kit is designed to convert Your Warbotron/Machine ...Boy Vortex to a IDW styled Rotorstorm.
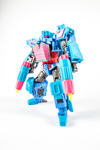
I have changed transformation schematics (waist rotated 180 degrees to allow for an up-sweep of tail) plus some fiddling with arms. take a look a the pictures and You'll figure it out.
Thanks to my good friend Marcin Starzomski here
https://www.facebook.com/Printformers/?fref=ts
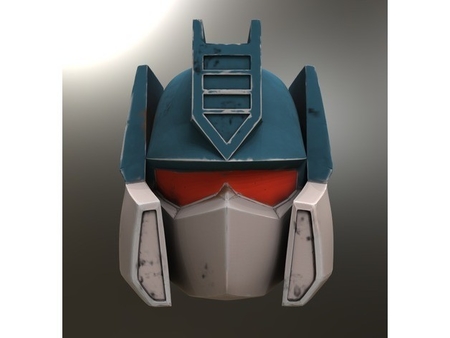
we have a great Rotorstorm head!
it has been slightly redesigned to fit inside during transformation, You just need to rotate it 180 degrees to face his back before transforming.
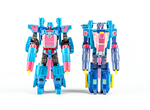
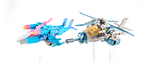
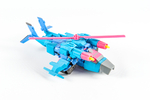
The tail transforms without detaching into the configuration shown in the pictures, the fins rotate 360 so the proper configuration can be reached without partsforming.
please be careful when installing the shoulder axle, I had mine printed slightly too tight and it snapped leaving half of it inside the socket. I STRONGLY SUGGEST TO PRINT THE AXLE IN HORIZONTAL POSITION, this way it will be much less prone to snapping in the worse possible way (when you print it vertically the circular layers will just snap off and will stay inside the body forcing you to drill them out, it's a pain, believe me)
the nose section will fit inside the back of the figure (under the flap), the hole in front is intended to house the original L-shaped connector (you need to remove it from the original nose/gun section). the long connecting rod that goes through it (and connects the front section that follows the nose) can be stored inside the body of the figure, underneath the nose section.
in order to remove the old canopy You need to knock the pin out with a small screwdriver and a hammer, then fit the canopy and squeeze the pin in with pliers.
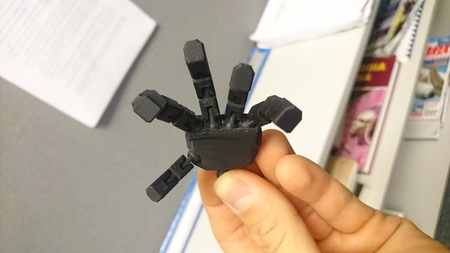
the two mushroom shaped cylinders go into holes in the arms and are used to store the split nose section in bot mode, and the wings in heli mode.
the smallest cylinder is intended to be installed on the back of the...butt, in one of the screw holes. it will prevent the helicopter from tipping back constantly. i ran out of energy before getting to landing gear, sorry :D
You have feet that nicely replace the originals. you need to play with them when transforming to get them out of the way of the tail. Warning - please mind the original balljoint pegs of the feet - if you print the feet in a way that te sockets will bee too tight You are very likely to brake the pegs, as did I.
the knee cover fronts are to be detached and swapped during transformation, this way they will cover the back of the guns in alt mode and will also nicely continue the side line of the chopper.
you have to detach the back caps of the guns for transformation. there is no good place to store them - You can mount them on top in the gun holes in the flap, or underneath the wings in his hands.
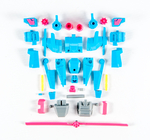
all the files have been printed a couple of times now and are good to go, depending on your printers resolution and calibrations you will have to put some time in making the holes round and the tolerances sit, otherwise the prints will crack and get stress marks.
any questions please ask. i can write an assembly manual if required.
Ps - you need two shoulder connectors 01, two shoulder axles (please be very careful with those!), two rotor blades (obviously;), two feet, two arm connectors and two gun sets.
the project is free but it would be nice if you gave some appreciation and contributed so i can keep wasting my time on doing cool stuff like that ;) if you want to contribute please pm me or go to paypal.me/PiotrSidoruk
thanks and enjoy!
Designer
PIOTR SIDORUK3d model description
This kit is designed to convert Your Warbotron/Machine Boy Vortex to a IDW styled Rotorstorm.This kit is designed to convert Your Warbotron/Machine ...Boy Vortex to a IDW styled Rotorstorm.
I have changed transformation schematics (waist rotated 180 degrees to allow for an up-sweep of tail) plus some fiddling with arms. take a look a the pictures and You'll figure it out.
Thanks to my good friend Marcin Starzomski here
https://www.facebook.com/Printformers/?fref=ts
we have a great Rotorstorm head!
it has been slightly redesigned to fit inside during transformation, You just need to rotate it 180 degrees to face his back before transforming.
The tail transforms without detaching into the configuration shown in the pictures, the fins rotate 360 so the proper configuration can be reached without partsforming.
please be careful when installing the shoulder axle, I had mine printed slightly too tight and it snapped leaving half of it inside the socket. I STRONGLY SUGGEST TO PRINT THE AXLE IN HORIZONTAL POSITION, this way it will be much less prone to snapping in the worse possible way (when you print it vertically the circular layers will just snap off and will stay inside the body forcing you to drill them out, it's a pain, believe me)
the nose section will fit inside the back of the figure (under the flap), the hole in front is intended to house the original L-shaped connector (you need to remove it from the original nose/gun section). the long connecting rod that goes through it (and connects the front section that follows the nose) can be stored inside the body of the figure, underneath the nose section.
in order to remove the old canopy You need to knock the pin out with a small screwdriver and a hammer, then fit the canopy and squeeze the pin in with pliers.
the two mushroom shaped cylinders go into holes in the arms and are used to store the split nose section in bot mode, and the wings in heli mode.
the smallest cylinder is intended to be installed on the back of the...butt, in one of the screw holes. it will prevent the helicopter from tipping back constantly. i ran out of energy before getting to landing gear, sorry :D
You have feet that nicely replace the originals. you need to play with them when transforming to get them out of the way of the tail. Warning - please mind the original balljoint pegs of the feet - if you print the feet in a way that te sockets will bee too tight You are very likely to brake the pegs, as did I.
the knee cover fronts are to be detached and swapped during transformation, this way they will cover the back of the guns in alt mode and will also nicely continue the side line of the chopper.
you have to detach the back caps of the guns for transformation. there is no good place to store them - You can mount them on top in the gun holes in the flap, or underneath the wings in his hands.
all the files have been printed a couple of times now and are good to go, depending on your printers resolution and calibrations you will have to put some time in making the holes round and the tolerances sit, otherwise the prints will crack and get stress marks.
any questions please ask. i can write an assembly manual if required.
Ps - you need two shoulder connectors 01, two shoulder axles (please be very careful with those!), two rotor blades (obviously;), two feet, two arm connectors and two gun sets.
the project is free but it would be nice if you gave some appreciation and contributed so i can keep wasting my time on doing cool stuff like that ;) if you want to contribute please pm me or go to paypal.me/PiotrSidoruk
thanks and enjoy!