Intelligrill®, powered by feather. 3D for print


899 Views 0 Likes 0 Downloads Download
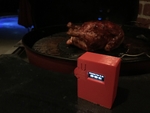
"Intelligrill®, Powered by Feather" is a wifi enabled remote ...grill, smoker and oven thermometer with the added feature of providing real time updates of when the "main course" will be ready to serve. By constantly monitoring the change in food temperature over time, "Intelligrill®, Powered by Feather" provides you with a very reasonable estimate of the time remaining to when your main course is ready to be moved from the grill, smoker or oven to your table. You simply specify the temperature you desire, and Intelligrill will keep you constantly informed of the cooking progress and time remaining via the Intelligrill OLED display and via a wifi connected web browser of your choice.
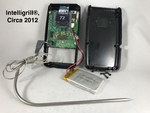
I designed the first Intelligrill in 2012 using a PIC24FJ64GB002 processor, a Roving Networks wifi module, an Adafruit 128 by 64 oled module, and around 20 additional components (see the photo "Intelligrill®, Circa 2012"). It was designed for my wife, who as soon as the main course (say a whole chicken, whole turkey, pork roast or shoulder, etc.) was placed in the grill, smoker or oven, would immediately ask "when will it be ready?" Intelligrill kept her updated, via an iOS application I wrote, by constantly displaying the time remaining until, and the time of day that, the main course would be table ready. We've used Intelligrill hundreds of times since Intelligrill was born with great results (e.g. the wife was happy, very happy). But unfortunately, after years of problem free iOS upgrades on our iPhone and iPad devices, the App Store announced that the newest release of iOS would break my iOS Intelligrill application, so they removed it from the App Store.
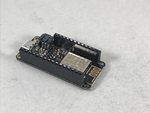
Decision time: update the Intelligrill iOS app, or find an alternative. So while searching for an alternative to iOS (that was easy), I came across a remarkable little board, the Adafruit Feather Huzza ESP8266. This board had everything I required for a new Intelligrill; a decent processor, a lithium ion battery port with charger, wifi, analog input, plus the ability to easily attach an oled display. So I ordered the Feather Huzza ESP8266 and an oled board, gathered some parts, ported the original Intelligrill iOS software into the Arduino IDE, wrote additional software to welcome the Intelligrill to it's new home, took a crash course in HTML / Javascript / JSON programming then wrote the client side software, designed and 3D printed a case, and finally after a very long week "Intelligrill®, Powered by Feather" was born.
"Intelligrill®, Powered by Feather" is programmed in C/C++, HTML, Javascript and JSON, which means it will communicate remotely with most any wifi enabled device having a web browser (e.g. no more App Store, no more iOS update induced failures). Intelligrill can be used as a simple wired digital thermometer, as a wireless digital thermometer (when using the Intelligrill access point), and as a long distance wireless digital thermometer (when used with a wifi router).
You will need soldering skills and soldering equipment, wire, and all parts listed in the first step, plus an Arduino IDE with appropriate Adafruit libraries installed, to assemble and program Intelligrill.
Please note that Intelligrill is copyrighted and is a registered trademark of Zumwalt Properties, LLC. However, I've included all Intelligrill source code and the Autodesk Fusion 360 design file in the upload, so feel free to modify Intelligrill for your own personal, non-commercial use. And please publish your results as I would truly enjoy seeing a much better Intelligrill presentation than mine!
Having little to no HTML / Javascript / JSON experience, I depended heavily on the tutorials from w3schools.com (a great resource), the ESP8266 data sheets, and the wonderful tutorials, data and examples at Adafruit.com. If you have questions or comments about Intelligrill, please feel free to comment or message and I will do my best to answer them.
And as usual, I probably forgot a file or two or who knows what else, so if you have any questions, please do not hesitate to ask as I do make mistakes in plenty.
The electronic circuitry was designed using pencil, paper and a calculator (who knew that still worked?).
The software was designed using Arduino IDE version 1.8.5. Note that this is my first experience with HTML, Javascript and JSON programming, so please be gentle in the comments.
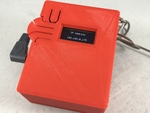
And finally the case was designed using Autodesk Fusion 360, sliced using Cura 2.7.0, and printed in PLA on an Ultimaker 3 Extended.
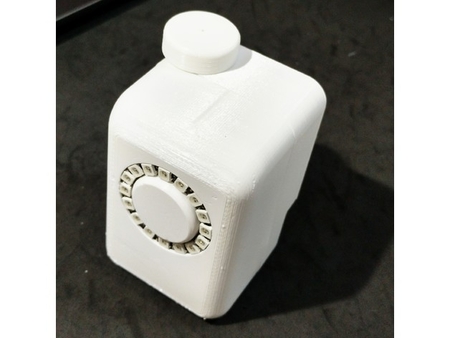
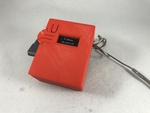
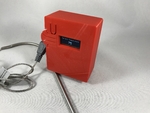
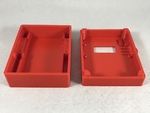
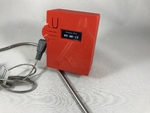
If you wish to place your completed Intelligrill in a case, I've included a two part case, "Case Bottom.stl" and "C...ase Top.stl". I printed my case parts in red PLA with a .1mm layer height and 100% infill. The four buttons used in this design (reset, A, B and C) for local control of Intelligrill are the tightly spaced buttons on the oled display. The case design attempts to extend the distance between these buttons, and 100% infill increases the rigidity required to do so. Also, the case is designed for friction fit assembly to avoid metallic screws interfering with the "no go" zones of the wifi antennae.
You will also need one each of the following parts:
1) Adafruit "Feather Huzzah ESP8266" (available from Adafruit, Mouser and other sources).
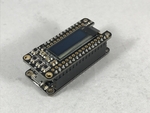
2) Adafruit "Featherwing OLED - 128x32 OLED Add-on For All Feather Boards" (available from Adafruit, Mouser and other sources).
3) Maverick ET-72 Temperature Probe (available on line).
4) 2.5mm audio connector, panel mount (Mouser 693-4831.2300 or equivalent).
5) 22k ohm 1% 1/8 watt resistor (available on line).
6) 680 ohm 1% 1/8 watt resistor (available on line).
7) 1VDC reference source (available from Mouser, Analog Devices ADR510).
8) 3.7VDC 1300mA lithium battery (available from Adafruit).
2) Assemble and Program the Feather.
I followed the wonderful Adafruit tutorials for assembly of the feather ESP8266 and oled display modules. Since I was going to place my Intelligrill in a case, I used the socket female headers on the feather ESP8266 (short pins, not the long pins required for breadboarding).
With the connectors installed on both modules, plug the oled module onto the ESP8266 module.
Plug this assembly into your computer using a usb to micro usb cable.
The file "IntelligrillFeatherServer.zip" contains the Arduino sketch source code that creates Intelligrill. Unzip this file, then load, compile and download the sketch to the assembled feather using the Arduino IDE. The following message should appear on the Arduino IDE serial monitor:
Intelligrill ® Feather Copyright 2017 by Zumwalt Properties, LLC. All Rights Reserved
Intelligrill data recovered from storage: rtcRead : crc fail.
Intelligrill data recovery from storage FAILED.
Intelligrill ssid : Intelligrill
Intelligrill password : Intelligrill
The "Intelligrill data recovered from storage: rtcRead : crc fail." and "Intelligrill data recovery from storage FAILED." messages are normal. This is because the Intelligrill data does not yet exist and will be created in a following step.
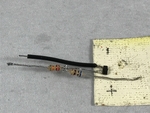
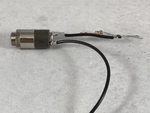
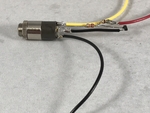
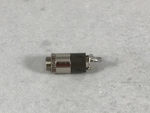
3) Assemble the Temperature Probe Connector.
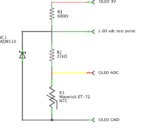
The feather ESP8266 analog input is limited to a range of 0 through 1VDC, yet the feather ESP8266 has no externally available 1VDC reference, only regulated 3.3VDC. Thus the temperature probe circuit must use the regulated 3.3VDC for power, and reduce the temperature probe range from 0 through 3.3VDC to 0 through 1.0VDC. And since the temperature probe used in this design is resistive, a resistor divider alone would not provide the accuracy I was looking for, so I chose to use a 1VDC reference IC that I had in my parts bin (this part remains readily available).
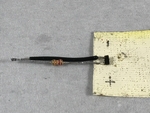
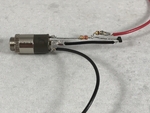
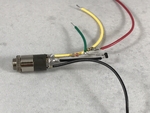
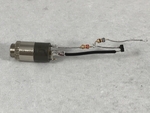
The included schematic represents the circuit to be assembled. Designing a printed circuit board for only 3 components seemed a bit too much, so I decided to simply solder the components directly to the temperature probe connector itself.
As can be seen in the photo, the reference IC is small; very, very small. In order solder it, begin by placing the IC upside down on a piece of double sided tape, then stick the tape to your workbench and proceed as follows.
Solder a 1" piece of 22 gauge black insulated wire to the "-" pin of the IC as shown.
Cut the leads of the 22k ohm resistor (save one) such that its total length is slightly (1/8") longer that of the black wire, then solder one end to the "+" pin of the IC as shown.
Cut the leads of the 680 ohm resister to 1/2". Solder one end of this resistor to the 22k ohm resistor, then bend it 90 degrees as shown.
Solder the length of resistor lead saved from the 22k ohm resistor between the RING and SHIELD pins of the temperature probe connector as shown.
Solder the free end of the 22k ohm resister to the TIP pin of the temperature probe connector, then solder the free end of the black wire to the SHIELD pin of the temperature probe connector as shown.
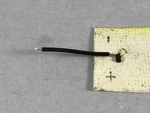
Solder a 3" piece of 22 gauge black insulated wire to the RING pin of the temperature probe connector as shown.
Solder a 3" piece of 22 gauge red insulated wire to the free end of the 680 ohm resistor as shown.
Solder a 3" piece of 22 gauge yellow insulated wire to the TIP pin of the temperature probe connector as shown.
Finally, solder a 3" piece of 22 gauge green insulated wire to the solder joint between the 22k ohm resistor and the 680 ohm resistor as shown.
Test the temperature probe connector assembly by using a 3.3vdc power source. Attach the free end of the black wire to the power source ground, and the free end of the red wire to the power source 3.3vdc. Read the voltage between ground and the green wire. It should be 1.0vdc. If not, carefully examine the assembly and correct any errors. When the temperature probe connector assembly passes the test, remove the green wire then carefully insulate the temperature probe connector assembly components with electrical tape and / or heat shrink tubing.
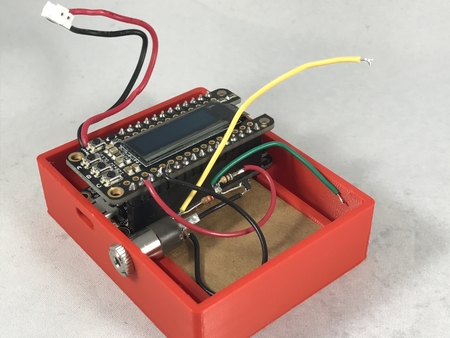
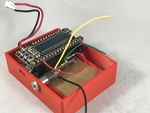
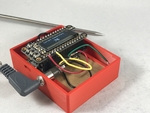
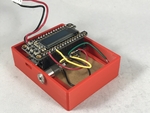
4) Assemble Intelligrill.
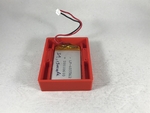
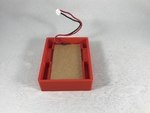
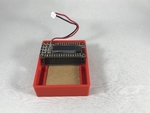
Place the battery in the case bottom as shown.
Place an insulating material (such as cardboard) on top of the battery as shown.
Press the feather assembly into position as shown, making sure the holes in the feather ESP8266 align with the holes in the case bottom and the micro usb connector on the feather ESP8266 aligns with the hole in the side of the case bottom.
Install the assembled temperature probe connector into the side of the case bottom as shown.
Carefully solder the free end of the red wire from the temperature probe connector assembly to the oled 3V pin as shown.
Carefully solder the free end of the black wire from the temperature probe connector assembly to the oled GND pin as shown.
Carefully solder the free end of the yellow wire from the temperature probe connector assembly to the oled AD0 pin as shown.
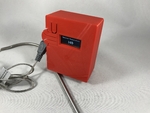
Plug the temperature probe into the temperature probe connector.
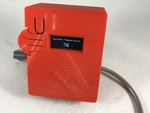
Plug the Intelligrill into a usb power supply source using a usb to micro usb cable or if your lithium battery is charged, plug it into the feather ESP8266 battery port. The Intelligrill should cycle through the title and copyright screens, then end on the "IP Address" display. Press button "C" once to change to the "Current Temperature" display. The current temperature should be the current temperature of the environment in which Intelligrill is located. If it is not, remove power immediately and recheck the connector assembly and wiring.
5) Prepare Intelligrill for Use.
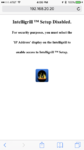
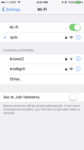
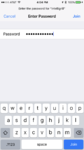
With the settings I have provided in the Intelligrill software, after the first start up, Intelligrill attempts to connect to a wifi network with an ssid "your_ssid" and password "Intelligrill". At the same time, Intelligrill also creates an "access point" network with the ssid "Intelligrill" and password "Intelligrill". In order to provide Intellgrill with access to your wifi network, you will need to connect to the Intelligrill access point network to alter the Intelligrill wifi settings for your wifi network. The steps involved in doing so follow and require a wifi enabled device with a web browser. I've used both an iPhone and a MAC Powerbook Pro with Safari to prepare each Intelligrill for use.
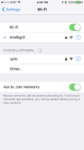
With the Intelligrill turned on and the "IP Address" page displayed on the oled, go to the wifi settings on your wifi enabled device and select the "Intelligrill" network.
When the wifi settings ask for a password for the Intelligrill network, enter "Intelligrill".
Once the network connects (this can take some time for reasons I have yet to determine), enter "192.168.20.20/setup" into the url field of the web browser on you wifi enabled device.
The Intelligrill Setup page should appear on your browser. However, if your Intelligrill was not on the "IP Address" display, a friendly reminder will appear in your web browser informing you as such. Simply select the Intelligrill "IP Address" display on the Intelligrill using the "A" or "C" buttons, then refresh the browser.
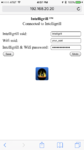
If you wish to alter the Intelligrill ssid (for example, if you will be using more than one Intelligrill at a time, they will require different ssids), enter the desired Intelligrill ssid in the "Intelligrill ssid:" box. Since I have a static IP addresses from my internet service provider, I reserve fixed IP addresses for my Intelligrills on my wifi router for each Intelligrill I use, then enable port forwarding on my wifi router and assign a unique port number for each Intelligrill, thus I set the ssid of each intelligrill to be "Intelligrill" + port number (e.g. "Intelligrill2204"). Using this method, I can monitor each Intelligrill on my wifi network from anywhere I have internet access.
Enter the ssid of your wifi router in the "Wifi ssid:" box.
Enter the password of your wifi router in the "Intelligrill & Wifi password:" box. Your wifi router password will also become the password for the "Intelligrill" access point for any future access to the Intelligrill access point.
Click "Save". If you happen to have the Arduino IDE connected and serial monitor open, you should see the "Intelligrill data written to storage:"' message followed by the Intelligrill ssid, Wifi ssid, and password you entered. This is a good thing.
Return to the wifi settings on your wifi enabled device and "forget" the Intelligrill network (since the password has now been changed, connecting to this network is no longer possible), then logon to your wifi network.
Restart Intelligrill by pressing the reset button.
On the Intelligrill display, after the title and copyright pages cycle, the "IP Address" page should now display an ip address provided by your wifi network router as anything other than "0.0.0.0". Typically, the display will show something like "192.168.X.X". where X indicates values provided by your router. And again if you happen to have the Arduino IDE connected and serial monitor open, you should see the "Intelligrill data recovered from storage:" message followed by the Intelligrill ssid, WiFi ssid, and password you entered. This is a very good thing.
Enter the ip address that appears on the Intelligrill "IP Address" display into the web browser url window , and when the Intelligrill page appears, you are cooking!
Note the ESP8266 does not provide a mechanism to write your ssids and password into flash memory via this technique. As such, Intelligrill writes these values into the ESP8266 real time clock memory. If your Intelligrill battery ever becomes fully depleted, then you will have to repeat the above setup process to restore Intelligrill access to your wifi network.
As such, I recommend putting Intelligrill in "power down" mode (press and hold button "B" until the "Good Night !" message appears) when not in use and keep it connected to a usb power source in order to keep the battery fully charged. And for long term grilling / smoking, either leave your Intelligrill plugged into mains AC via a usb power supply, or in the event your location does not have access to mains AC, simply use an external cellphone style battery extender or other usb compatible battery source with a usb to micro usb cable connected between the usb compatible power source and the micro usb port on the ESP8266.
If at any time you believe the settings process has become hoplessly lost, remove both the usb and battery connections to completely power down the Intelligrill, wait a minute or so, then recconect power and repeat the setup process from the beginning.
6) Using Intelligrill.
Using Intelligrill is quite simple.
Light the grill, start the smoker, or turn on the oven.
Plug the temperature probe into the Intelligrill temperature probe connector.
Insert the temperature probe into the deepest location in the food item you will be grilling, smoking or baking. Positioning of the probe is very important for accurate readings, so make sure it does not touch a bone, or enter into the cavity of poultry.
Place the food item you are grilling, smoking or baking in the grill, smoker or oven.
"Turn on" the Intelligrill by pressing the reset button.
If you are not using wifi, simply use the buttons on the Intelligrill to adjust the desired temperature, check the temperature, and watch the time to go. Cook your food item until the current temperature display matches the desired temperature display.
If you are using wifi, from you web browser, log onto your Intelligrill using the ip address provided on the Intelligrill "IP Address" page. Set the desired temperature from either the Intelligrill "Desired Temperature" display (as described below) or from the web browser range control. Cook your food item until the current temperature display matches the desired temperature display.
When finished, press and hold button "B" until the "Good Night !" display appears to "turn off" Intelligrill (this isn't a battery disconnect, it simply places Intelligrill in a "deep sleep" mode).
Plug Intelligrill into a usb power source to maintain the battery charge and thus your settings.
That's how Intelligrill found its new feather home.
Hope you like Intelligrill as much as we do!
7) Additional Intelligrill Details.
Intelligrill uses the four buttons provided on the Featherwing OLED display; "reset", "A", "B" and "C". The "reset" button resets Intelligrill. The "A", "B" an "C" buttons function as follows:
1) Button "A" is used to move to the previous page or, when editing, increases a value.
2) Button "B" is used to edit a display or power down Intelligrill as follows:
a) If you press button "B" while the "Desired Temperature" display is active, then brackets will appear which indicate you can use button "A" to increase the desired temperature and button "C" to decrease the desired temperature. When you have set the desired temperature you desire, press button "B" again to accept your selection, the brackets will disappear, and buttons "A" and "B" return to the page select function.
b) On a time display, pressing button "B" will toggle between seconds and no seconds display.
c) To place Intelligrill into "deep sleep" mode (e.g. "power down"), press and hold button "B" for longer than 2 seconds, Intelligrill will display "Good Night !', and enter a deep sleep mode to conserve battery power. While in deep sleep mode, leave Intelligrill connected to a usb power source to keep the battery charged and maintain settings. To exit deep sleep mode, press the reset button.
3) Button "C" is used to move to the next page or, when editing, decreases a value.
Intelligrill is designed for ascending temperatures.
Intelligrill starts calculating the time to reach the desired temperature when the current temperature rises 5 degrees F above the lowest temperature detected since it was started.
Intelligrill stops calculating the time to reach the desired temperature when the current temperature falls 10 degrees F below the highest temperature detected since it was started. This warns you that the grill, smoker or oven has ceased producing heat.
If a displayed value is out of range (e.g. when seconds are not being displayed and a time calculation is less than one minute), the display blanks.
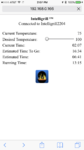
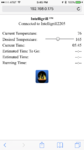
The Intelligrill web page shows from top to bottom the following readouts:
1) Intelligrill Title.
Nothing to see here, simply move on.
2) Intelligrill ssid that you are monitoring.
This readout indicates which of your Intelligrills you are monitoring from your web browser. If you have multiple Intelligrills, and have programmed each with a unique ssid as previously described, you can use the web browser to scroll through all of you Intelligrills.
3) Current temperature.
This readout is the current temperature of the temperature probe on the Intelligrill you are monitoring.
4) Desired temperature.
This readout is the desired temperature you select for the food item you are cooking associated with the Intelligrill you are monitoring. You may adjust the desired temperature at any time from any web browser, or directly from Intelligrill itself on the "Desired Temperature" display. From the web browser, simply drag the range control to set the desired temperature. From the Intelligrill, using buttons "A" or "C", select the "Desired Temperature" display, then press button "B". When brackets appear around the desired temperature, use buttons "A" or "C" to select the temperature you desire, then press button "B" when complete and the brackets disappear. Note that from any source, either the web browser or Intelligrill, the desired temperature setting is updated everywhere.
5) Current Time.
This readout is your local time.
6) Estimated Time To Go.
This readout is the result of the Intelligrill calculations and displays the estimated time to go until the desired temperature you entering is attained in the Intelligrill you are monitoring. The results become more accurate as time progresses, and usually after 10 minutes on average, become the most accurate. With use in a smoker, this does not compensate for the "stall".
7) Estimated Time.
This readout is simply the addition of the estimated time to go to the current time, and provides an estimated time of day at which desired temperature associated with the Intelligrill you are monitoring will be attained.
8) Running Time.
This readout is the time Intelligrill has been running since the calculations began on the Intelligrill you are monitoring. When you start Intelligrill, it measures the current temperature and waits until the temperature rises 5 degrees F. When that happens, Intelligrill starts calculating the estimated time to attain the desired temperature. Until the Estimated Time To Go, Estimated Time and Running Time attain a displayable value, they will remain blank. When the Estimated Time To Go, Estimated Time and Running Time reach displayable values, the values will appear in the appropriate places on the display.
9) The Intelligrill button.
This icon directs you to the Intelligrill website which is currently under construction and will provide additional help, recipes, a user blog and various tips for using Intelligrill if demand requires.
Regarding the Maverick ET-72 Temperature probe:
1) Do not submerse the probe in water as doing so will cause the probe to fail.
2) Do not place the probe directly over a fire as this will melt the insulator and causes the probe to fail.
3) If at all possible, especially in high static electricity environments, leave the probe connected to Intelligrill at all times. If you are in a high static discharge area, you might consider adding clamping diodes to the temperature probe connector circuit.
Designer
Greg Zumwalt3d model description
A wifi enabled remote grill, smoker and oven thermometer with time until done display."Intelligrill®, Powered by Feather" is a wifi enabled remote ...grill, smoker and oven thermometer with the added feature of providing real time updates of when the "main course" will be ready to serve. By constantly monitoring the change in food temperature over time, "Intelligrill®, Powered by Feather" provides you with a very reasonable estimate of the time remaining to when your main course is ready to be moved from the grill, smoker or oven to your table. You simply specify the temperature you desire, and Intelligrill will keep you constantly informed of the cooking progress and time remaining via the Intelligrill OLED display and via a wifi connected web browser of your choice.
I designed the first Intelligrill in 2012 using a PIC24FJ64GB002 processor, a Roving Networks wifi module, an Adafruit 128 by 64 oled module, and around 20 additional components (see the photo "Intelligrill®, Circa 2012"). It was designed for my wife, who as soon as the main course (say a whole chicken, whole turkey, pork roast or shoulder, etc.) was placed in the grill, smoker or oven, would immediately ask "when will it be ready?" Intelligrill kept her updated, via an iOS application I wrote, by constantly displaying the time remaining until, and the time of day that, the main course would be table ready. We've used Intelligrill hundreds of times since Intelligrill was born with great results (e.g. the wife was happy, very happy). But unfortunately, after years of problem free iOS upgrades on our iPhone and iPad devices, the App Store announced that the newest release of iOS would break my iOS Intelligrill application, so they removed it from the App Store.
Decision time: update the Intelligrill iOS app, or find an alternative. So while searching for an alternative to iOS (that was easy), I came across a remarkable little board, the Adafruit Feather Huzza ESP8266. This board had everything I required for a new Intelligrill; a decent processor, a lithium ion battery port with charger, wifi, analog input, plus the ability to easily attach an oled display. So I ordered the Feather Huzza ESP8266 and an oled board, gathered some parts, ported the original Intelligrill iOS software into the Arduino IDE, wrote additional software to welcome the Intelligrill to it's new home, took a crash course in HTML / Javascript / JSON programming then wrote the client side software, designed and 3D printed a case, and finally after a very long week "Intelligrill®, Powered by Feather" was born.
"Intelligrill®, Powered by Feather" is programmed in C/C++, HTML, Javascript and JSON, which means it will communicate remotely with most any wifi enabled device having a web browser (e.g. no more App Store, no more iOS update induced failures). Intelligrill can be used as a simple wired digital thermometer, as a wireless digital thermometer (when using the Intelligrill access point), and as a long distance wireless digital thermometer (when used with a wifi router).
You will need soldering skills and soldering equipment, wire, and all parts listed in the first step, plus an Arduino IDE with appropriate Adafruit libraries installed, to assemble and program Intelligrill.
Please note that Intelligrill is copyrighted and is a registered trademark of Zumwalt Properties, LLC. However, I've included all Intelligrill source code and the Autodesk Fusion 360 design file in the upload, so feel free to modify Intelligrill for your own personal, non-commercial use. And please publish your results as I would truly enjoy seeing a much better Intelligrill presentation than mine!
Having little to no HTML / Javascript / JSON experience, I depended heavily on the tutorials from w3schools.com (a great resource), the ESP8266 data sheets, and the wonderful tutorials, data and examples at Adafruit.com. If you have questions or comments about Intelligrill, please feel free to comment or message and I will do my best to answer them.
And as usual, I probably forgot a file or two or who knows what else, so if you have any questions, please do not hesitate to ask as I do make mistakes in plenty.
The electronic circuitry was designed using pencil, paper and a calculator (who knew that still worked?).
The software was designed using Arduino IDE version 1.8.5. Note that this is my first experience with HTML, Javascript and JSON programming, so please be gentle in the comments.
And finally the case was designed using Autodesk Fusion 360, sliced using Cura 2.7.0, and printed in PLA on an Ultimaker 3 Extended.
3d model print parameters
1) Print and Purhase the Parts.If you wish to place your completed Intelligrill in a case, I've included a two part case, "Case Bottom.stl" and "C...ase Top.stl". I printed my case parts in red PLA with a .1mm layer height and 100% infill. The four buttons used in this design (reset, A, B and C) for local control of Intelligrill are the tightly spaced buttons on the oled display. The case design attempts to extend the distance between these buttons, and 100% infill increases the rigidity required to do so. Also, the case is designed for friction fit assembly to avoid metallic screws interfering with the "no go" zones of the wifi antennae.
You will also need one each of the following parts:
1) Adafruit "Feather Huzzah ESP8266" (available from Adafruit, Mouser and other sources).
2) Adafruit "Featherwing OLED - 128x32 OLED Add-on For All Feather Boards" (available from Adafruit, Mouser and other sources).
3) Maverick ET-72 Temperature Probe (available on line).
4) 2.5mm audio connector, panel mount (Mouser 693-4831.2300 or equivalent).
5) 22k ohm 1% 1/8 watt resistor (available on line).
6) 680 ohm 1% 1/8 watt resistor (available on line).
7) 1VDC reference source (available from Mouser, Analog Devices ADR510).
8) 3.7VDC 1300mA lithium battery (available from Adafruit).
2) Assemble and Program the Feather.
I followed the wonderful Adafruit tutorials for assembly of the feather ESP8266 and oled display modules. Since I was going to place my Intelligrill in a case, I used the socket female headers on the feather ESP8266 (short pins, not the long pins required for breadboarding).
With the connectors installed on both modules, plug the oled module onto the ESP8266 module.
Plug this assembly into your computer using a usb to micro usb cable.
The file "IntelligrillFeatherServer.zip" contains the Arduino sketch source code that creates Intelligrill. Unzip this file, then load, compile and download the sketch to the assembled feather using the Arduino IDE. The following message should appear on the Arduino IDE serial monitor:
Intelligrill ® Feather Copyright 2017 by Zumwalt Properties, LLC. All Rights Reserved
Intelligrill data recovered from storage: rtcRead : crc fail.
Intelligrill data recovery from storage FAILED.
Intelligrill ssid : Intelligrill
Intelligrill password : Intelligrill
The "Intelligrill data recovered from storage: rtcRead : crc fail." and "Intelligrill data recovery from storage FAILED." messages are normal. This is because the Intelligrill data does not yet exist and will be created in a following step.
3) Assemble the Temperature Probe Connector.
The feather ESP8266 analog input is limited to a range of 0 through 1VDC, yet the feather ESP8266 has no externally available 1VDC reference, only regulated 3.3VDC. Thus the temperature probe circuit must use the regulated 3.3VDC for power, and reduce the temperature probe range from 0 through 3.3VDC to 0 through 1.0VDC. And since the temperature probe used in this design is resistive, a resistor divider alone would not provide the accuracy I was looking for, so I chose to use a 1VDC reference IC that I had in my parts bin (this part remains readily available).
The included schematic represents the circuit to be assembled. Designing a printed circuit board for only 3 components seemed a bit too much, so I decided to simply solder the components directly to the temperature probe connector itself.
As can be seen in the photo, the reference IC is small; very, very small. In order solder it, begin by placing the IC upside down on a piece of double sided tape, then stick the tape to your workbench and proceed as follows.
Solder a 1" piece of 22 gauge black insulated wire to the "-" pin of the IC as shown.
Cut the leads of the 22k ohm resistor (save one) such that its total length is slightly (1/8") longer that of the black wire, then solder one end to the "+" pin of the IC as shown.
Cut the leads of the 680 ohm resister to 1/2". Solder one end of this resistor to the 22k ohm resistor, then bend it 90 degrees as shown.
Solder the length of resistor lead saved from the 22k ohm resistor between the RING and SHIELD pins of the temperature probe connector as shown.
Solder the free end of the 22k ohm resister to the TIP pin of the temperature probe connector, then solder the free end of the black wire to the SHIELD pin of the temperature probe connector as shown.
Solder a 3" piece of 22 gauge black insulated wire to the RING pin of the temperature probe connector as shown.
Solder a 3" piece of 22 gauge red insulated wire to the free end of the 680 ohm resistor as shown.
Solder a 3" piece of 22 gauge yellow insulated wire to the TIP pin of the temperature probe connector as shown.
Finally, solder a 3" piece of 22 gauge green insulated wire to the solder joint between the 22k ohm resistor and the 680 ohm resistor as shown.
Test the temperature probe connector assembly by using a 3.3vdc power source. Attach the free end of the black wire to the power source ground, and the free end of the red wire to the power source 3.3vdc. Read the voltage between ground and the green wire. It should be 1.0vdc. If not, carefully examine the assembly and correct any errors. When the temperature probe connector assembly passes the test, remove the green wire then carefully insulate the temperature probe connector assembly components with electrical tape and / or heat shrink tubing.
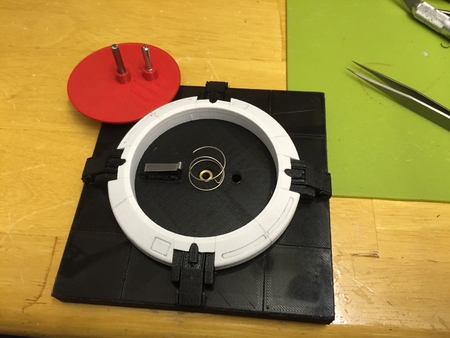
4) Assemble Intelligrill.
Place the battery in the case bottom as shown.
Place an insulating material (such as cardboard) on top of the battery as shown.
Press the feather assembly into position as shown, making sure the holes in the feather ESP8266 align with the holes in the case bottom and the micro usb connector on the feather ESP8266 aligns with the hole in the side of the case bottom.
Install the assembled temperature probe connector into the side of the case bottom as shown.
Carefully solder the free end of the red wire from the temperature probe connector assembly to the oled 3V pin as shown.
Carefully solder the free end of the black wire from the temperature probe connector assembly to the oled GND pin as shown.
Carefully solder the free end of the yellow wire from the temperature probe connector assembly to the oled AD0 pin as shown.
Plug the temperature probe into the temperature probe connector.
Plug the Intelligrill into a usb power supply source using a usb to micro usb cable or if your lithium battery is charged, plug it into the feather ESP8266 battery port. The Intelligrill should cycle through the title and copyright screens, then end on the "IP Address" display. Press button "C" once to change to the "Current Temperature" display. The current temperature should be the current temperature of the environment in which Intelligrill is located. If it is not, remove power immediately and recheck the connector assembly and wiring.
5) Prepare Intelligrill for Use.
With the settings I have provided in the Intelligrill software, after the first start up, Intelligrill attempts to connect to a wifi network with an ssid "your_ssid" and password "Intelligrill". At the same time, Intelligrill also creates an "access point" network with the ssid "Intelligrill" and password "Intelligrill". In order to provide Intellgrill with access to your wifi network, you will need to connect to the Intelligrill access point network to alter the Intelligrill wifi settings for your wifi network. The steps involved in doing so follow and require a wifi enabled device with a web browser. I've used both an iPhone and a MAC Powerbook Pro with Safari to prepare each Intelligrill for use.
With the Intelligrill turned on and the "IP Address" page displayed on the oled, go to the wifi settings on your wifi enabled device and select the "Intelligrill" network.
When the wifi settings ask for a password for the Intelligrill network, enter "Intelligrill".
Once the network connects (this can take some time for reasons I have yet to determine), enter "192.168.20.20/setup" into the url field of the web browser on you wifi enabled device.
The Intelligrill Setup page should appear on your browser. However, if your Intelligrill was not on the "IP Address" display, a friendly reminder will appear in your web browser informing you as such. Simply select the Intelligrill "IP Address" display on the Intelligrill using the "A" or "C" buttons, then refresh the browser.
If you wish to alter the Intelligrill ssid (for example, if you will be using more than one Intelligrill at a time, they will require different ssids), enter the desired Intelligrill ssid in the "Intelligrill ssid:" box. Since I have a static IP addresses from my internet service provider, I reserve fixed IP addresses for my Intelligrills on my wifi router for each Intelligrill I use, then enable port forwarding on my wifi router and assign a unique port number for each Intelligrill, thus I set the ssid of each intelligrill to be "Intelligrill" + port number (e.g. "Intelligrill2204"). Using this method, I can monitor each Intelligrill on my wifi network from anywhere I have internet access.
Enter the ssid of your wifi router in the "Wifi ssid:" box.
Enter the password of your wifi router in the "Intelligrill & Wifi password:" box. Your wifi router password will also become the password for the "Intelligrill" access point for any future access to the Intelligrill access point.
Click "Save". If you happen to have the Arduino IDE connected and serial monitor open, you should see the "Intelligrill data written to storage:"' message followed by the Intelligrill ssid, Wifi ssid, and password you entered. This is a good thing.
Return to the wifi settings on your wifi enabled device and "forget" the Intelligrill network (since the password has now been changed, connecting to this network is no longer possible), then logon to your wifi network.
Restart Intelligrill by pressing the reset button.
On the Intelligrill display, after the title and copyright pages cycle, the "IP Address" page should now display an ip address provided by your wifi network router as anything other than "0.0.0.0". Typically, the display will show something like "192.168.X.X". where X indicates values provided by your router. And again if you happen to have the Arduino IDE connected and serial monitor open, you should see the "Intelligrill data recovered from storage:" message followed by the Intelligrill ssid, WiFi ssid, and password you entered. This is a very good thing.
Enter the ip address that appears on the Intelligrill "IP Address" display into the web browser url window , and when the Intelligrill page appears, you are cooking!
Note the ESP8266 does not provide a mechanism to write your ssids and password into flash memory via this technique. As such, Intelligrill writes these values into the ESP8266 real time clock memory. If your Intelligrill battery ever becomes fully depleted, then you will have to repeat the above setup process to restore Intelligrill access to your wifi network.
As such, I recommend putting Intelligrill in "power down" mode (press and hold button "B" until the "Good Night !" message appears) when not in use and keep it connected to a usb power source in order to keep the battery fully charged. And for long term grilling / smoking, either leave your Intelligrill plugged into mains AC via a usb power supply, or in the event your location does not have access to mains AC, simply use an external cellphone style battery extender or other usb compatible battery source with a usb to micro usb cable connected between the usb compatible power source and the micro usb port on the ESP8266.
If at any time you believe the settings process has become hoplessly lost, remove both the usb and battery connections to completely power down the Intelligrill, wait a minute or so, then recconect power and repeat the setup process from the beginning.
6) Using Intelligrill.
Using Intelligrill is quite simple.
Light the grill, start the smoker, or turn on the oven.
Plug the temperature probe into the Intelligrill temperature probe connector.
Insert the temperature probe into the deepest location in the food item you will be grilling, smoking or baking. Positioning of the probe is very important for accurate readings, so make sure it does not touch a bone, or enter into the cavity of poultry.
Place the food item you are grilling, smoking or baking in the grill, smoker or oven.
"Turn on" the Intelligrill by pressing the reset button.
If you are not using wifi, simply use the buttons on the Intelligrill to adjust the desired temperature, check the temperature, and watch the time to go. Cook your food item until the current temperature display matches the desired temperature display.
If you are using wifi, from you web browser, log onto your Intelligrill using the ip address provided on the Intelligrill "IP Address" page. Set the desired temperature from either the Intelligrill "Desired Temperature" display (as described below) or from the web browser range control. Cook your food item until the current temperature display matches the desired temperature display.
When finished, press and hold button "B" until the "Good Night !" display appears to "turn off" Intelligrill (this isn't a battery disconnect, it simply places Intelligrill in a "deep sleep" mode).
Plug Intelligrill into a usb power source to maintain the battery charge and thus your settings.
That's how Intelligrill found its new feather home.
Hope you like Intelligrill as much as we do!
7) Additional Intelligrill Details.
Intelligrill uses the four buttons provided on the Featherwing OLED display; "reset", "A", "B" and "C". The "reset" button resets Intelligrill. The "A", "B" an "C" buttons function as follows:
1) Button "A" is used to move to the previous page or, when editing, increases a value.
2) Button "B" is used to edit a display or power down Intelligrill as follows:
a) If you press button "B" while the "Desired Temperature" display is active, then brackets will appear which indicate you can use button "A" to increase the desired temperature and button "C" to decrease the desired temperature. When you have set the desired temperature you desire, press button "B" again to accept your selection, the brackets will disappear, and buttons "A" and "B" return to the page select function.
b) On a time display, pressing button "B" will toggle between seconds and no seconds display.
c) To place Intelligrill into "deep sleep" mode (e.g. "power down"), press and hold button "B" for longer than 2 seconds, Intelligrill will display "Good Night !', and enter a deep sleep mode to conserve battery power. While in deep sleep mode, leave Intelligrill connected to a usb power source to keep the battery charged and maintain settings. To exit deep sleep mode, press the reset button.
3) Button "C" is used to move to the next page or, when editing, decreases a value.
Intelligrill is designed for ascending temperatures.
Intelligrill starts calculating the time to reach the desired temperature when the current temperature rises 5 degrees F above the lowest temperature detected since it was started.
Intelligrill stops calculating the time to reach the desired temperature when the current temperature falls 10 degrees F below the highest temperature detected since it was started. This warns you that the grill, smoker or oven has ceased producing heat.
If a displayed value is out of range (e.g. when seconds are not being displayed and a time calculation is less than one minute), the display blanks.
The Intelligrill web page shows from top to bottom the following readouts:
1) Intelligrill Title.
Nothing to see here, simply move on.
2) Intelligrill ssid that you are monitoring.
This readout indicates which of your Intelligrills you are monitoring from your web browser. If you have multiple Intelligrills, and have programmed each with a unique ssid as previously described, you can use the web browser to scroll through all of you Intelligrills.
3) Current temperature.
This readout is the current temperature of the temperature probe on the Intelligrill you are monitoring.
4) Desired temperature.
This readout is the desired temperature you select for the food item you are cooking associated with the Intelligrill you are monitoring. You may adjust the desired temperature at any time from any web browser, or directly from Intelligrill itself on the "Desired Temperature" display. From the web browser, simply drag the range control to set the desired temperature. From the Intelligrill, using buttons "A" or "C", select the "Desired Temperature" display, then press button "B". When brackets appear around the desired temperature, use buttons "A" or "C" to select the temperature you desire, then press button "B" when complete and the brackets disappear. Note that from any source, either the web browser or Intelligrill, the desired temperature setting is updated everywhere.
5) Current Time.
This readout is your local time.
6) Estimated Time To Go.
This readout is the result of the Intelligrill calculations and displays the estimated time to go until the desired temperature you entering is attained in the Intelligrill you are monitoring. The results become more accurate as time progresses, and usually after 10 minutes on average, become the most accurate. With use in a smoker, this does not compensate for the "stall".
7) Estimated Time.
This readout is simply the addition of the estimated time to go to the current time, and provides an estimated time of day at which desired temperature associated with the Intelligrill you are monitoring will be attained.
8) Running Time.
This readout is the time Intelligrill has been running since the calculations began on the Intelligrill you are monitoring. When you start Intelligrill, it measures the current temperature and waits until the temperature rises 5 degrees F. When that happens, Intelligrill starts calculating the estimated time to attain the desired temperature. Until the Estimated Time To Go, Estimated Time and Running Time attain a displayable value, they will remain blank. When the Estimated Time To Go, Estimated Time and Running Time reach displayable values, the values will appear in the appropriate places on the display.
9) The Intelligrill button.
This icon directs you to the Intelligrill website which is currently under construction and will provide additional help, recipes, a user blog and various tips for using Intelligrill if demand requires.
Regarding the Maverick ET-72 Temperature probe:
1) Do not submerse the probe in water as doing so will cause the probe to fail.
2) Do not place the probe directly over a fire as this will melt the insulator and causes the probe to fail.
3) If at all possible, especially in high static electricity environments, leave the probe connected to Intelligrill at all times. If you are in a high static discharge area, you might consider adding clamping diodes to the temperature probe connector circuit.