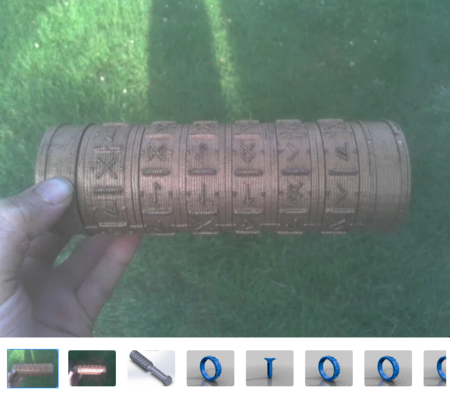
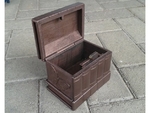
Old copper secret box 3D for print

10621 Views 1 Likes 0 Downloads Download the piece here from 3dforprint
https://www.thingiverse.com/thing:3109214
Vielen Dank und Hochachtung an 3DPRINTINGWORLD für dieses tolle Design.
Vie...le Veränderungen habe ich nicht vorgenommen, aber da mich viele gefragt haben wie ein 3D-Druck farblich nachbearbeitet werden kann, möchte ich hier darauf eingehen.
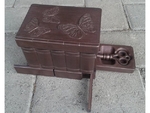
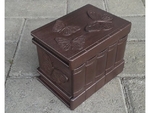
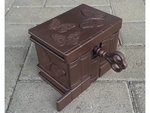
Ich liebe es Dinge auf alt und benutzt zu trimmen, deshalb sollte die Box in altem Kupfer erstrahlen.
Zum Druck selber:
Alle Einzelteile habe ich mit orangem PLA-Filament, meist in 0.2mm Layer, ausgedruckt. Das orange Filament bietet imho den besten Kontrast zu der geplanten Nachbearbeitung.
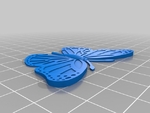
Da die Schmetterlinge doch sehr viele Überhänge hatten, habe ich die Einzelteile ohne gedruckt, und die Schmetterlinge nach dem Druck aufgeklebt. Auf beiden Seiten und auf der Rückseite befindet sich je ein Schmetterling in 70% Größe. Auf den Deckel habe ich habe ich 2 Schmetterlinge in 50% und einen in 70% Größe platziert.
Den Schlüssel habe ich mit ein paar Stützen versehen, die nach dem Druck leicht entfernt und beigeschliffen werden können.
Zur Nachbearbeitung:
Zunächst werden alle Einzelteile mit 100er Schleifpapier sorgfältig geschliffen, dabei geht es nicht darum alle Unebenheiten zu beseitigen, sondern die Oberfläche aufzurauhen. Da ich ohne Primer lackiere würde die Farbe sonst nicht richtig eindringen und haften.
Für die Lackierung benutze ich Acryl-Farben, und zwar "Vallejo Model Air" die ich in diesem Fall mit dem Pinsel auftrage und nicht mit dem Airbrush. Die Farbtöne die ich verwende sind alle in dem Set1 (6 Basisfarben) von Vallejo enthalten.
Für das anschließende Kupfer-Finish benutze ich Wax-Metall-Finish von Rub'nBuff, Farbtönung "Spanish Copper".
Das Kupfer-Finish kommt am besten auf einer konstrastreichen Grundlage zur Geltung.
Ich habe folgendes Mischverhältnis verwendet:
15 Teile Schwarz
7 Teile Gelb
4 Teile Rot
Das Mischverhältnis ändere ich immer ein wenig, um Konstrastunterschiede zu erzeugen.
Sehr gut geht auch zu gleichen Teilen Olivgrün mit Schwarz gemischt.
Nachdem alle Farben getrocknet sind, geht es mit mit dem Wax-Metall-Finisher zur Sache.
Es gibt 2 gute Effekte:
1 - Man trägt das Wax-Finish nur auf die Kanten und die hervorragenden Flächen auf. Dieses erzeugt den Effekt als ob die Farbe durch Gebrauch abgenutzt ist, und das blanke Kupfer hervorkommt. Das mach man am besten mit dem Finger, dadurch man hat aber das beste Gefühl beim polieren der Kanten. Keine Sorge die Finger werden ganz einfach wieder mit Seife sauber. Wichtig ist immer nur ganz kleine Mengen mit dem Finger aufzutragen und zu polieren.
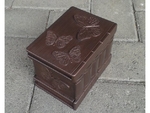
2 - das Wax-Finish wird flächig aufgetragen. Wichtig ist dabei das die Grundierung immer wieder durchschimmert. Das mache ich mit einem steifen Pinsel, wo ich die Borsten extra kürze. Die hier gezeigte Box habe ich mit dieser Methode bearbeitet.
Druckparameter:
40% Fülldichte
0,2mm Schichthöhe
3 vertikale Konturen
3 horizontale Konturhüllen
80mm/s Druckgeschwindigkeit
Support ist nicht erforderlich.
Bei einem gelungen Druck würde ich mich über einen Like sehr freuen!
Gruß Hardy
This is a remix from
https://www.thingiverse.com/thing:3109214
Many thanks and respect to 3DPRINTINGWORLD for this great design.
I haven't made many changes, but since many people have asked me how a 3D print can be reworked in color, I'd like to discuss it here.
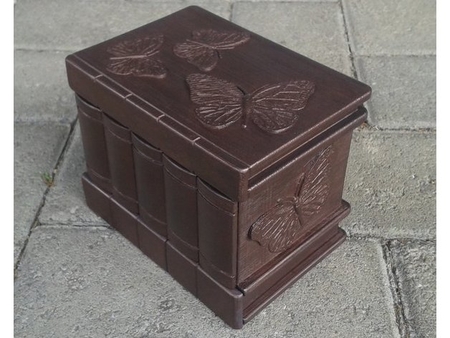
I love to trim things to old and used, so the box should shine in old copper.
To the print itself:
I printed all parts with orange PLA-filament, mostly in 0.2mm layer. The orange filament offers the best contrast to the planned post-processing.
Since the butterflies had a lot of overhangs, I printed the individual parts without them, and glued the butterflies on after printing. On both sides and on the back there is a butterfly in 70% size. On the lid I have placed 2 butterflies in 50% and one in 70% size.
I provided the key with a few supports, which can be easily removed and sanded after printing.
For finishing:
At first all parts are carefully sanded with 100er sandpaper, it is not a matter of removing all unevenness, but of roughening the surface. As I varnish without primer, the paint would not penetrate and stick properly otherwise.
For the varnishing I use acrylic paints, namely "Vallejo Model Air" which I apply in this case with the brush and not with the airbrush. The colours I use are all included in the Set1 (6 basic colours) of Vallejo.
For the following copper finish I use Rub'nBuff wax-metal finish, colour "Spanish Copper".
The copper finish is best used on a contrasting base.
I used the following mixing ratio:
15 parts black
7 parts yellow
4 parts red
I always change the mixing ratio a little to create contrast differences.
Very good is also the same amount of olive green mixed with black.
After all colours have dried, I start with the Wax Metal Finisher.
There are 2 good effects:
1 - The wax finish is only applied to the edges and the excellent surfaces. This creates the effect as if the paint is worn out through use, and the bare copper comes out. This is best done with your finger, but it gives you the best feeling when polishing the edges. Don't worry, your fingers will simply be cleaned with soap again. It is always important to apply and polish only very small amounts with your finger.
2 - The wax finish is applied over the entire surface. It is important that the primer shimmers through again and again. I do this with a stiff brush, where I shorten the bristles extra. The box shown here I have worked with this method.
Printing parameters:
40% filling density
0,2mm layer height
3 vertical contours
3 horizontal contour envelopes
80mm/s Print speed
Support is not required.
With a successful print I would be very happy about a Like!
Greetings Hardy
Designer
hardyp3d model description
Dieses ist ein Remix vonhttps://www.thingiverse.com/thing:3109214
Vielen Dank und Hochachtung an 3DPRINTINGWORLD für dieses tolle Design.
Vie...le Veränderungen habe ich nicht vorgenommen, aber da mich viele gefragt haben wie ein 3D-Druck farblich nachbearbeitet werden kann, möchte ich hier darauf eingehen.
Ich liebe es Dinge auf alt und benutzt zu trimmen, deshalb sollte die Box in altem Kupfer erstrahlen.
Zum Druck selber:
Alle Einzelteile habe ich mit orangem PLA-Filament, meist in 0.2mm Layer, ausgedruckt. Das orange Filament bietet imho den besten Kontrast zu der geplanten Nachbearbeitung.
Da die Schmetterlinge doch sehr viele Überhänge hatten, habe ich die Einzelteile ohne gedruckt, und die Schmetterlinge nach dem Druck aufgeklebt. Auf beiden Seiten und auf der Rückseite befindet sich je ein Schmetterling in 70% Größe. Auf den Deckel habe ich habe ich 2 Schmetterlinge in 50% und einen in 70% Größe platziert.
Den Schlüssel habe ich mit ein paar Stützen versehen, die nach dem Druck leicht entfernt und beigeschliffen werden können.
Zur Nachbearbeitung:
Zunächst werden alle Einzelteile mit 100er Schleifpapier sorgfältig geschliffen, dabei geht es nicht darum alle Unebenheiten zu beseitigen, sondern die Oberfläche aufzurauhen. Da ich ohne Primer lackiere würde die Farbe sonst nicht richtig eindringen und haften.
Für die Lackierung benutze ich Acryl-Farben, und zwar "Vallejo Model Air" die ich in diesem Fall mit dem Pinsel auftrage und nicht mit dem Airbrush. Die Farbtöne die ich verwende sind alle in dem Set1 (6 Basisfarben) von Vallejo enthalten.
Für das anschließende Kupfer-Finish benutze ich Wax-Metall-Finish von Rub'nBuff, Farbtönung "Spanish Copper".
Das Kupfer-Finish kommt am besten auf einer konstrastreichen Grundlage zur Geltung.
Ich habe folgendes Mischverhältnis verwendet:
15 Teile Schwarz
7 Teile Gelb
4 Teile Rot
Das Mischverhältnis ändere ich immer ein wenig, um Konstrastunterschiede zu erzeugen.
Sehr gut geht auch zu gleichen Teilen Olivgrün mit Schwarz gemischt.
Nachdem alle Farben getrocknet sind, geht es mit mit dem Wax-Metall-Finisher zur Sache.
Es gibt 2 gute Effekte:
1 - Man trägt das Wax-Finish nur auf die Kanten und die hervorragenden Flächen auf. Dieses erzeugt den Effekt als ob die Farbe durch Gebrauch abgenutzt ist, und das blanke Kupfer hervorkommt. Das mach man am besten mit dem Finger, dadurch man hat aber das beste Gefühl beim polieren der Kanten. Keine Sorge die Finger werden ganz einfach wieder mit Seife sauber. Wichtig ist immer nur ganz kleine Mengen mit dem Finger aufzutragen und zu polieren.
2 - das Wax-Finish wird flächig aufgetragen. Wichtig ist dabei das die Grundierung immer wieder durchschimmert. Das mache ich mit einem steifen Pinsel, wo ich die Borsten extra kürze. Die hier gezeigte Box habe ich mit dieser Methode bearbeitet.
Druckparameter:
40% Fülldichte
0,2mm Schichthöhe
3 vertikale Konturen
3 horizontale Konturhüllen
80mm/s Druckgeschwindigkeit
Support ist nicht erforderlich.
Bei einem gelungen Druck würde ich mich über einen Like sehr freuen!
Gruß Hardy
This is a remix from
https://www.thingiverse.com/thing:3109214
Many thanks and respect to 3DPRINTINGWORLD for this great design.
I haven't made many changes, but since many people have asked me how a 3D print can be reworked in color, I'd like to discuss it here.
I love to trim things to old and used, so the box should shine in old copper.
To the print itself:
I printed all parts with orange PLA-filament, mostly in 0.2mm layer. The orange filament offers the best contrast to the planned post-processing.
Since the butterflies had a lot of overhangs, I printed the individual parts without them, and glued the butterflies on after printing. On both sides and on the back there is a butterfly in 70% size. On the lid I have placed 2 butterflies in 50% and one in 70% size.
I provided the key with a few supports, which can be easily removed and sanded after printing.
For finishing:
At first all parts are carefully sanded with 100er sandpaper, it is not a matter of removing all unevenness, but of roughening the surface. As I varnish without primer, the paint would not penetrate and stick properly otherwise.
For the varnishing I use acrylic paints, namely "Vallejo Model Air" which I apply in this case with the brush and not with the airbrush. The colours I use are all included in the Set1 (6 basic colours) of Vallejo.
For the following copper finish I use Rub'nBuff wax-metal finish, colour "Spanish Copper".
The copper finish is best used on a contrasting base.
I used the following mixing ratio:
15 parts black
7 parts yellow
4 parts red
I always change the mixing ratio a little to create contrast differences.
Very good is also the same amount of olive green mixed with black.
After all colours have dried, I start with the Wax Metal Finisher.
There are 2 good effects:
1 - The wax finish is only applied to the edges and the excellent surfaces. This creates the effect as if the paint is worn out through use, and the bare copper comes out. This is best done with your finger, but it gives you the best feeling when polishing the edges. Don't worry, your fingers will simply be cleaned with soap again. It is always important to apply and polish only very small amounts with your finger.
2 - The wax finish is applied over the entire surface. It is important that the primer shimmers through again and again. I do this with a stiff brush, where I shorten the bristles extra. The box shown here I have worked with this method.
Printing parameters:
40% filling density
0,2mm layer height
3 vertical contours
3 horizontal contour envelopes
80mm/s Print speed
Support is not required.
With a successful print I would be very happy about a Like!
Greetings Hardy