Opus 3D for print


1719 Views 1 Likes 0 Downloads Download the piece here from 3dforprint
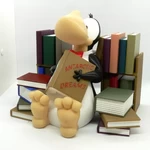
Set in Bloom County, the satirical strip was launched on November 23, 2003, and was sy...ndicated by The Washington Post Writers Group. Opus is the title character and protagonist of the strip. Though he returned to Antarctica at the end of Outland, Opus traveled back home to Bloom County, only to find that time has changed everything and everyone he once held dear. His employment usually depended on the week's joke. Since Opus began, he has so far been a political operative, a garbageman, and a newspaper ombudsman – but he was most often depicted as a syndicated cartoonist.
No supports are required. If you have the proper filament colors, no painting is needed.
The assembled model is 210mm tall.
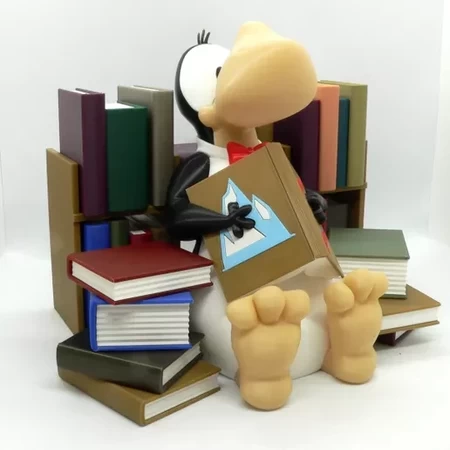
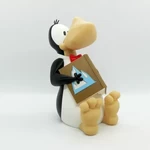
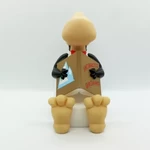
The scene is taken from the cover of one of Breathed works. The main model is complete on it's own without the bookcase and books, therefore it can be printed alone if desired.
Special thanks to Maker 'BillTheCat' aka 'Biil-de_cat' for suggesting this model and diligently looking over my shoulder and offering suggestions along the way.
Enjoy!
Print Instructions
Supports: No
Resolution: .2mm
Infill: 10%
Notes:**
Refer to the notes below for a few significant printing and assembly instructions.
......................................................................................................
Building the model
Colors (see the notes section for printing multiple books)
Skin: (Paramount3D PLA - Universal Beige)
nose
foot_left
foot_right
..
Black: (Paramount3D PLA - Black)
body_black
head_black
eye_black_left
eye_black_right
arm_left
arm_right
..
White: (Paramount3D PLA - White)
eye_whites
glacier_white
collar
body_white
openbook_pages
flatbook_pages_1 (see notes on how many to print)
flatbook_pages_2 (see notes on how many to print)
flatbook_pages_3 (see notes on how many to print)
..
Red: (Hatchbox PLA - Red)
tie_left
tie_right
antarctic_dreams
..
Light Blue: (unknown PLA)
glacier_blue
..
Brown: (Paramount3D PLA - Military MBT Brown)
openbook_cover_front
openbook_cover_back
openbook_spine
bookcase_left
bookcase_right
bookcase_full (depending on the size of the print bed,
either print the one piece bookcase OR each half)
Various colors of your choice: (Paramount3D sample pack worked for me)
flatbook_cover_1 (see notes on how many to print)
flatbook_cover_2 (see notes on how many to print)
flatbook_cover_3 (see notes on how many to print)
Any color: (hidden piece)
tie_pin
.....................................................................................................
Printing and assembly tips
Printing tips
1-No supports are required
2-The flatbook covers should be printed with a brim. Use your discretion for other parts.
3-The parts should fit nicely when printed cleanly or with a slight first layer squish.
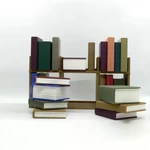
4-The bookcase and flat books are all optional. For the bookcase, either print the full one OR the two halves, depending on your printer bed size
5-For the books, you can print as many or as few as you like. Personally, I printed the following using mostly the filament form the Paramount3D sample pack and varying the colors:
book1 - 10 copies
book2 - 8 copies
book3 - 5 copies
..
Assembly tips:
1-I used E6000 sticky craft glue to put this model together. The sticky glue allows more time to position the parts than a fast drying superglue.
2-When attaching the openbook_cover_front/back to the arms, be sure to insert the covers all the way into the fingers and push the cover back as far as you can.
3-I glued the feet/body_black/body_white and let it dry first. After gluing in the words and glacier on the book cover I then glued the arms/openbook_covers/openbook_pages to the body all at the same time. Be sure the book_covers are the same height. Once dry, I then added the openbook_spine.
4-There should be no issue, but If for some reason you did not get the book in fully and the spine is too narrow, simply make the spine wider before gluing it.
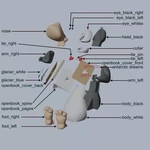
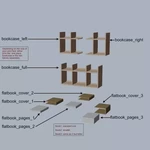
5-Refer to the assembly diagram in the pictures section as well as the uploaded pictures for putting the model together. The model is meant to be glued.
Do not hesitate to ask questions, feedback is essential to making better models.
Designer
REDDADSTEVE3d model description
Opus, from the Bloom County comic strip, by Berkeley Breathed.Set in Bloom County, the satirical strip was launched on November 23, 2003, and was sy...ndicated by The Washington Post Writers Group. Opus is the title character and protagonist of the strip. Though he returned to Antarctica at the end of Outland, Opus traveled back home to Bloom County, only to find that time has changed everything and everyone he once held dear. His employment usually depended on the week's joke. Since Opus began, he has so far been a political operative, a garbageman, and a newspaper ombudsman – but he was most often depicted as a syndicated cartoonist.
No supports are required. If you have the proper filament colors, no painting is needed.
The assembled model is 210mm tall.
The scene is taken from the cover of one of Breathed works. The main model is complete on it's own without the bookcase and books, therefore it can be printed alone if desired.
Special thanks to Maker 'BillTheCat' aka 'Biil-de_cat' for suggesting this model and diligently looking over my shoulder and offering suggestions along the way.
Enjoy!
Print Instructions
Supports: No
Resolution: .2mm
Infill: 10%
Notes:**
Refer to the notes below for a few significant printing and assembly instructions.
......................................................................................................
Building the model
Colors (see the notes section for printing multiple books)
Skin: (Paramount3D PLA - Universal Beige)
nose
foot_left
foot_right
..
Black: (Paramount3D PLA - Black)
body_black
head_black
eye_black_left
eye_black_right
arm_left
arm_right
..
White: (Paramount3D PLA - White)
eye_whites
glacier_white
collar
body_white
openbook_pages
flatbook_pages_1 (see notes on how many to print)
flatbook_pages_2 (see notes on how many to print)
flatbook_pages_3 (see notes on how many to print)
..
Red: (Hatchbox PLA - Red)
tie_left
tie_right
antarctic_dreams
..
Light Blue: (unknown PLA)
glacier_blue
..
Brown: (Paramount3D PLA - Military MBT Brown)
openbook_cover_front
openbook_cover_back
openbook_spine
bookcase_left
bookcase_right
bookcase_full (depending on the size of the print bed,
either print the one piece bookcase OR each half)
Various colors of your choice: (Paramount3D sample pack worked for me)
flatbook_cover_1 (see notes on how many to print)
flatbook_cover_2 (see notes on how many to print)
flatbook_cover_3 (see notes on how many to print)
Any color: (hidden piece)
tie_pin
.....................................................................................................
Printing and assembly tips
Printing tips
1-No supports are required
2-The flatbook covers should be printed with a brim. Use your discretion for other parts.
3-The parts should fit nicely when printed cleanly or with a slight first layer squish.
4-The bookcase and flat books are all optional. For the bookcase, either print the full one OR the two halves, depending on your printer bed size
5-For the books, you can print as many or as few as you like. Personally, I printed the following using mostly the filament form the Paramount3D sample pack and varying the colors:
book1 - 10 copies
book2 - 8 copies
book3 - 5 copies
..
Assembly tips:
1-I used E6000 sticky craft glue to put this model together. The sticky glue allows more time to position the parts than a fast drying superglue.
2-When attaching the openbook_cover_front/back to the arms, be sure to insert the covers all the way into the fingers and push the cover back as far as you can.
3-I glued the feet/body_black/body_white and let it dry first. After gluing in the words and glacier on the book cover I then glued the arms/openbook_covers/openbook_pages to the body all at the same time. Be sure the book_covers are the same height. Once dry, I then added the openbook_spine.
4-There should be no issue, but If for some reason you did not get the book in fully and the spine is too narrow, simply make the spine wider before gluing it.
5-Refer to the assembly diagram in the pictures section as well as the uploaded pictures for putting the model together. The model is meant to be glued.
Do not hesitate to ask questions, feedback is essential to making better models.
