Pink and green domino machine ii 3D for print
2846 Views 1 Likes 0 Downloads Download the piece here from 3dforprint
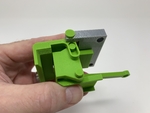
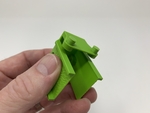
A little over three years ago I designed, 3D printed and assembled a "horizontally stacked" domino dispensing ...machine for the kids and grandkids, which they named the "Pink and Green Domino Machine":
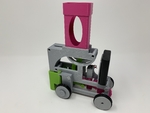
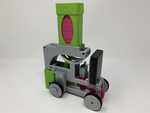
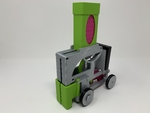
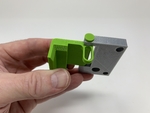
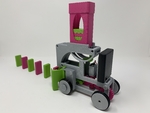
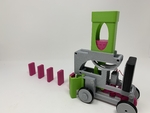
I've have seen a number of variations of the horizontally stacked domino machines over the years, but I have only seen two "vertically stacked" domino machines, so I decided to design, 3D print and assemble this vertically stacked domino machine, which the kids and grandkids have creatively named the "Pink and Green Domino Machine II".
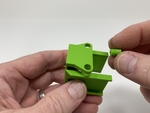
When designing a mechanism such as this, I start by isolating the design constraints needed to determine the overall design of the model. In this model, the primary design constraint was the size of a "standard" domino (which I quickly discovered was not that "standard" after all) which would determine the size and swing of the guides, the size and stroke of the piston, the length, width and arc of the track from the vertical stack to the piston, and finally the width and height of the entire model. Along with the domino design constraints, the motor and battery back dimensions must also be considered. After incorporating the various design constraints and dimensions and positioning the various components, the design is completed by "filling in the blanks" required to connect the various dimensions and components with structure and, in this model, gears, control arms and axles.
As usual, I probably forgot a file or two or who knows what else, so if you have any questions, please do not hesitate to ask as I do make plenty of mistakes.
Designed using Autodesk Fusion 360, sliced using Cura 4.2, and printed in PLA on an Ultimaker 2+ Extended and an Ultimaker 3 Extended.
I purchased the following parts:
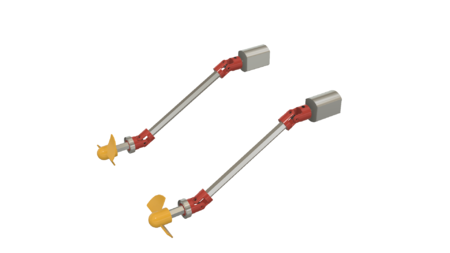
• 500rpm 6VDC Gear Motor (search for "DC 6V 500RPM Micro Speed Reducti...on Motor Electric Geared Motor").
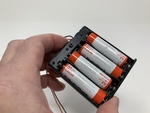
• One 6VDC AAA battery pack with switch (available on line).
• Eight R-24 (31mm ID, 3.5mm section, local hardware store) O-Rings.
• Four AAA batteries (local hardware store).
The included file "Parts.pdf" contains the part names, quantities, layer heights, infill and support settings of the parts I 3D printed for this model.
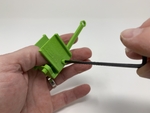
This is a high precision print and assembly model. Prior to assembly, test fit and trim, file, sand, etc. all parts as necessary for smooth movement of moving surfaces, and tight fit for non moving surfaces. Depending on you printer, your printer settings and the colors you chose, more or less trimming, filing and/or sanding may be required. Carefully file all edges that contacted the build plate to make absolutely sure that all build plate "ooze" is removed and that all edges are smooth. I used small jewelers files and plenty of patience to perform this step.
The model also uses threaded assembly, so I used a tap and die set (6mm by 1, 10mm by 1.5) for thread cleaning.
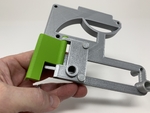
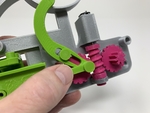
Assemble the Chassis Left Side.
To assemble the chassis left side, I performed the following steps:
• Threaded "Hub.stl" into the front axle hole in "Chassis, Left.stl".
• Positioned the gear motor between the motor mount and worm gear axle mount on the chassis left assembly then slid the motor up and into the motor mount until the motor shaft end was even with the motor mount.
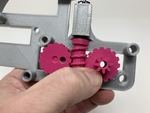
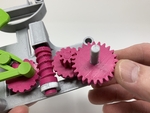
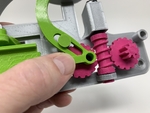
• Positioned "Gear, Worm.stl" between the motor shaft and worm gear axle mount such that the motor shaft hole in the worm gear is nearest the motor shaft and with the motor shaft hole flat aligned with the motor shaft flat, then pressed the motor down into the worm gear.
• Slid "Axle, Gear, Worm.stl" through the worm gear axle mount hole then threaded it into the worm gear.
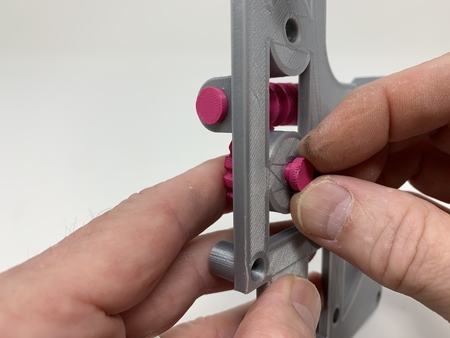
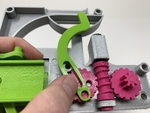
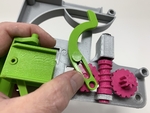
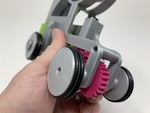
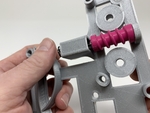
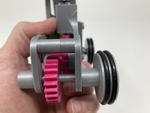
• Positioned "Gear, Arms.stl" onto the assembly then secured in place with "Axle, Gear, Arms.stl".
• Positioned "Gear, Drive.stl" onto the assembly then secured in place with "Axle, Gear, Drive.stl".
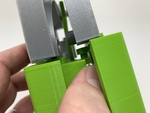
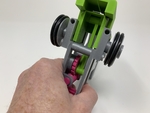
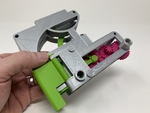
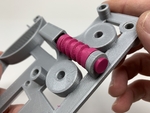
• Threaded two "Pin.stl" into "Piston.stl".
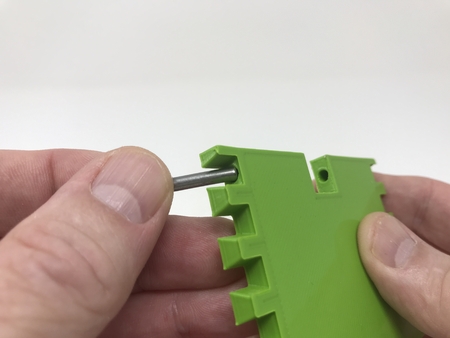
• Positioned "Arm, Piston.stl" in the piston assembly then secured in place with "Axle, Arm, Piston.stl" using a 7/64" hex wrench.
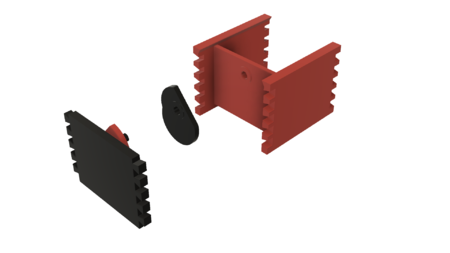
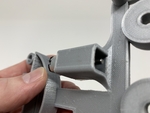
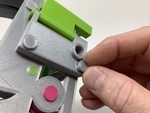
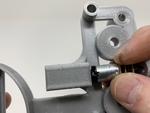
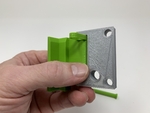
• Positioned "Guide, Left.stl" into "Mount, Left.stl" then secured in place using one "Axle, Guide.stl".
• Positioned the left piston pin into the left guide guide slot, slid the assembly onto the chassis left assembly piston guide, then secured the assembly in place with one "Bolt, Mount.stl" (a second bolt is added later).
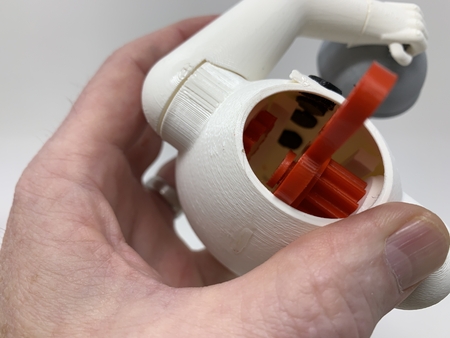
• Positioned "Arm, Domino.stl" onto the chassis assembly then secured in place with "Axle, Arm, Domino.stl".
• Secured the free ends of the piston and domino arms to the arms gear using one "Axle, Gear, Arms, Arms.stl".
Assemble the Chassis Right Side.
To assemble the chassis right side, I performed the following steps:
• Positioned "Guide, Right.stl" into "Mount,Right.stl" then secured in place using the remaining "Axle, Guide.stl".
• Positioned the right guide assembly onto "Chassis, Right.stl" and secured in place with two "Bolt, Mount.stl".
• Threaded the remaining "Hub.stl" into the front axle hole of the right chassis assembly.
Final Assembly.
For final assembly, I performed the following steps:
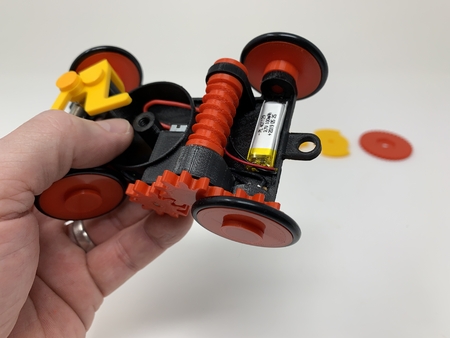
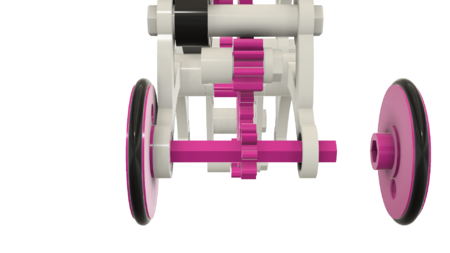
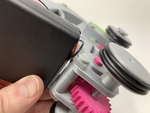
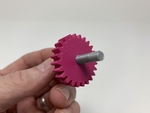
• Pressed "Gear, Front.stl" onto "Axle, Wheel, Front.stl" centering the gear on the axle spline.
• Positioned the front axle assembly into the chassis left assembly, long end first.
• Positioned the pin slot on the right guide over the right pin on the piston, positioned the front axle into the axle hole of the chassis right assembly, carefully positioned the left and right chassis assemblies together, then secured together using three "Bolt, Chassis.stl".
• Installed "Bolt, Mount, Chassis.stl" in the left chassis mount assembly.
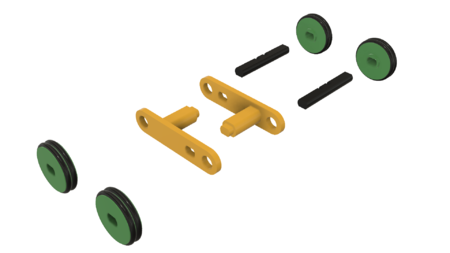
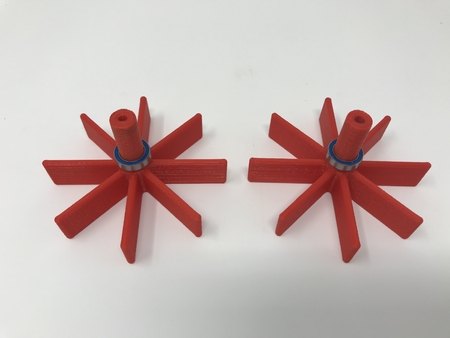
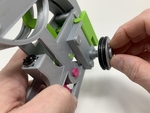
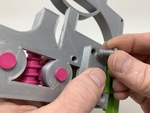
• Placed four O-Rings onto the two "Wheel, Rear.stl" then secured the wheels to the chassis assembly using two "Axle, Wheel, Rear.stl".
• Placed four O-Rings onto the two "Wheel, Front.stl" then threaded the wheels onto the front axle assembly.
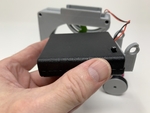
• Placed four batteries in the battery holder then installed the battery holder cover.
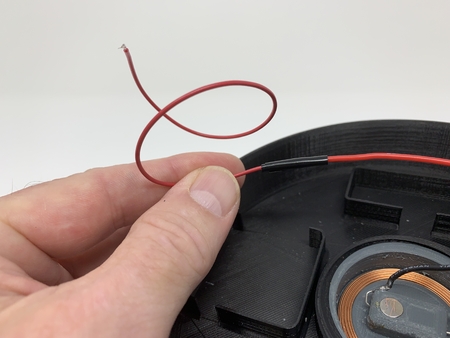
• Soldered the battery holder red ("+") wire to the motor "+" terminal, then soldered the battery holder black ("-") wire to the motor "-" terminal.
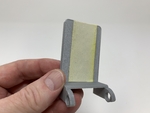
• Placed double sided tape on "Mount, Battery.stl".
• Pressed the battery holder onto the double sided tape, centering the battery onto the battery mount.
• Secured the battery holder assembly to the chassis assembly using one "Bolt, Chassis.stl" and one "Bolt, Mount, Battery.stl".
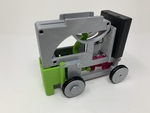
Operation.
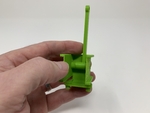
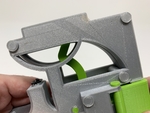
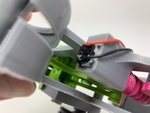
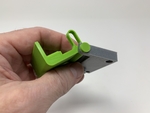
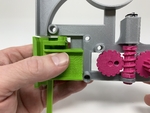
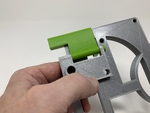
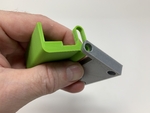
• Press "Funnel.stl" into the funnel guides on the top of the model.
• Turn the model on, wait until the two guides are fully closed, then turn the model off (this step makes sure "Arm, Domino.stl" is in the proper position for domino loading).
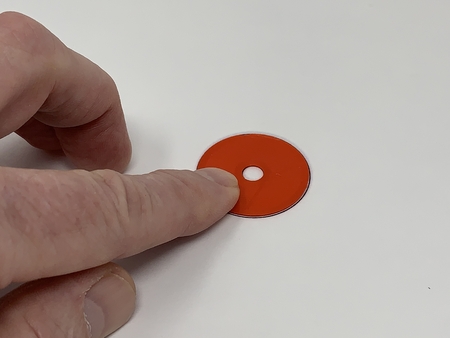
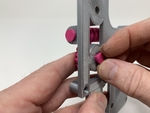
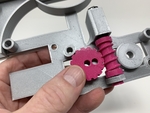
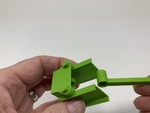
• Load up to ten "Domino.stl" into the funnel.
• Turn the model on and deposit dominoes!
Hope you enjoy it!
Designer
Greg Zumwalt3d model description
A vertical stack domino machine.A little over three years ago I designed, 3D printed and assembled a "horizontally stacked" domino dispensing ...machine for the kids and grandkids, which they named the "Pink and Green Domino Machine":
I've have seen a number of variations of the horizontally stacked domino machines over the years, but I have only seen two "vertically stacked" domino machines, so I decided to design, 3D print and assemble this vertically stacked domino machine, which the kids and grandkids have creatively named the "Pink and Green Domino Machine II".
When designing a mechanism such as this, I start by isolating the design constraints needed to determine the overall design of the model. In this model, the primary design constraint was the size of a "standard" domino (which I quickly discovered was not that "standard" after all) which would determine the size and swing of the guides, the size and stroke of the piston, the length, width and arc of the track from the vertical stack to the piston, and finally the width and height of the entire model. Along with the domino design constraints, the motor and battery back dimensions must also be considered. After incorporating the various design constraints and dimensions and positioning the various components, the design is completed by "filling in the blanks" required to connect the various dimensions and components with structure and, in this model, gears, control arms and axles.
As usual, I probably forgot a file or two or who knows what else, so if you have any questions, please do not hesitate to ask as I do make plenty of mistakes.
Designed using Autodesk Fusion 360, sliced using Cura 4.2, and printed in PLA on an Ultimaker 2+ Extended and an Ultimaker 3 Extended.
3d model print parameters
Purchase, Print and Prepare the Parts.I purchased the following parts:
• 500rpm 6VDC Gear Motor (search for "DC 6V 500RPM Micro Speed Reducti...on Motor Electric Geared Motor").
• One 6VDC AAA battery pack with switch (available on line).
• Eight R-24 (31mm ID, 3.5mm section, local hardware store) O-Rings.
• Four AAA batteries (local hardware store).
The included file "Parts.pdf" contains the part names, quantities, layer heights, infill and support settings of the parts I 3D printed for this model.
This is a high precision print and assembly model. Prior to assembly, test fit and trim, file, sand, etc. all parts as necessary for smooth movement of moving surfaces, and tight fit for non moving surfaces. Depending on you printer, your printer settings and the colors you chose, more or less trimming, filing and/or sanding may be required. Carefully file all edges that contacted the build plate to make absolutely sure that all build plate "ooze" is removed and that all edges are smooth. I used small jewelers files and plenty of patience to perform this step.
The model also uses threaded assembly, so I used a tap and die set (6mm by 1, 10mm by 1.5) for thread cleaning.
Assemble the Chassis Left Side.
To assemble the chassis left side, I performed the following steps:
• Threaded "Hub.stl" into the front axle hole in "Chassis, Left.stl".
• Positioned the gear motor between the motor mount and worm gear axle mount on the chassis left assembly then slid the motor up and into the motor mount until the motor shaft end was even with the motor mount.
• Positioned "Gear, Worm.stl" between the motor shaft and worm gear axle mount such that the motor shaft hole in the worm gear is nearest the motor shaft and with the motor shaft hole flat aligned with the motor shaft flat, then pressed the motor down into the worm gear.
• Slid "Axle, Gear, Worm.stl" through the worm gear axle mount hole then threaded it into the worm gear.
• Positioned "Gear, Arms.stl" onto the assembly then secured in place with "Axle, Gear, Arms.stl".
• Positioned "Gear, Drive.stl" onto the assembly then secured in place with "Axle, Gear, Drive.stl".
• Threaded two "Pin.stl" into "Piston.stl".
• Positioned "Arm, Piston.stl" in the piston assembly then secured in place with "Axle, Arm, Piston.stl" using a 7/64" hex wrench.
• Positioned "Guide, Left.stl" into "Mount, Left.stl" then secured in place using one "Axle, Guide.stl".
• Positioned the left piston pin into the left guide guide slot, slid the assembly onto the chassis left assembly piston guide, then secured the assembly in place with one "Bolt, Mount.stl" (a second bolt is added later).
• Positioned "Arm, Domino.stl" onto the chassis assembly then secured in place with "Axle, Arm, Domino.stl".
• Secured the free ends of the piston and domino arms to the arms gear using one "Axle, Gear, Arms, Arms.stl".
Assemble the Chassis Right Side.
To assemble the chassis right side, I performed the following steps:
• Positioned "Guide, Right.stl" into "Mount,Right.stl" then secured in place using the remaining "Axle, Guide.stl".
• Positioned the right guide assembly onto "Chassis, Right.stl" and secured in place with two "Bolt, Mount.stl".
• Threaded the remaining "Hub.stl" into the front axle hole of the right chassis assembly.
Final Assembly.
For final assembly, I performed the following steps:
• Pressed "Gear, Front.stl" onto "Axle, Wheel, Front.stl" centering the gear on the axle spline.
• Positioned the front axle assembly into the chassis left assembly, long end first.
• Positioned the pin slot on the right guide over the right pin on the piston, positioned the front axle into the axle hole of the chassis right assembly, carefully positioned the left and right chassis assemblies together, then secured together using three "Bolt, Chassis.stl".
• Installed "Bolt, Mount, Chassis.stl" in the left chassis mount assembly.
• Placed four O-Rings onto the two "Wheel, Rear.stl" then secured the wheels to the chassis assembly using two "Axle, Wheel, Rear.stl".
• Placed four O-Rings onto the two "Wheel, Front.stl" then threaded the wheels onto the front axle assembly.
• Placed four batteries in the battery holder then installed the battery holder cover.
• Soldered the battery holder red ("+") wire to the motor "+" terminal, then soldered the battery holder black ("-") wire to the motor "-" terminal.
• Placed double sided tape on "Mount, Battery.stl".
• Pressed the battery holder onto the double sided tape, centering the battery onto the battery mount.
• Secured the battery holder assembly to the chassis assembly using one "Bolt, Chassis.stl" and one "Bolt, Mount, Battery.stl".
Operation.
• Press "Funnel.stl" into the funnel guides on the top of the model.
• Turn the model on, wait until the two guides are fully closed, then turn the model off (this step makes sure "Arm, Domino.stl" is in the proper position for domino loading).
• Load up to ten "Domino.stl" into the funnel.
• Turn the model on and deposit dominoes!
Hope you enjoy it!