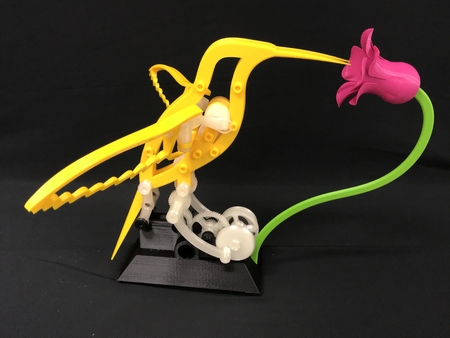
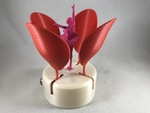
Ballerina in petals 3D for print


1049 Views 0 Likes 0 Downloads Download
While giraffes are my wife's number one favorite of all things (well, aside from me, hopefully...), ballerinas run a close secon...d. A few years back in my early 3D printing days, I designed and printed a hand operated ballerina automata for her. Since I was most certainly not an artist, I had a friend sketch me a ballerina on paper, which I in turn scanned, traced the outline, and extruded it into a 2mm thick ballerina profile for the hand operated design.
"Ballerina In Petals" is my second attempt at a ballerina themed design, using a truly 3D ballerina as opposed to a 2D extruded one. And again as I am still most certainly not an artist, this time I searched the web for a 3D modeled ballerina and found one published by Maryam Sadegh (https://www.thingiverse.com/thing:761132), an unbelievably highly detailed model which, thankfully, she allows sharing with attribution. After much processing using both Meshmixer and Autodesk Fusion 360, I manipulated the feet, arms, legs and polygon count of her extraordinarily detailed model to fit within my design constraints.
As usual, I probably forgot a file or two or who knows what else, so if you have any questions, please do not hesitate to ask as I do make mistakes in plenty. Designed using Autodesk Fusion 360, sliced using Cura 2.6.2, and printed in PLA on an Ultimaker 2+ Extended and a dual extrusion Ultimaker 3 Extended.
In order to complete this model, you will need to purchase a 6VDC 30RPM gear motor (available from a vari...ety of sources, including https://www.amazon.com/2-5KG-Micro-Speed-Reducing... and a 1.5vdc to 6vdc power supply (again available from a variety of sources). Optionally, I used this power connector https://www.amazon.com/2-5KG-Micro-Speed-Reducing... to interface with the power supply I chose.
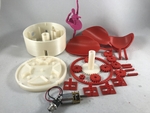
To assist in printing this model, I've included the file "Ballerina.pdf" which includes the settings I used for the various parts of "Ballerina".
Note there are some fairly small and finely detailed 3D printed parts in this model. In order to achieve the level of detail I desired, I used an "Advanced Ultimaker 3 Extended 3D Printing Kit" provided to me by the wonderful people at Ultimaker (thanks Matt!). I printed all parts on an Ultimaker 2+ Extended and an Ultimaker 3 Extended (using the Advanced 3D Printing Kit especially for the petals and ballerina). I've attached a PDF containing the settings I used for each of the parts. Prior to assembly, test fit and trim, file, sand, etc. all parts as necessary for smooth movement of moving surfaces, and tight fit for non moving surfaces. Depending on the colors you chose and your printer settings, more or less trimming, filing and/or sanding may be required. Carefully file all edges that contacted the build plate to make absolutely sure that all build plate "ooze" is removed and that all edges are smooth. I used small jewelers files and plenty of patience to perform this step.
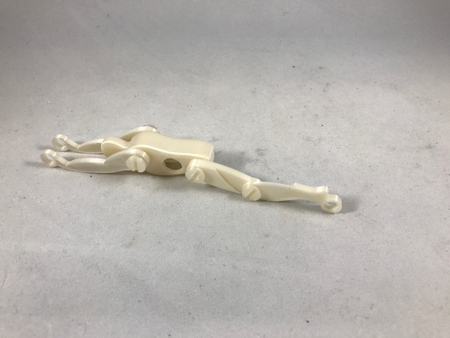
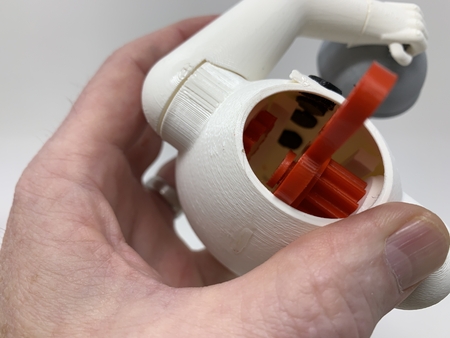
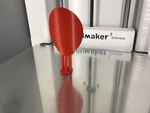
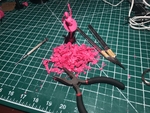
Regarding "Ballerina.stl", as noted in "Ballerina.pdf", I used both a brim and support to print this part, the support as noted in the attached PDF being at a 30 degree overhang angle. As shown in the before and after photographs, you will experience a sort of "Michelangelo" moment as you carefully remove piece by piece all PLA material (support) that doesn't look like a ballerina. But then again, if you have a dual extrusion printer such as an Ultimaker 3 (as do I), my son Marc eagerly pointed out that I have PVA water soluble filament and, well, that was one of my many "duh" moments for this model. Thanks Marc! I printed both a pink and transparent ballerina using PVA support material, and after a few hours in a heated/agitating water bath (I use a PCB tank with fresh water), they both turned out wonderful. Also note I printed this part using 100% infill to strengthen the joint between the ballerina's left foot at the threaded base.
Regarding "Petal Inside.stl" and "Petal Outside.stl" also as noted in "Ballerina.pdf", I printed these parts with support using a 60 degree overhang angle. While these models do not necessarily require support, the addition of the two support towers on both sides of the petal stem provides increased lateral stability during printing which greatly improves the appearance of these parts.
This model uses one M8 by1 threaded assembly and may require a M8 by 1 tap and/or die to clean the threaded components.
I soldered two three inch lengths of wire between the motor and connector; red to the motor "+" terminal and connector "tip"(center) terminal, and black to the motor "-" terminal and connector "ring" (case) terminal.
2) Assemble the Base.
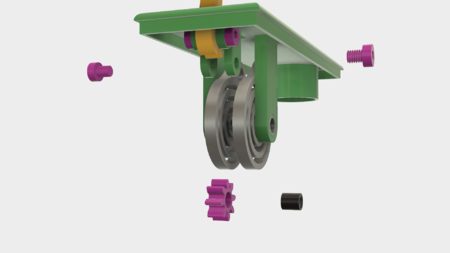
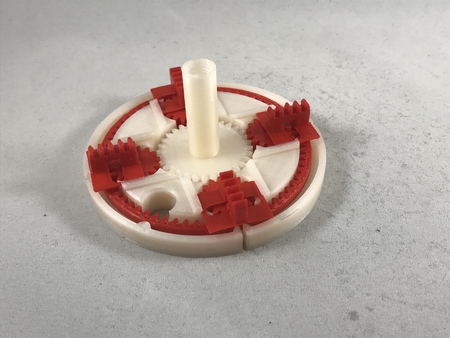
Prior to assembling the base, make absolutely certain that each "Yoke.stl" slides easily in each yoke slot in "Base.stl", and that each of the four "Gear Yoke.stl" and the one "Gear Ballerina.stl" rotate easily on their respective pins in "Base.stl". If not, for the yokes, using a 220 grit or slightly finer sheet of sandpaper laying flat on a smooth work surface, carefully sand the bottom and guide edges (the edges that will run in the yoke slots) of each "Yoke.stl" until they do. For the gears, use a round jewelers file, a modeling knife or 4mm drill bit to slightly enlarge the holes in these gears slightly until smooth rotation is attained; not sloppy, just smooth.
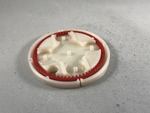
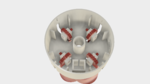
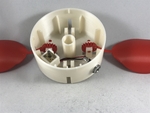
Position "Gear Ring (64 teeth).stl" into "Base.stl" as shown. The ring gear should rotate freely in the base.
Postion all four "Gear Yoke.stl" into "Base.stl" as shown carefully noting the position of the pins on "Gear Yoke.stl". Test the assembly to again insure free rotation.
Starting from the inside of a yoke slot in "Base.stl", insert one "Yoke.stl" into the yoke slots in "Base.stl". When you reach the yoke pin on "Gear Yoke.stl", slightly lift "Yoke.stl", slide it over the pin, the let it settle into place such that the pin on "Gear Yoke.stl" is in the pin slot of "Yoke.stl" as shown. Repeat this process with the remaining three "Yoke.stl". And again, check to make sure the ring gear, yoke gears and yokes slide freely.
Position "Gear Ballerina.stl" into "Base.stl" as shown. I applied a liberal coating of petroleum jelly between the contacting surfaces of "Gear Ballerina.stl" and "Base.stl" in order to hold it in position for final assembly. When complete, you should easily be able to rotate the ballerina column on "Gear Ballerina.stl" which in turn rotates the yokes and ring gears.
This is the base assembly.
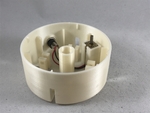
3) Assemble the Top.
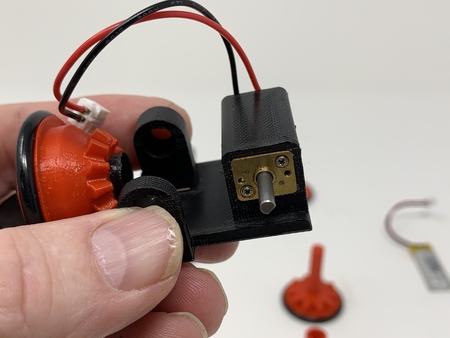
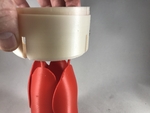
Press the motor into the motor housing in "Base.stl" guiding the motor wires through the motor slot opening as shown.
Position the connector (if you decide to use one) into the base as shown, then secure it with the included washer and nut.
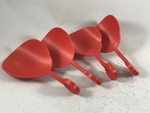
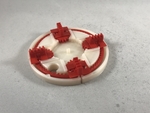
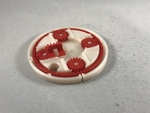
Press one each of "Gear Petal.stl" onto each of the two "Petal Inside.stl" as shown. This is the inside petal assembly. Note the gear teeth on "Gear Petal.stl" face outwards (towards the convex side of the petal).
Press one each of "Gear Petal.stl" onto each of the two "Petal Outside.stl" as shown. This is the outside petal assembly. Note again the gear teeth on "Gear Petal.stl" face outwards (towards the convex side of the petal).
Position one inside petal assembly between the petal assembly towers in "Base.stl" as shown, then press one "Axle Gear Petal.stl" through the petal assembly tower axle holes as shown. Note the axle, as shown, is longer than required to secure the petal assembly to the base. This is to allow removal of the axle if necessary. Repeat this process with the remaining inside petal assembly on the opposite petal assembly tower in "Base.stl".
Position one outside petal assembly between one of the remaining two petal assembly towers in "Base.stl", then press one "Axle Gear Petal.stl" through the petal assembly tower axle holes as shown. Note again the axle, as shown, is longer than required to secure the petal assembly to the base. And again, this is to allow removal of the axle if necessary. Repeat this process with the remaining outside petal assembly on the remaining petal assembly tower in "Base.stl".
This is the top assembly.
4) Final Assembly.
This step can be a little tricky and patience is required.
I applied a liberal amount of petroleum jelly to all gears and yokes prior to final assembly.
Using the tower on "Gear Ballerina (32 teeth).stl", rotate the gears such that all yokes are in the extreme outward position.
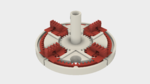
Turn the top assembly upside down such that the petals dangle straight down. While carefully aligning the four location pin slots and one motor gear access hole in the base assembly with the four location pins and motor shaft of the top assembly, press the two assemblies together until they fully engage.
Next, press "Gear Motor (8 teeth).stl" onto the motor shaft via the motor gear access hole in the base assembly. You may need to alter the rotational position of the ring gear in order for these two gears to mesh.
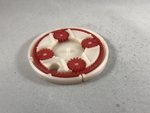
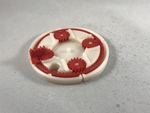
Turn the assembly right side up, apply power and make sure the petals raise and lower in unison. If not, carefully separate the base and top assemblies and recheck the alignment and position of the yoke gears.
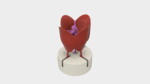
An elongated break in period (24 hours or so) will help to loosen the gears and petals before installing the ballerina. After break in, when the petals rotate to their lowest position, remove power and thread "Ballerina.stl" into the tower of "Gear Ballerina (32 teeth).stl" as shown.
Congratulations, you're done!
Hope you enjoy it!
Designer
Greg Zumwalt3d model description
A Ballerina AutomataWhile giraffes are my wife's number one favorite of all things (well, aside from me, hopefully...), ballerinas run a close secon...d. A few years back in my early 3D printing days, I designed and printed a hand operated ballerina automata for her. Since I was most certainly not an artist, I had a friend sketch me a ballerina on paper, which I in turn scanned, traced the outline, and extruded it into a 2mm thick ballerina profile for the hand operated design.
"Ballerina In Petals" is my second attempt at a ballerina themed design, using a truly 3D ballerina as opposed to a 2D extruded one. And again as I am still most certainly not an artist, this time I searched the web for a 3D modeled ballerina and found one published by Maryam Sadegh (https://www.thingiverse.com/thing:761132), an unbelievably highly detailed model which, thankfully, she allows sharing with attribution. After much processing using both Meshmixer and Autodesk Fusion 360, I manipulated the feet, arms, legs and polygon count of her extraordinarily detailed model to fit within my design constraints.
As usual, I probably forgot a file or two or who knows what else, so if you have any questions, please do not hesitate to ask as I do make mistakes in plenty. Designed using Autodesk Fusion 360, sliced using Cura 2.6.2, and printed in PLA on an Ultimaker 2+ Extended and a dual extrusion Ultimaker 3 Extended.
3d model print parameters
1) Purchase, Print and Prepare the Parts.In order to complete this model, you will need to purchase a 6VDC 30RPM gear motor (available from a vari...ety of sources, including https://www.amazon.com/2-5KG-Micro-Speed-Reducing... and a 1.5vdc to 6vdc power supply (again available from a variety of sources). Optionally, I used this power connector https://www.amazon.com/2-5KG-Micro-Speed-Reducing... to interface with the power supply I chose.
To assist in printing this model, I've included the file "Ballerina.pdf" which includes the settings I used for the various parts of "Ballerina".
Note there are some fairly small and finely detailed 3D printed parts in this model. In order to achieve the level of detail I desired, I used an "Advanced Ultimaker 3 Extended 3D Printing Kit" provided to me by the wonderful people at Ultimaker (thanks Matt!). I printed all parts on an Ultimaker 2+ Extended and an Ultimaker 3 Extended (using the Advanced 3D Printing Kit especially for the petals and ballerina). I've attached a PDF containing the settings I used for each of the parts. Prior to assembly, test fit and trim, file, sand, etc. all parts as necessary for smooth movement of moving surfaces, and tight fit for non moving surfaces. Depending on the colors you chose and your printer settings, more or less trimming, filing and/or sanding may be required. Carefully file all edges that contacted the build plate to make absolutely sure that all build plate "ooze" is removed and that all edges are smooth. I used small jewelers files and plenty of patience to perform this step.
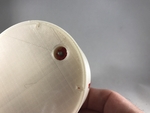
Regarding "Ballerina.stl", as noted in "Ballerina.pdf", I used both a brim and support to print this part, the support as noted in the attached PDF being at a 30 degree overhang angle. As shown in the before and after photographs, you will experience a sort of "Michelangelo" moment as you carefully remove piece by piece all PLA material (support) that doesn't look like a ballerina. But then again, if you have a dual extrusion printer such as an Ultimaker 3 (as do I), my son Marc eagerly pointed out that I have PVA water soluble filament and, well, that was one of my many "duh" moments for this model. Thanks Marc! I printed both a pink and transparent ballerina using PVA support material, and after a few hours in a heated/agitating water bath (I use a PCB tank with fresh water), they both turned out wonderful. Also note I printed this part using 100% infill to strengthen the joint between the ballerina's left foot at the threaded base.
Regarding "Petal Inside.stl" and "Petal Outside.stl" also as noted in "Ballerina.pdf", I printed these parts with support using a 60 degree overhang angle. While these models do not necessarily require support, the addition of the two support towers on both sides of the petal stem provides increased lateral stability during printing which greatly improves the appearance of these parts.
This model uses one M8 by1 threaded assembly and may require a M8 by 1 tap and/or die to clean the threaded components.
I soldered two three inch lengths of wire between the motor and connector; red to the motor "+" terminal and connector "tip"(center) terminal, and black to the motor "-" terminal and connector "ring" (case) terminal.
2) Assemble the Base.
Prior to assembling the base, make absolutely certain that each "Yoke.stl" slides easily in each yoke slot in "Base.stl", and that each of the four "Gear Yoke.stl" and the one "Gear Ballerina.stl" rotate easily on their respective pins in "Base.stl". If not, for the yokes, using a 220 grit or slightly finer sheet of sandpaper laying flat on a smooth work surface, carefully sand the bottom and guide edges (the edges that will run in the yoke slots) of each "Yoke.stl" until they do. For the gears, use a round jewelers file, a modeling knife or 4mm drill bit to slightly enlarge the holes in these gears slightly until smooth rotation is attained; not sloppy, just smooth.
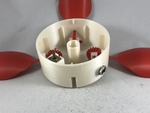
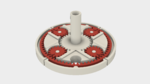
Position "Gear Ring (64 teeth).stl" into "Base.stl" as shown. The ring gear should rotate freely in the base.
Postion all four "Gear Yoke.stl" into "Base.stl" as shown carefully noting the position of the pins on "Gear Yoke.stl". Test the assembly to again insure free rotation.
Starting from the inside of a yoke slot in "Base.stl", insert one "Yoke.stl" into the yoke slots in "Base.stl". When you reach the yoke pin on "Gear Yoke.stl", slightly lift "Yoke.stl", slide it over the pin, the let it settle into place such that the pin on "Gear Yoke.stl" is in the pin slot of "Yoke.stl" as shown. Repeat this process with the remaining three "Yoke.stl". And again, check to make sure the ring gear, yoke gears and yokes slide freely.
Position "Gear Ballerina.stl" into "Base.stl" as shown. I applied a liberal coating of petroleum jelly between the contacting surfaces of "Gear Ballerina.stl" and "Base.stl" in order to hold it in position for final assembly. When complete, you should easily be able to rotate the ballerina column on "Gear Ballerina.stl" which in turn rotates the yokes and ring gears.
This is the base assembly.
3) Assemble the Top.
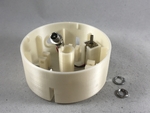
Press the motor into the motor housing in "Base.stl" guiding the motor wires through the motor slot opening as shown.
Position the connector (if you decide to use one) into the base as shown, then secure it with the included washer and nut.
Press one each of "Gear Petal.stl" onto each of the two "Petal Inside.stl" as shown. This is the inside petal assembly. Note the gear teeth on "Gear Petal.stl" face outwards (towards the convex side of the petal).
Press one each of "Gear Petal.stl" onto each of the two "Petal Outside.stl" as shown. This is the outside petal assembly. Note again the gear teeth on "Gear Petal.stl" face outwards (towards the convex side of the petal).
Position one inside petal assembly between the petal assembly towers in "Base.stl" as shown, then press one "Axle Gear Petal.stl" through the petal assembly tower axle holes as shown. Note the axle, as shown, is longer than required to secure the petal assembly to the base. This is to allow removal of the axle if necessary. Repeat this process with the remaining inside petal assembly on the opposite petal assembly tower in "Base.stl".
Position one outside petal assembly between one of the remaining two petal assembly towers in "Base.stl", then press one "Axle Gear Petal.stl" through the petal assembly tower axle holes as shown. Note again the axle, as shown, is longer than required to secure the petal assembly to the base. And again, this is to allow removal of the axle if necessary. Repeat this process with the remaining outside petal assembly on the remaining petal assembly tower in "Base.stl".
This is the top assembly.
4) Final Assembly.
This step can be a little tricky and patience is required.
I applied a liberal amount of petroleum jelly to all gears and yokes prior to final assembly.
Using the tower on "Gear Ballerina (32 teeth).stl", rotate the gears such that all yokes are in the extreme outward position.
Turn the top assembly upside down such that the petals dangle straight down. While carefully aligning the four location pin slots and one motor gear access hole in the base assembly with the four location pins and motor shaft of the top assembly, press the two assemblies together until they fully engage.
Next, press "Gear Motor (8 teeth).stl" onto the motor shaft via the motor gear access hole in the base assembly. You may need to alter the rotational position of the ring gear in order for these two gears to mesh.
Turn the assembly right side up, apply power and make sure the petals raise and lower in unison. If not, carefully separate the base and top assemblies and recheck the alignment and position of the yoke gears.
An elongated break in period (24 hours or so) will help to loosen the gears and petals before installing the ballerina. After break in, when the petals rotate to their lowest position, remove power and thread "Ballerina.stl" into the tower of "Gear Ballerina (32 teeth).stl" as shown.
Congratulations, you're done!
Hope you enjoy it!