Red baron hand launched glider 3D for print


19056 Views 1 Likes 0 Downloads Download the piece here from 3dforprint
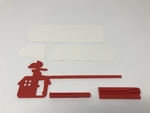
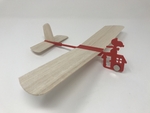
"Red Baron Hand Launched Glider" is a hybrid PLA / balsa wood hand launched glider. Weighing in at a scan...t 11g (.4oz) before balancing, this model features the Mr. Schulz "Snoopy" character at the helm of his flying doghouse and is designed for indoor / calm weather outdoor flying.
The design combines a 3D printed fuselage structure in conjunction with balsa wood flight surfaces in order to minimize weight and increase glide performance. Consisting of only three 3D printed fuselage components, and three 3D printed templates (used for cutting the four flight surfaces from 1/32" balsa wood), this model is pretty easy to print, assemble and fly. I used 3D printed templates for cutting the flight surfaces knowing I had many more of these to make.
As usual, I probably forgot a file or two or who knows what else, so if you have any questions, please do not hesitate to ask as I do make mistakes in plenty.
Designed using Autodesk Fusion 360, sliced using Cura 3.4.1 and printed in PLA on both an Ultimaker 2+ Extended and an Ultimaker 3 Extended.
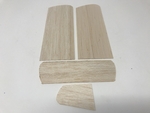
I purchased a 1/32" by 4" by 36" sheet of balsa and some neodymium disk magnets (I used two 12mm diameter di...sk magnets for balance) from my local hobby shop.
I printed one each of all parts at .1mm layer height, 20% infill, and printed "Fuselage, Tail.stl" using a brim.
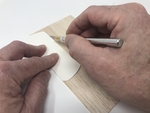
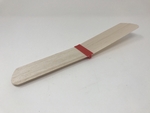
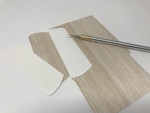
Using the template parts as a guide, I cut two wings and one each of the horizontal and vertical stabilizers from the balsa sheet. Note the grain orientation when cutting the wings and stabilizers. Once cut, I sanded the edges of the balsa parts using 220 grit sandpaper.
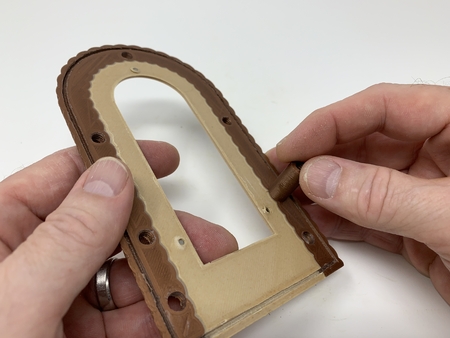
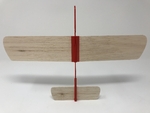
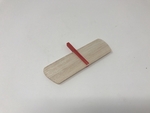
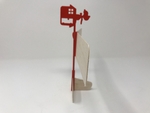
Assemble the Tail Section.
Slide the horizontal stabilizer into "Fuselage, Tail.stl" as shown, making sure it is centered.
Slide the vertical stabilizer into the assembly as shown.
Secure both stabilizers in position using small dots of thick cyanoacrylate glue.
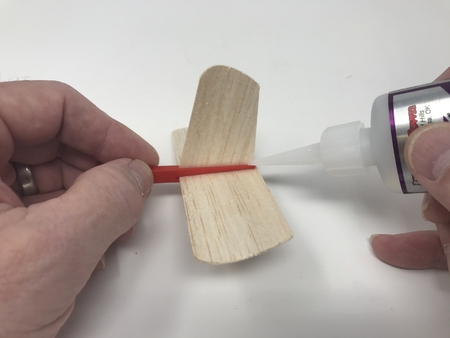
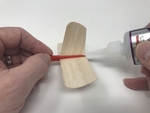
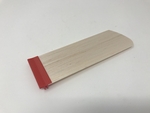
Assemble the Wing.
Press one wing into "Wing, Root.stl" as shown. Note the photograph shows the wing root thumb grip closest to the camera.
Press the second wing into the assembly as shown.
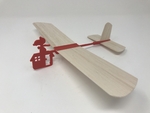
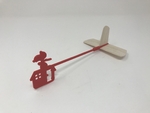
Final Assembly and Test.
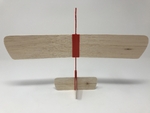
Press the tail assembly onto "Fuselage.stl" as shown.
Press the wing assembly onto the fuselage in the approximate location as shown.
Attach the two magnets to the fuselage in the approximate assembly as shown.
To fly the glider, grip the thumb grip on the wing assembly using your thumb and index finger as shown, then gently throw the glider into level flight. Examine the flight path and if the glider "stalls", slide the wing assembly towards the rear of the glider, if the glider noses down, slide the wing assembly towards the front of the glider. The magnets position and size may need to be adjusted in conjunction with wing assembly movement. Once your glider flies to your liking, fix the magnets and wing assembly into position using small dots of cyanoacrylate glue.
That is how I printed and assembled "Red Baron Hand Launched Glider".
Hope you enjoyed it!
Designer
Greg Zumwalt3d model description
A hand launched "Snoopy" controlled glider."Red Baron Hand Launched Glider" is a hybrid PLA / balsa wood hand launched glider. Weighing in at a scan...t 11g (.4oz) before balancing, this model features the Mr. Schulz "Snoopy" character at the helm of his flying doghouse and is designed for indoor / calm weather outdoor flying.
The design combines a 3D printed fuselage structure in conjunction with balsa wood flight surfaces in order to minimize weight and increase glide performance. Consisting of only three 3D printed fuselage components, and three 3D printed templates (used for cutting the four flight surfaces from 1/32" balsa wood), this model is pretty easy to print, assemble and fly. I used 3D printed templates for cutting the flight surfaces knowing I had many more of these to make.
As usual, I probably forgot a file or two or who knows what else, so if you have any questions, please do not hesitate to ask as I do make mistakes in plenty.
Designed using Autodesk Fusion 360, sliced using Cura 3.4.1 and printed in PLA on both an Ultimaker 2+ Extended and an Ultimaker 3 Extended.
3d model print parameters
Purchase, Print and Prepare the Parts.I purchased a 1/32" by 4" by 36" sheet of balsa and some neodymium disk magnets (I used two 12mm diameter di...sk magnets for balance) from my local hobby shop.
I printed one each of all parts at .1mm layer height, 20% infill, and printed "Fuselage, Tail.stl" using a brim.
Using the template parts as a guide, I cut two wings and one each of the horizontal and vertical stabilizers from the balsa sheet. Note the grain orientation when cutting the wings and stabilizers. Once cut, I sanded the edges of the balsa parts using 220 grit sandpaper.
Assemble the Tail Section.
Slide the horizontal stabilizer into "Fuselage, Tail.stl" as shown, making sure it is centered.
Slide the vertical stabilizer into the assembly as shown.
Secure both stabilizers in position using small dots of thick cyanoacrylate glue.
Assemble the Wing.
Press one wing into "Wing, Root.stl" as shown. Note the photograph shows the wing root thumb grip closest to the camera.
Press the second wing into the assembly as shown.
Final Assembly and Test.
Press the tail assembly onto "Fuselage.stl" as shown.
Press the wing assembly onto the fuselage in the approximate location as shown.
Attach the two magnets to the fuselage in the approximate assembly as shown.
To fly the glider, grip the thumb grip on the wing assembly using your thumb and index finger as shown, then gently throw the glider into level flight. Examine the flight path and if the glider "stalls", slide the wing assembly towards the rear of the glider, if the glider noses down, slide the wing assembly towards the front of the glider. The magnets position and size may need to be adjusted in conjunction with wing assembly movement. Once your glider flies to your liking, fix the magnets and wing assembly into position using small dots of cyanoacrylate glue.
That is how I printed and assembled "Red Baron Hand Launched Glider".
Hope you enjoyed it!