Simple secret box iv: jack o'lantern coin box 3D for print


8239 Views 1 Likes 0 Downloads Download the piece here from 3dforprint
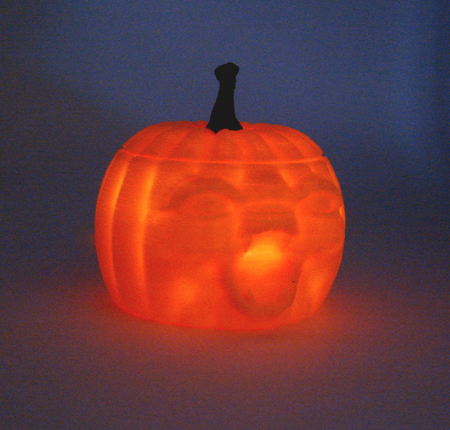
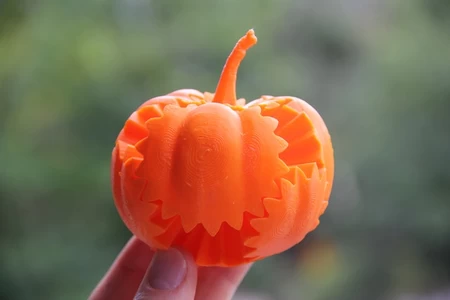
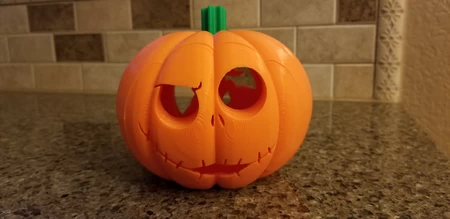
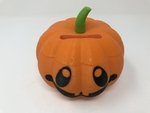
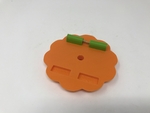
Simple Secret Box IV: Jack O'Lantern Coin Box is a Halloween / fall themed coin bo...x with a secret unlock / locking mechanism.
Like my Simple Secret Box II: Coin Bank model, this model was designed to teach the grandkids to save money while discouraging them from making early savings withdrawals (I didn't shown them how to open this box either).
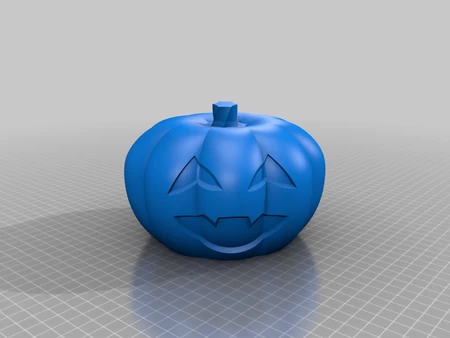
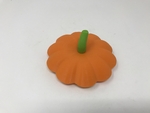
I've included two tops for this model, "Top.stl" and "Top With Coin Slot.stl", so that you may use the box as either a simple locking container or coin box. I've also included two bases for this model, "Base.stl" for single extrusion printers and "Base, Dual Extrusion.3mf" for dual extrusion printers.
As usual, I probably forgot a file or two or who knows what else, so if you have any questions, please do not hesitate to ask as I do make mistakes in plenty.
Designed using Autodesk Fusion 360, sliced using Cura 3.4.1 and printed in PLA on both an Ultimaker 2+ Extended and an Ultimaker 3 Extended.
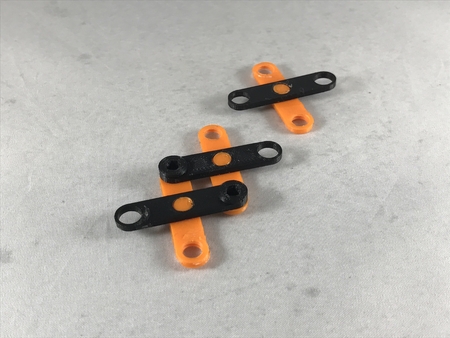
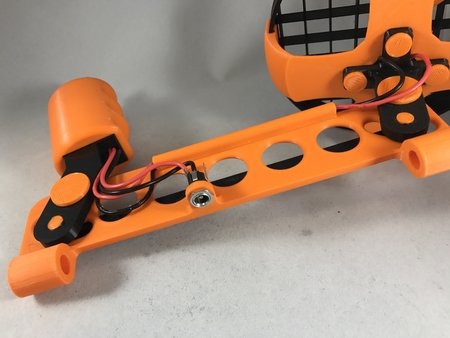
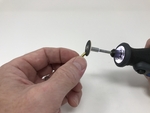
I purchased a 3.2mm (.125 or 1/8") by 36" brass rod from my local hobby shop to make the four 24 by 3.2mm lo...ck pins. I cut 4 24mm long pieces from this rod using a saw, then deburred the cut ends using a hand held motor tool. Make sure the pins are completely smooth with no burrs.
I printed all parts at .15mm with 20% infill. I printed "Base.stl" and "Base, Dual Extrusion.3mf" with supports, the remaining parts with no supports (I have printed both bases without supports which required minor interior clean up after printing). I printed four of "Guide.stl", and one each of the remaining parts.
Prior to assembly, test fit and trim, file, sand, etc. all parts as necessary for smooth movement of moving surfaces, and tight fit for non moving surfaces. Depending on the colors you chose and your printer settings, more or less trimming, filing and/or sanding may be required. Carefully file all edges that contacted the build plate to make absolutely sure that all build plate "ooze" is removed and that all edges are smooth. I used small jewelers files and plenty of patience to perform this step.
Assembly.
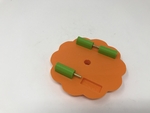
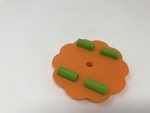
Press one "Guide.stl" into position in "Top.stl" (or "Top With Coin Slot.stl") as shown. Slide one of the prepared pins into the guide as shown. The pin should easily slide in and out of the guide.
Place another of the prepared pins into another guide, then press it into the top assembly as shown such that the pins are facing each other. Repeat this process with the remaining to guides and pins.
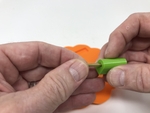
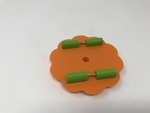
To test the mechanism, rock the assembly from side to side to make sure the pins slide in and out of their guides, then spin the mechanism to ensure the pins fully retract into the guides as shown.
With testing complete, press "Stem.stl" into the top assembly as shown.
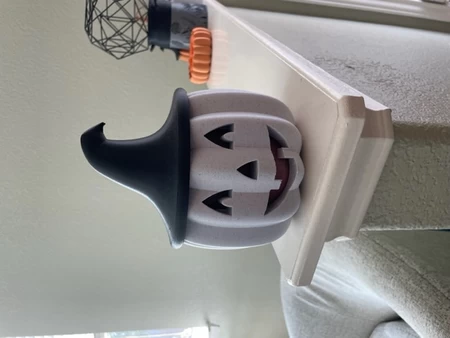
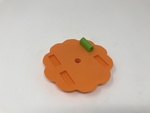
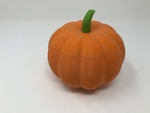
Finally, spin the top (stem side up) to retract the pins, then carefully place it on "Base.stl" (or "Base, Dual Extrusion.stl") as shown. If you bump or tilt the top during this process, a pin (or pins) may extend from its guide which will not allow the top to sit on the base. If this happens, simply place the top (stem side up) on a flat, smooth surface and spin it again.
At this time you may wish to glue the guides and stem to the top. If so, I recommend a couple of drops of thick cyanoacrylate glue to secure these parts in place.
That is how I printed and assembled "Simple Secret Box IV: Jack O'Lantern Coin Box".
Hope you enjoy it!
Designer
Greg Zumwalt3d model description
Halloween / Fall themed coin box / container with secret lock.Simple Secret Box IV: Jack O'Lantern Coin Box is a Halloween / fall themed coin bo...x with a secret unlock / locking mechanism.
Like my Simple Secret Box II: Coin Bank model, this model was designed to teach the grandkids to save money while discouraging them from making early savings withdrawals (I didn't shown them how to open this box either).
I've included two tops for this model, "Top.stl" and "Top With Coin Slot.stl", so that you may use the box as either a simple locking container or coin box. I've also included two bases for this model, "Base.stl" for single extrusion printers and "Base, Dual Extrusion.3mf" for dual extrusion printers.
As usual, I probably forgot a file or two or who knows what else, so if you have any questions, please do not hesitate to ask as I do make mistakes in plenty.
Designed using Autodesk Fusion 360, sliced using Cura 3.4.1 and printed in PLA on both an Ultimaker 2+ Extended and an Ultimaker 3 Extended.
3d model print parameters
Purchase, Print and Prepare the Parts.I purchased a 3.2mm (.125 or 1/8") by 36" brass rod from my local hobby shop to make the four 24 by 3.2mm lo...ck pins. I cut 4 24mm long pieces from this rod using a saw, then deburred the cut ends using a hand held motor tool. Make sure the pins are completely smooth with no burrs.
I printed all parts at .15mm with 20% infill. I printed "Base.stl" and "Base, Dual Extrusion.3mf" with supports, the remaining parts with no supports (I have printed both bases without supports which required minor interior clean up after printing). I printed four of "Guide.stl", and one each of the remaining parts.
Prior to assembly, test fit and trim, file, sand, etc. all parts as necessary for smooth movement of moving surfaces, and tight fit for non moving surfaces. Depending on the colors you chose and your printer settings, more or less trimming, filing and/or sanding may be required. Carefully file all edges that contacted the build plate to make absolutely sure that all build plate "ooze" is removed and that all edges are smooth. I used small jewelers files and plenty of patience to perform this step.
Assembly.
Press one "Guide.stl" into position in "Top.stl" (or "Top With Coin Slot.stl") as shown. Slide one of the prepared pins into the guide as shown. The pin should easily slide in and out of the guide.
Place another of the prepared pins into another guide, then press it into the top assembly as shown such that the pins are facing each other. Repeat this process with the remaining to guides and pins.
To test the mechanism, rock the assembly from side to side to make sure the pins slide in and out of their guides, then spin the mechanism to ensure the pins fully retract into the guides as shown.
With testing complete, press "Stem.stl" into the top assembly as shown.
Finally, spin the top (stem side up) to retract the pins, then carefully place it on "Base.stl" (or "Base, Dual Extrusion.stl") as shown. If you bump or tilt the top during this process, a pin (or pins) may extend from its guide which will not allow the top to sit on the base. If this happens, simply place the top (stem side up) on a flat, smooth surface and spin it again.
At this time you may wish to glue the guides and stem to the top. If so, I recommend a couple of drops of thick cyanoacrylate glue to secure these parts in place.
That is how I printed and assembled "Simple Secret Box IV: Jack O'Lantern Coin Box".
Hope you enjoy it!