Simple secret box v: gift box edition 3D for print


18648 Views 1 Likes 0 Downloads Download the piece here from 3dforprint
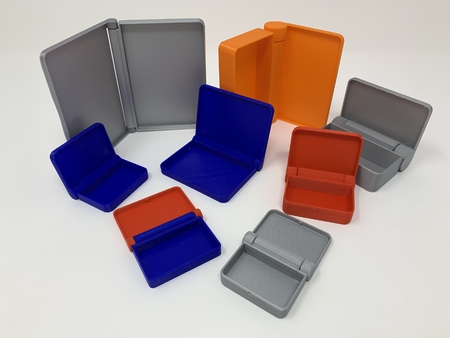
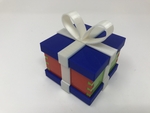
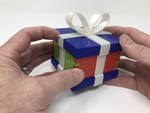
The kids and grandkids really like secret opening boxes (and well, ok, so do I), so I designed "Simple Secret Box ...V: Gift Box Edition" as yet another box with a secret locking mechanism. This box uses neodymium magnets and ferrous pins as the locking mechanism, and requires a sharp jolt on the correct axis in order to open it. The ribbons are optional, but with the upcoming holidays I decided to add them in order to give these boxes, with small gifts inside, to family and friends. As a final note, if you do not wish to assemble this as a locking box, simply skip the steps dealing with the pins and magnets, and you will have a gift box featuring dovetail construction that is easy to open.
As usual, I probably forgot a file or two or who knows what else, so if you have any questions, please do not hesitate to ask as I do make mistakes in plenty.
Designed using Autodesk Fusion 360, sliced using Cura 3.4.1 and printed in PLA on both an Ultimaker 2+ Extended and an Ultimaker 3 Extended.
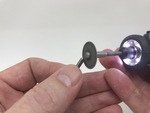
I purchased one 36" by .125" weld rod (any ferrous rod will work fine) and six 3mm diameter by 2mm thick neo...dymium disk magnets from my local hobby shop. I created the two locking pins by cutting two 28mm lengths from the weld rod using a hand held motor tool, then polished the cut ends again using a hand held motor tool to remove all burrs.
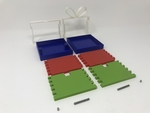
I printed two of "End.stl", one each of the remaining parts, at .15mm layer height with 20% infill.
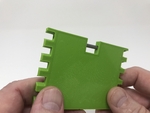
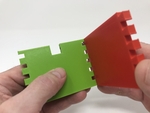
Prior to assembly, test fit and trim, file, sand, etc. all parts as necessary for smooth movement of moving surfaces, and tight fit for non moving surfaces. Depending on the colors you chose, your printer model and your printer settings, more or less trimming, filing and/or sanding may be required. Carefully file all edges that contacted the build plate, especially in and around the dovetail joints, to make absolutely sure that all build plate "ooze" is removed and that all edges are smooth. I used small jewelers files and plenty of patience to perform this step.
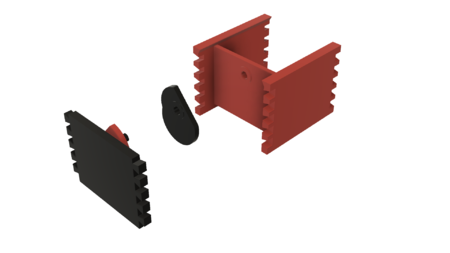
Assemble the Sides.
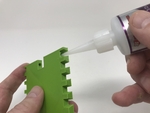
Stack three of the neodymium magnets together, place them in the non-through hole in "Side Left.stl", then secure in place with thick cyanoacrylate glue.
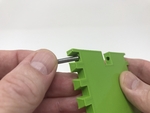
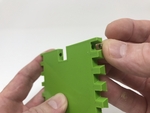
Slide one of the pins into the remaining hole (the through hole) in the left side.
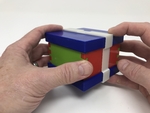
Test the assembly to make sure the pin will disengage from the magnets when the pin end of the side is sharply struck on a firm surface.
Repeat this process with the remaining side, "Side Right.stl".
Assemble the Box.
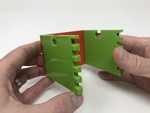
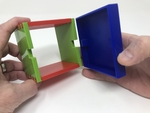
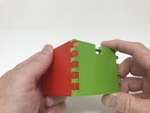
Press one "End.stl" onto one of the side assemblies as shown, making sure the dovetail pins and tails are tight.
Press the remaining side assembly on the opposite end of "End.stl" as shown, again making sure the dovetail pins and tails are tight.
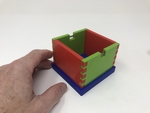
Press the remaining "End.stl" onto the assembly as shown.
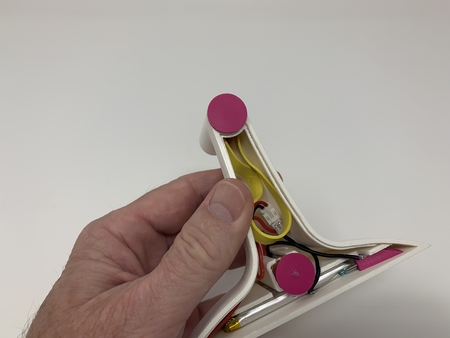
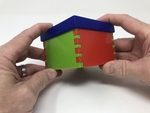
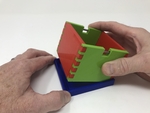
Place "Top.stl" on the assembly as shown, then test the locking mechanism.
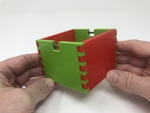
After testing, remove the top, press the side / end assembly into "Base.stl" as shown, glue in place with thick cyanoacrylate glue, then replace the top.
Slide "Ribbon 2.stl" onto the box as shown, followed by "Ribbon 1.stl", and align the half lap joints as shown.
That is how I printed and assembled "Simple Secret Box V: Gift Box Edition".
Hope you enjoy it!
Designer
Greg Zumwalt3d model description
A gift box secret opening box.The kids and grandkids really like secret opening boxes (and well, ok, so do I), so I designed "Simple Secret Box ...V: Gift Box Edition" as yet another box with a secret locking mechanism. This box uses neodymium magnets and ferrous pins as the locking mechanism, and requires a sharp jolt on the correct axis in order to open it. The ribbons are optional, but with the upcoming holidays I decided to add them in order to give these boxes, with small gifts inside, to family and friends. As a final note, if you do not wish to assemble this as a locking box, simply skip the steps dealing with the pins and magnets, and you will have a gift box featuring dovetail construction that is easy to open.
As usual, I probably forgot a file or two or who knows what else, so if you have any questions, please do not hesitate to ask as I do make mistakes in plenty.
Designed using Autodesk Fusion 360, sliced using Cura 3.4.1 and printed in PLA on both an Ultimaker 2+ Extended and an Ultimaker 3 Extended.
3d model print parameters
Purchase, Print and Prepare the Parts.I purchased one 36" by .125" weld rod (any ferrous rod will work fine) and six 3mm diameter by 2mm thick neo...dymium disk magnets from my local hobby shop. I created the two locking pins by cutting two 28mm lengths from the weld rod using a hand held motor tool, then polished the cut ends again using a hand held motor tool to remove all burrs.
I printed two of "End.stl", one each of the remaining parts, at .15mm layer height with 20% infill.
Prior to assembly, test fit and trim, file, sand, etc. all parts as necessary for smooth movement of moving surfaces, and tight fit for non moving surfaces. Depending on the colors you chose, your printer model and your printer settings, more or less trimming, filing and/or sanding may be required. Carefully file all edges that contacted the build plate, especially in and around the dovetail joints, to make absolutely sure that all build plate "ooze" is removed and that all edges are smooth. I used small jewelers files and plenty of patience to perform this step.
Assemble the Sides.
Stack three of the neodymium magnets together, place them in the non-through hole in "Side Left.stl", then secure in place with thick cyanoacrylate glue.
Slide one of the pins into the remaining hole (the through hole) in the left side.
Test the assembly to make sure the pin will disengage from the magnets when the pin end of the side is sharply struck on a firm surface.
Repeat this process with the remaining side, "Side Right.stl".
Assemble the Box.
Press one "End.stl" onto one of the side assemblies as shown, making sure the dovetail pins and tails are tight.
Press the remaining side assembly on the opposite end of "End.stl" as shown, again making sure the dovetail pins and tails are tight.
Press the remaining "End.stl" onto the assembly as shown.
Place "Top.stl" on the assembly as shown, then test the locking mechanism.
After testing, remove the top, press the side / end assembly into "Base.stl" as shown, glue in place with thick cyanoacrylate glue, then replace the top.
Slide "Ribbon 2.stl" onto the box as shown, followed by "Ribbon 1.stl", and align the half lap joints as shown.
That is how I printed and assembled "Simple Secret Box V: Gift Box Edition".
Hope you enjoy it!