The illumination of pi 3D for print


 The illumination of pi  3d model for 3d printers

 The illumination of pi  3d model for 3d printers
 The illumination of pi  3d model for 3d printers The illumination of pi  3d model for 3d printers
1180 Views 0 Likes 0 Downloads Download

Designer

marciot

3d model description

Summary

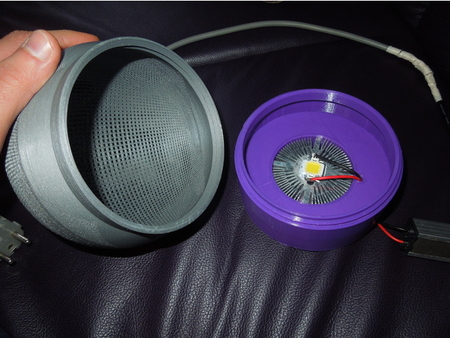
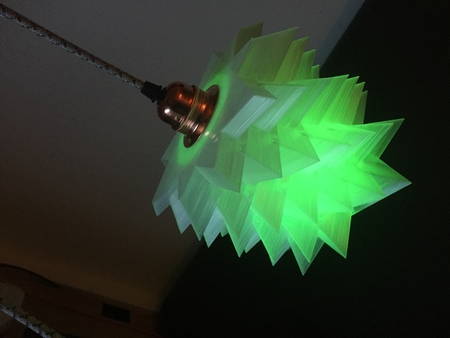
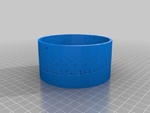
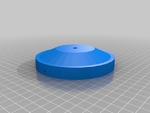
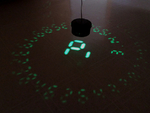
This light sculpture illuminates pi, a number that has brought enlightenment to students and scholars of math and science throughout the ag...es.

A mathematical technique warps the cutouts on the curved sides of the cylinder such that an unwarped shadow is cast on the floor. The digits of pi swirl along the arm of an Archimedes spiral; the length of the sequence before it fades a measure of your printer's ability to capture fine details.


3d model print parameters

*This project involves soldering, small-parts, electrical components and an extremely bright LED. You assume all risks and liabilities should you wish... to undertake it.* **Print it:** The lamp consists of two parts, a base and a lid. The cutouts on the base are larger towards the bottom of the lamp and get smaller further up. Because of this, you should get a good print regardless of the resolution of your printer -- a high resolution print will extend length of the sequence that is legible, but is not necessary. I made my print on a consumer FDM printer at 0.16mm layer height and retraction enabled **Light it up:** I used a 20mm high-power green LED star for my build. A pack of ten costs about $5 on eBay. The LED is rated at up to 3W. I've found running it at around half that seems to give good results without overheating and without needing a heat sink. Be careful not to look directly at the LED. It is extremely bright and could damage your eyes. **Power it:** A green high-power LED star will run off 2.2-3.4V, so you will need a suitable power supply. I used a bench-top adjustable power supply for testing, but in my final build I used a recycled 12V wall wart combined with a adjustable micro DC-DC step-down converter from e-bay. The particular one I used was listed as "10pcs Mini DC-DC Converter Step Down Module Adjustable Output 1-17V for RC PLANE" and sold by axeprice. It was small enough to fit inside the lamp, but you could also mount a larger module outside of the lamp. The converter has an adjustable output voltage, so you can tune the brightness of the LED and balance it against heat output. You could also get fairly good results with a two AA batteries and maybe some resistors, but it would not run as long. **Choosing the correct voltage:** Because in my build I did not use resistors, picking the correct voltage for the LED is very critical. The LED will begin conducting at a certain voltage, but beyond that, the current will increase very sharply. The sweet spot is only a few tenths of a volt beyond the initial conduction point. I recommend using a bench-top power supply with a variable voltage knob and an integrated ammeter to determine the voltage that causes enough current to run through the LED without overheating (about 0.4A for a 3W LED). Once you have determined the correct voltage, re-check it using a multimeter and write it down. You will use this voltage to tune the DC-to-DC converter during assembly. **Assemble it:** Assembly consists of soldering the various parts together. Be very careful about the polarity of the components. The following build sequence worked for me: * Cut the plug off your AC wall wart and separate the two wires to give a slack of about six inches. * Feed the two wires through the guide holes on the lid to the other side. * Solder the wires to the input pads of your DC-to-DC converter (In+ and In-). Use a multimeter to determine which wire is positive and which is negative if you cannot tell. Polarity is very important. * Plug in the AC wall wart and using the multimeter adjust the voltage on your DC-to-DC converter to the value you determined above. If you do not have a multimeter, set it to 2.3V to start -- this will keep you from blowing out your LED when you first power it up. * Solder two short lengths of wire to the LED + and - pads. A set of bench top helping hands is very good for this task. * Solder the other end of the wires to the output terminals of the DC-to-DC converter. Mind the polarity -- if you get it reversed, the LED will not light. * Use double sided foam tape to stick the DC-to-DC converter and the LED to the inside of the lid. The LED needs to be perfectly centered for the shadows to cast correctly. **Tune it:** Once you first plug it in, run your lamp without the base attached and monitor it to make sure the LED is not getting too hot. Let it run a couple minutes and checking regularly to make sure that it is not getting too hot to the touch. If it is, dial back the voltage on the DC-to-DC converter. You want the LED to run warm, but not hot enough to melt the plastic or cause a fire hazard. Do not run the lamp unattended until you have monitored it for several hours to make sure heat is not a problem. **Customize it:** This design is fully customizable. Be sure to check it out in the Makerbot customizer! **Credits and Inspiration:** * The idea of depicting PI in a spiral came from "Tower of Pi" by Roman Hegglin * Inspired by stereographic projection ideas of Henry Segerman and Saul Schleimer

Tags

Customizer Lamp Led Lightitup Math Middle school Pi Spiral Steam Stem Technology Tvy

License

CC Atribution

Related 3d models with tags

Customizable Artistic Vase

Customizable Artistic Vase

Dead or Alive. LED Chess Set

Dead or Alive. LED Chess Set

Tetradyma by Yavuz Demirhan

Tetradyma by Yavuz Demirhan

Tunable Tolerance Tetrahedron Twist Timewasting Toy

Tunable Tolerance Tetrahedron Twist Timewasting Toy

Customizable stereographic picture projector v3 highres

Customizable stereographic picture projector v3 highres

Pointy lamp shade

Pointy lamp shade

Hyperboloid pen holder

Hyperboloid pen holder

Customizable Convex Polyhedra

Customizable Convex Polyhedra

Ten Easter Eggshells

Ten Easter Eggshells

Petrified Shallows (Tealight holder - Voronoi noise)

Petrified Shallows (Tealight holder - Voronoi noise)

Cartoon Character Maker - A Customizable Avatar Builder

Cartoon Character Maker - A Customizable Avatar Builder

Twinkling Bloom (Tealight holder - Procedural Growth)

Twinkling Bloom (Tealight holder - Procedural Growth)

Preassembled Secret Heart Box

Preassembled Secret Heart Box

Street lamp (supportless, FDM friendly)

Street lamp (supportless, FDM friendly)

Torch lamp

Torch lamp

Customizable Cube Gears

Customizable Cube Gears

Simple LED light Bridge/Arc (Easy Print)

Simple LED light Bridge/Arc (Easy Print)

Alluvial Crush (Tealight holder - Reaction-Diffusion spirals)

Alluvial Crush (Tealight holder - Reaction-Diffusion spirals)

Tealight Holders (TPMS)

Tealight Holders (TPMS)

Tealight Holders (Lattice)

Tealight Holders (Lattice)