Ultimaker heated bed mosfet relay hack - v2 3D for print

2984 Views 2 Likes 1 Downloads Download the piece here from 3dforprint
NOTE: New version is out...!
https://www.youmagine.com/designs/prototype-heated-bed-mosfet-relay-v3
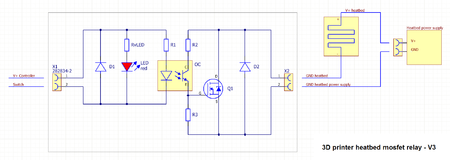
Hearing about people buying SSRs or even mechanical relays instead of just simply using a MosFET kinda hurts my feelings, so I decided to put together a little DIY hack to solve the problem.
In short: mechanical relays SUCK for DC (especially 24V, 200W which is a heavy burden for any mechanical relay to switch). Solid state relays (SSRs) are waaaay overengineered because they're made for industrial control applications where safety certificates, electrical isolation and things like these matter.
Anyways, I made this little hack which uses a MosFET (rated for 120A actual rms current! Forget any SSR's or mechanical relay's current capabilities...) to switch the heated bed's power from an Ultimaker 1 electronics board without using any current from the UM1's original power supply.
Of course, you need a second power supply dedicated for the heated bed (recommendations included in the BOM. Don't forget that these all come without wiring). I strongly recommend using a 24V power supply over 12V, because that means less current, meaning less stress on your wiring and connectors. Less current also means less electromagnetic interference.
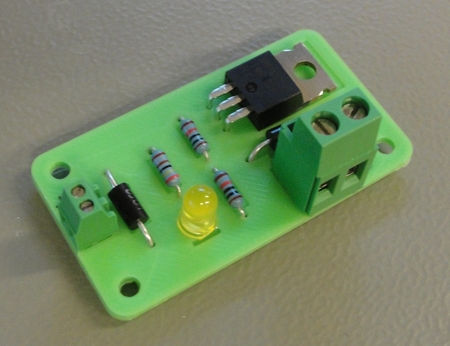
The hack includes a printable circuit board - you print the circuit board with your 3D printer, put in the components and solder them using their own "legs" (full instructions in the files). All you need is a soldering station (preferrably with temperature control) and some standard electronics solder.
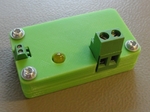
This design includes an LED indicator that will light up when the heatbed is activated. It's also fully ESD protected and enclosed.
Don't be afraid of the long instructions, it's really easy to solder the components together.
Note that you need to use the case if you want the thing to be protected against ESD effectively. The current design uses self-tapping screws for thermoplastics (aka "plastite screws"). If you really need a design that uses standard M3 screws, tell me. I can adapt the design. You could also just use a drill and drill through the small holes. Then you can put screws through and add nuts on the bottom.
Important: Make sure you don't put the MosFET relay on something that gets hot (such as the power supply unit)! It will not get warm by itself, but you don't want it to melt down and short-circuit...
The BOM includes supplier information for www.mouser.com. I recommend you get the parts from there. They ship worldwide. If you take one of the power supplies listed in the BOM, you should also get free shipping.
Note about the picture of the PCB's bottom side: Youmagine decided to rotate the picture and crop it. I tried it 3 times, it keeps rotating it. I have no time for this... See the assembly instructions for more pictures ;)
/update:
Added the sketchup source file. I completely forgot that earlier, sorry o.O
/update 2 (2015-06-02):
Added Wiring.pdf as a better display of how to hook this thing up.
IMPORTANT NOTE:
This hack is intended to be used with the Ultimaker Original power supply and electronics platform! Don't use it with anything else than that - this hack is not an universal design but really just a "hack" to get the UMO working with a heatbed.
Update: Other platforms may work as well, as long as there are no differences in how the heater outputs are switched (compared to the UMO electronics).
ANOTHER IMPORTANT NOTE:
Due to the way the heatbed output works and the fact that this MosFET relay hack does NOT feature an electrical insulation between input and output, you MUST use the second (heatbed) power supply EXCLUSIVELY for the heated bed and nothing else. The MosFET relay only works when it can break the GND connection between the controller (UMO electronics) and the heated bed. If you create any other GND connection between the controller and the heatbed power supply, then you bypass the relay, keeping it always in "ON" state.
As long as there is no other GND connection, the hack is completely safe to use as long as you solder all the joints correctly.
- 3x screws: 3mm diameter x 12mm length self-threading screws for thermoplastics...
Designer
Jonathan Bischof3d model description
Redefining the term PCB - from "printed circuit board" to "printable circuit board" !Make sure to look at all the documents!NOTE: New version is out...!
https://www.youmagine.com/designs/prototype-heated-bed-mosfet-relay-v3
Hearing about people buying SSRs or even mechanical relays instead of just simply using a MosFET kinda hurts my feelings, so I decided to put together a little DIY hack to solve the problem.
In short: mechanical relays SUCK for DC (especially 24V, 200W which is a heavy burden for any mechanical relay to switch). Solid state relays (SSRs) are waaaay overengineered because they're made for industrial control applications where safety certificates, electrical isolation and things like these matter.
Anyways, I made this little hack which uses a MosFET (rated for 120A actual rms current! Forget any SSR's or mechanical relay's current capabilities...) to switch the heated bed's power from an Ultimaker 1 electronics board without using any current from the UM1's original power supply.
Of course, you need a second power supply dedicated for the heated bed (recommendations included in the BOM. Don't forget that these all come without wiring). I strongly recommend using a 24V power supply over 12V, because that means less current, meaning less stress on your wiring and connectors. Less current also means less electromagnetic interference.
The hack includes a printable circuit board - you print the circuit board with your 3D printer, put in the components and solder them using their own "legs" (full instructions in the files). All you need is a soldering station (preferrably with temperature control) and some standard electronics solder.
This design includes an LED indicator that will light up when the heatbed is activated. It's also fully ESD protected and enclosed.
Don't be afraid of the long instructions, it's really easy to solder the components together.
Note that you need to use the case if you want the thing to be protected against ESD effectively. The current design uses self-tapping screws for thermoplastics (aka "plastite screws"). If you really need a design that uses standard M3 screws, tell me. I can adapt the design. You could also just use a drill and drill through the small holes. Then you can put screws through and add nuts on the bottom.
Important: Make sure you don't put the MosFET relay on something that gets hot (such as the power supply unit)! It will not get warm by itself, but you don't want it to melt down and short-circuit...
The BOM includes supplier information for www.mouser.com. I recommend you get the parts from there. They ship worldwide. If you take one of the power supplies listed in the BOM, you should also get free shipping.
Note about the picture of the PCB's bottom side: Youmagine decided to rotate the picture and crop it. I tried it 3 times, it keeps rotating it. I have no time for this... See the assembly instructions for more pictures ;)
/update:
Added the sketchup source file. I completely forgot that earlier, sorry o.O
/update 2 (2015-06-02):
Added Wiring.pdf as a better display of how to hook this thing up.
IMPORTANT NOTE:
This hack is intended to be used with the Ultimaker Original power supply and electronics platform! Don't use it with anything else than that - this hack is not an universal design but really just a "hack" to get the UMO working with a heatbed.
Update: Other platforms may work as well, as long as there are no differences in how the heater outputs are switched (compared to the UMO electronics).
ANOTHER IMPORTANT NOTE:
Due to the way the heatbed output works and the fact that this MosFET relay hack does NOT feature an electrical insulation between input and output, you MUST use the second (heatbed) power supply EXCLUSIVELY for the heated bed and nothing else. The MosFET relay only works when it can break the GND connection between the controller (UMO electronics) and the heated bed. If you create any other GND connection between the controller and the heatbed power supply, then you bypass the relay, keeping it always in "ON" state.
As long as there is no other GND connection, the hack is completely safe to use as long as you solder all the joints correctly.
3d model print parameters
- See BOM_V2.pdf for all the electronics parts- 3x screws: 3mm diameter x 12mm length self-threading screws for thermoplastics...