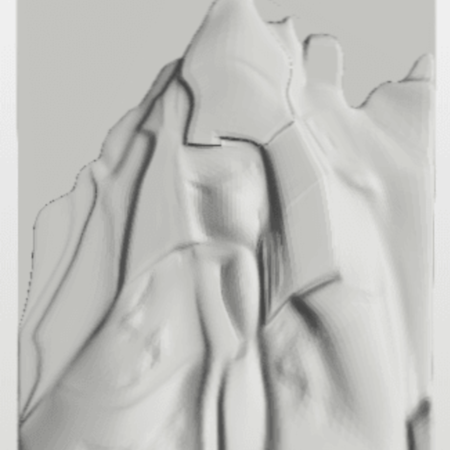
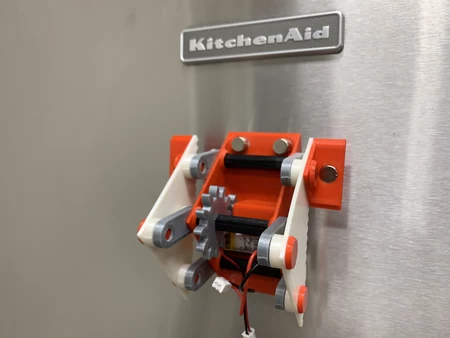
Refrigerator rover 3D for print
7891 Views 1 Likes 0 Downloads Download the piece here from 3dforprint
https://youtu.be/IzrAztJ-se8
https://youtu.be/SdlJh3FiCNA
...
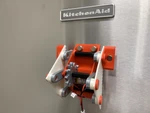
gets a new pair of (magnetic) shoes! Good for climbing ferrous mountains (or most refrigerators)!
In any event, the grandkids are fascinated wi...th it!
As usual, I probably forgot a file or two or who knows what else, so if you have any questions, please do not hesitate to ask as I do make plenty of mistakes.
Designed using FreeCAD, sliced using Ultimaker Cura 4.7.0, and 3D printed in PLA on Ultimaker S5s.
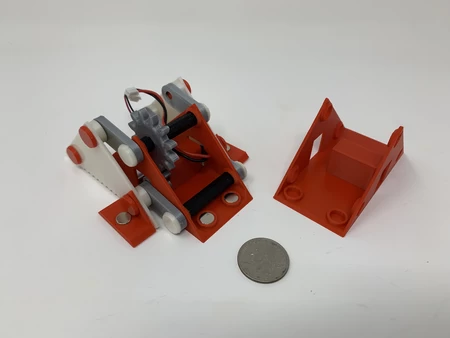
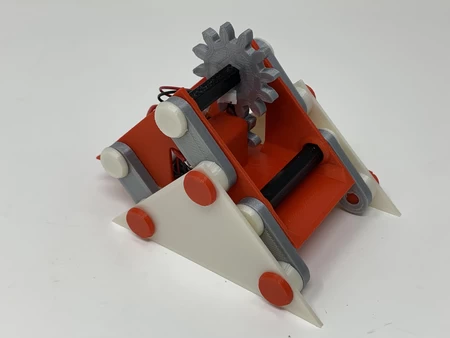
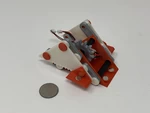
Parts.
I acquired the following parts:
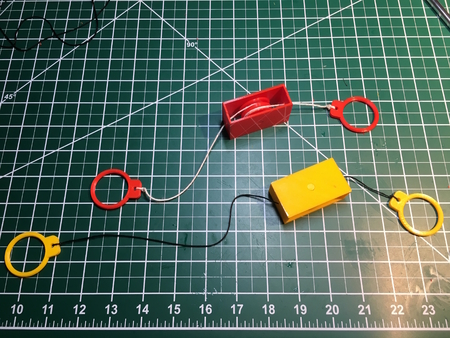
• One 3.7vdc 100ma Lithium Battery (https://www.adafruit.com/product/1570) and charger.
• One JST PH 2-Pin Cable (https://www.adafruit.com/product/3814).
• One N20 6VDC 100RPM gear motor (on line).
• Four 8mm (diameter) by 3mm (thick) neodymium magnets.
I 3D printed the following parts at .15mm layer height, 20% infill:
• Six "Arm.stl".
• Two "Axle, Magnet Mount.stl"
• Four "Axle, Side.stl".
• Three "Axle.stl".
• One "Base.stl".
• Six "Bolt, Axle.stl".
• One "Gear, Axle.stl".
• One "Gear, Motor.stl".
• Two "Magnet Mount.stl".
• Two "Side, Sawtooth.stl".
Prior to assembly, I test fit and trimmed, filed, drilled, sanded, etc. all parts as necessary for smooth movement of moving surfaces, and tight fit for non moving surfaces. Depending on you printer, your printer settings and the colors you chose, more or less trimming, filing, drilling and/or sanding may be required. Carefully file all edges that contacted the build plate to make absolutely certain that all build plate "ooze" is removed and that all edges are smooth.
I used small jewelers files and plenty of patience to perform this step.
The mechanism also uses threaded assembly, so I used a tap and die set (6mm by 1) for thread cleaning.
Assembly.
To assemble the mechanism, I performed the following steps:
• Positioned "Gear, Motor.stl" into "Base.stl", then pressed the motor into the base and gear.
• Pressed "Gear, Axle.stl" onto one of "Axle.stl".
• Soldered the JST connector to the motor such that the motor axle rotated counter clockwise when viewed from the axle end of the motor.
• Pressed two neodymium magnets in into the magnet pockets in the base assembly.
• Positioned the axle assembly in the base assembly, then secured in place with two "Arm.stl" and two "Bolt, Axle.stl".
• Positioned the second axle in the base assembly then secured in place with two "Arm.stl" and two "Bolt.stl".
• Positioned the third axle in the base assembly then secured in place with two "Arm.stl" and two "Bolt.stl".
• Attached one "Magnet Mount.stl" to one "Side, Sawtooth.stl" using a small dot of cyanoacrylate glue, making sure the axle hole on the magnet mount aligned with the axle hole in the side, then pressed one neodymium magnet in the magnet pocket of the magnet mount.
• Repeated the previous step for the remaining magnet mount and side.
• Attached one side assembly to the base assembly arms on one side using two "Axle, Side.stl" and one "Axle, Magnet Mount.stl".
• Repeated the previous step for the remaining side assembly.
• Secured the battery to the base assembly using double sided tape.
After assembly, I simply plugged the JST connector onto the battery connector, placed the mechanism on the refrigerator, and off it climbed!
And that is how I 3D printed and assembled "Refrigerator Rover".
I hope you enjoyed it!
Designer
Greg Zumwalt3d model description
A ferrous front refrigerator climbing mechanism.https://youtu.be/IzrAztJ-se8
https://youtu.be/SdlJh3FiCNA
...
3d model print parameters
gets a new pair of (magnetic) shoes! Good for climbing ferrous mountains (or most refrigerators)!
In any event, the grandkids are fascinated wi...th it!
As usual, I probably forgot a file or two or who knows what else, so if you have any questions, please do not hesitate to ask as I do make plenty of mistakes.
Designed using FreeCAD, sliced using Ultimaker Cura 4.7.0, and 3D printed in PLA on Ultimaker S5s.
Parts.
I acquired the following parts:
• One 3.7vdc 100ma Lithium Battery (https://www.adafruit.com/product/1570) and charger.
• One JST PH 2-Pin Cable (https://www.adafruit.com/product/3814).
• One N20 6VDC 100RPM gear motor (on line).
• Four 8mm (diameter) by 3mm (thick) neodymium magnets.
I 3D printed the following parts at .15mm layer height, 20% infill:
• Six "Arm.stl".
• Two "Axle, Magnet Mount.stl"
• Four "Axle, Side.stl".
• Three "Axle.stl".
• One "Base.stl".
• Six "Bolt, Axle.stl".
• One "Gear, Axle.stl".
• One "Gear, Motor.stl".
• Two "Magnet Mount.stl".
• Two "Side, Sawtooth.stl".
Prior to assembly, I test fit and trimmed, filed, drilled, sanded, etc. all parts as necessary for smooth movement of moving surfaces, and tight fit for non moving surfaces. Depending on you printer, your printer settings and the colors you chose, more or less trimming, filing, drilling and/or sanding may be required. Carefully file all edges that contacted the build plate to make absolutely certain that all build plate "ooze" is removed and that all edges are smooth.
I used small jewelers files and plenty of patience to perform this step.
The mechanism also uses threaded assembly, so I used a tap and die set (6mm by 1) for thread cleaning.
Assembly.
To assemble the mechanism, I performed the following steps:
• Positioned "Gear, Motor.stl" into "Base.stl", then pressed the motor into the base and gear.
• Pressed "Gear, Axle.stl" onto one of "Axle.stl".
• Soldered the JST connector to the motor such that the motor axle rotated counter clockwise when viewed from the axle end of the motor.
• Pressed two neodymium magnets in into the magnet pockets in the base assembly.
• Positioned the axle assembly in the base assembly, then secured in place with two "Arm.stl" and two "Bolt, Axle.stl".
• Positioned the second axle in the base assembly then secured in place with two "Arm.stl" and two "Bolt.stl".
• Positioned the third axle in the base assembly then secured in place with two "Arm.stl" and two "Bolt.stl".
• Attached one "Magnet Mount.stl" to one "Side, Sawtooth.stl" using a small dot of cyanoacrylate glue, making sure the axle hole on the magnet mount aligned with the axle hole in the side, then pressed one neodymium magnet in the magnet pocket of the magnet mount.
• Repeated the previous step for the remaining magnet mount and side.
• Attached one side assembly to the base assembly arms on one side using two "Axle, Side.stl" and one "Axle, Magnet Mount.stl".
• Repeated the previous step for the remaining side assembly.
• Secured the battery to the base assembly using double sided tape.
After assembly, I simply plugged the JST connector onto the battery connector, placed the mechanism on the refrigerator, and off it climbed!
And that is how I 3D printed and assembled "Refrigerator Rover".
I hope you enjoyed it!