star trek original series - hand phaser type i - midgrade 3D for print


2828 Views 1 Likes 0 Downloads Download the piece here from 3dforprint
A replica of the Phaser (Type I) prop from the original Star Trek ser...ies. This is the "midgrade" version (detailed enough to be seen in close-up, but no moving parts or electric components); a "hero" version is also in the works, and I plan to also make a Type II body into which these will fit.
I've included bodies for both the original version from the early first season, and the Wah Ming Chang screen-friendlier redesign that was used throughout the rest of the series.
For the early version, print "Midgrade P1 Body - Early Season One", "Midgrade P1 Thumbwheel", and "Midgrade P1 Emitter".
For the later version, print "Midgrade P1 Body", "Midgrade P1 Thumbwheel", "Midgrade P1 Emitter", "Midgrade P1 Crispy", "Midgrade P1 Rail 1", and "Midgrade P1 Rail 2".
There's also a "unibody" version of the latter, for those who absolutely hate printing multipart models, though it would make painting somewhat more tedious, and I would suggest using supports for the bottom of the thumbwheel (the bodies are intended to be printed vertically, with no supports).
NEW: I've added, by request, a "Midgrade P1 Body - Hollow" for SLS printing services. This version passes the Shapeways checks for all the plastic options currently available.
Modeled in Blender using reference photos from "The Making of Star Trek" (which very helpfully included a ruler for scale along with the top, bottom, and side views of the prop), and numerous HD screencaps from trekcore.com.
========== Print Settings ==========
Rafts: No
Supports: No
Resolution: 0.1mm layers
Infill: 25%
Printing Notes:
I printed all parts without supports or brims, except for the "crispy" (the rectangular part with a diamond pattern). On my printer, that part prints the cleanest when vertical, so I added a 15-line brim around it to keep it from tipping over. I also printed the main bodies on blue tape just for extra security, since they're tall and have a relatively small footprint.
========== Post-Printing ==========
1. Finish Parts
For the bodies, I used Smooth-On XTC-3D, then sanded away any imperfections that remained using progressively finer grits (120, 220, 320, 600, 800, 1000, 1500, 2000).
For the other parts, I sanded them using the same progression of sandpapers. The "crispy" (diamond-pattern metal plate) and the ridges of the thumbwheel were sanded only lightly, so as not to wear away the pattern too much.
The XTC-3D was too good, and completely filled in the grooves used to indicate where the removable cover would be on the hero prop. I deepened the grooves on the model, but the photos show the original version.
2. Prime
I used "Alclad II Grey Primer and Microfiller" on all parts.
3. Paint
To get a nice smooth surface, I recommend using an airbrush.
For the bodies, I used Vallejo paints (Black for the early version, German Grey for the later version), then after those had dried, gave them a coat of Alclad Klear Kote Light Sheen.
For the metallic bits, I covered them first with Alclad II Gloss Black, then painted with Alclad II Polished Brass (for the emitter) and Alclad II Airframe Aluminum (everything else).
I also painted the "screw" underneath, using Model Masters Silver paint and a small brush.
Note on colors: for the early phaser, solid black is the appropriate color choice (http://tinyurl.com/j8kpoot); later on, the color varied from medium-dark grey (http://tinyurl.com/js9avxk) to black (http://tinyurl.com/z9ax9cr). (Note that the latter image is one of the lower-grade props with a sharp-cornered "crispy" and the rails just painted on.)
4. Glue together
Using the clear epoxy (or your adhesive of choice), glue the thumbwheel into the rectangular depression on the top of the phaser, and the emitter onto the front, in the hemispherical space provided under the front detail.
For the later version of the phaser, also glue the rails into the slots on the sides and the "crispy" at the front of the rectangular depression on top.
5. Gauges
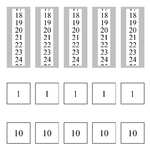
Print out the file "TOS Phaser I Gauges.png" at 600dpi. Coat both sides of the printout with Mod Podge (or similar acrylic sealer) and allow to dry. Cut out either one "1" square and one "10" square (for the early version of the phaser) or one of the graduated gauges.
For the earlier phaser, use the clear epoxy (or your adhesive of choice) to affix the "1" label to the front square on the right side of the phaser body, and the "10" label to the rear square (see pictures for reference).
For the later phaser, cut an 8.5mm (1/3") segment from the 19mm (3/4") rod. Then cut that almost in half (2mm off of center). Polish all cut edges of the smaller piece using successively finer sandpapers (as detailed in finishing step 1). Use clear epoxy to affix the graduated gauge to the flat rectangular edge of the gauge cover. Once that has dried, use clear epoxy to affix the gauge to the top of the phaser body, opposite the thumbwheel.
6. Power Indicator (optional)
For a power indicator on the later version of the phaser, I used an an Esslinger jeweled dustproof watch crown refill (4.5mm, Tap 10, Yellow w/ Blue). I didn't have any drill bits the exact size I needed, so I drilled with the next smallest size down and used a small round file to enlarge the hole until the crown would sit flat on the phaser top. Place the hole between the thumbwheel and the gauge, just a millimeter or so rear of center.
This feature didn't appear on all phasers, so it is an optional step. Color choice is also up to the user (of the two phasers shown in "Assignment: Earth" - http://tinyurl.com/zxsnfxy - one had a blue crown and the other had a red one.)
7. "Trigger" (optional)
Some phasers had a bright silver "button" on the underside (http://tinyurl.com/jgvzz69). It's about the perfect size and shape for a cylindrical neodymium magnet 8mm diameter by 3mm high (5/16" diameter by 3/32" high), which can be used to affix the phaser to a ferrous or magnetic surface for display.
Use clear epoxy to glue the magnet into the circular depression on the bottom of the phaser.
- Clear epoxy
- 8.5mm (1/3") length of 19mm (3/4") clear acrylic rod
- Watch crown (Esslinger jeweled dustproo...f watch crown refill - 4.5mm, Tap 10, Yellow w/ Blue) - OPTIONAL
- 8mm diameter by 3mm high (5/16" diameter by 3/32" high) cylindrical neodymium magnet - OPTIONAL
Designer
Shipbrook3d model description
Replica of the Type I Phaser prop from the original Star Trek television seriesA replica of the Phaser (Type I) prop from the original Star Trek ser...ies. This is the "midgrade" version (detailed enough to be seen in close-up, but no moving parts or electric components); a "hero" version is also in the works, and I plan to also make a Type II body into which these will fit.
I've included bodies for both the original version from the early first season, and the Wah Ming Chang screen-friendlier redesign that was used throughout the rest of the series.
For the early version, print "Midgrade P1 Body - Early Season One", "Midgrade P1 Thumbwheel", and "Midgrade P1 Emitter".
For the later version, print "Midgrade P1 Body", "Midgrade P1 Thumbwheel", "Midgrade P1 Emitter", "Midgrade P1 Crispy", "Midgrade P1 Rail 1", and "Midgrade P1 Rail 2".
There's also a "unibody" version of the latter, for those who absolutely hate printing multipart models, though it would make painting somewhat more tedious, and I would suggest using supports for the bottom of the thumbwheel (the bodies are intended to be printed vertically, with no supports).
NEW: I've added, by request, a "Midgrade P1 Body - Hollow" for SLS printing services. This version passes the Shapeways checks for all the plastic options currently available.
Modeled in Blender using reference photos from "The Making of Star Trek" (which very helpfully included a ruler for scale along with the top, bottom, and side views of the prop), and numerous HD screencaps from trekcore.com.
========== Print Settings ==========
Rafts: No
Supports: No
Resolution: 0.1mm layers
Infill: 25%
Printing Notes:
I printed all parts without supports or brims, except for the "crispy" (the rectangular part with a diamond pattern). On my printer, that part prints the cleanest when vertical, so I added a 15-line brim around it to keep it from tipping over. I also printed the main bodies on blue tape just for extra security, since they're tall and have a relatively small footprint.
========== Post-Printing ==========
1. Finish Parts
For the bodies, I used Smooth-On XTC-3D, then sanded away any imperfections that remained using progressively finer grits (120, 220, 320, 600, 800, 1000, 1500, 2000).
For the other parts, I sanded them using the same progression of sandpapers. The "crispy" (diamond-pattern metal plate) and the ridges of the thumbwheel were sanded only lightly, so as not to wear away the pattern too much.
The XTC-3D was too good, and completely filled in the grooves used to indicate where the removable cover would be on the hero prop. I deepened the grooves on the model, but the photos show the original version.
2. Prime
I used "Alclad II Grey Primer and Microfiller" on all parts.
3. Paint
To get a nice smooth surface, I recommend using an airbrush.
For the bodies, I used Vallejo paints (Black for the early version, German Grey for the later version), then after those had dried, gave them a coat of Alclad Klear Kote Light Sheen.
For the metallic bits, I covered them first with Alclad II Gloss Black, then painted with Alclad II Polished Brass (for the emitter) and Alclad II Airframe Aluminum (everything else).
I also painted the "screw" underneath, using Model Masters Silver paint and a small brush.
Note on colors: for the early phaser, solid black is the appropriate color choice (http://tinyurl.com/j8kpoot); later on, the color varied from medium-dark grey (http://tinyurl.com/js9avxk) to black (http://tinyurl.com/z9ax9cr). (Note that the latter image is one of the lower-grade props with a sharp-cornered "crispy" and the rails just painted on.)
4. Glue together
Using the clear epoxy (or your adhesive of choice), glue the thumbwheel into the rectangular depression on the top of the phaser, and the emitter onto the front, in the hemispherical space provided under the front detail.
For the later version of the phaser, also glue the rails into the slots on the sides and the "crispy" at the front of the rectangular depression on top.
5. Gauges
Print out the file "TOS Phaser I Gauges.png" at 600dpi. Coat both sides of the printout with Mod Podge (or similar acrylic sealer) and allow to dry. Cut out either one "1" square and one "10" square (for the early version of the phaser) or one of the graduated gauges.
For the earlier phaser, use the clear epoxy (or your adhesive of choice) to affix the "1" label to the front square on the right side of the phaser body, and the "10" label to the rear square (see pictures for reference).
For the later phaser, cut an 8.5mm (1/3") segment from the 19mm (3/4") rod. Then cut that almost in half (2mm off of center). Polish all cut edges of the smaller piece using successively finer sandpapers (as detailed in finishing step 1). Use clear epoxy to affix the graduated gauge to the flat rectangular edge of the gauge cover. Once that has dried, use clear epoxy to affix the gauge to the top of the phaser body, opposite the thumbwheel.
6. Power Indicator (optional)
For a power indicator on the later version of the phaser, I used an an Esslinger jeweled dustproof watch crown refill (4.5mm, Tap 10, Yellow w/ Blue). I didn't have any drill bits the exact size I needed, so I drilled with the next smallest size down and used a small round file to enlarge the hole until the crown would sit flat on the phaser top. Place the hole between the thumbwheel and the gauge, just a millimeter or so rear of center.
This feature didn't appear on all phasers, so it is an optional step. Color choice is also up to the user (of the two phasers shown in "Assignment: Earth" - http://tinyurl.com/zxsnfxy - one had a blue crown and the other had a red one.)
7. "Trigger" (optional)
Some phasers had a bright silver "button" on the underside (http://tinyurl.com/jgvzz69). It's about the perfect size and shape for a cylindrical neodymium magnet 8mm diameter by 3mm high (5/16" diameter by 3/32" high), which can be used to affix the phaser to a ferrous or magnetic surface for display.
Use clear epoxy to glue the magnet into the circular depression on the bottom of the phaser.
3d model print parameters
- Acrylic sealer (such as Mod Podge)- Clear epoxy
- 8.5mm (1/3") length of 19mm (3/4") clear acrylic rod
- Watch crown (Esslinger jeweled dustproo...f watch crown refill - 4.5mm, Tap 10, Yellow w/ Blue) - OPTIONAL
- 8mm diameter by 3mm high (5/16" diameter by 3/32" high) cylindrical neodymium magnet - OPTIONAL