Tension 3d pour imprimer


5701 Vues 1 Goûts 0 Téléchargements Téléchargez ici la pièce à partir de 3dforprint
J'ai vraiment besoin de sortir de mon rocher plus souvent ...
De nombreuses chaises, tables et modèles LEGO de �...�tendance» se sont présentés dans mon flux de «vidéo suggérée» ces derniers temps et je dois admettre que je n'avais jamais entendu parler de la tension et en tant que tel, je n'avais aucune idée de ce que cela signifiait. J'ai donc regardé quelques-unes des vidéos dans mon flux sur le sujet et j'ai décidé de m'essayer à la conception, à l'impression 3D et à l'assemblage d'un modèle de tendance simple et simple.
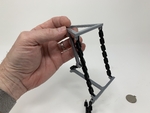
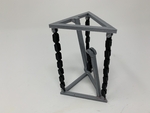
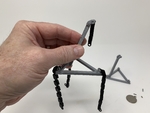
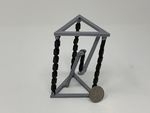
Ce modèle de tendance ("intégrité tension") est entièrement imprimé en 3D, y compris les trois chaînes extérieures "imprimées" plus longues "et la chaîne centrale unique" imprimée en place "plus courte. Et qu'est-ce qui rend ces chaînes si importantes? Eh bien, tandis que les trois chaînes extérieures maintiennent le haut et le bas ensemble (compression), en même temps, la chaîne centrale unique éloigne le haut et le bas (tension). Avec une bonne conception de longueur de chaîne, les forces de compression et de tension du modèle sont équilibrées et donc le modèle semble "flotter". Et pourquoi les chaînes imprimées 3D sont-elles plus utiles que la chaîne ou la ficelle? En utilisant Autodesk Fusion 360, j'ai pu concevoir des chaînes imprimées 3D suffisamment précises en longueur pour équilibrer les forces de compression / tension requises par ce modèle, par opposition à l'essai et à l'erreur de l'assemblage / ficelle nécessitant de nombreux ajustements. Et après l'impression et l'assemblage de quelques copies de ce modèle, les chaînes imprimées en 3D se sont en effet révélées beaucoup plus faciles à assembler que mes versions String / Twine, donc je suis resté avec les chaînes.
Comme d'habitude, j'ai probablement oublié un fichier ou deux ou qui sait quoi d'autre, donc si vous avez des questions, n'hésitez pas à demander car je fais beaucoup d'erreurs.
Conçu en utilisant Autodesk Fusion 360, tranché à l'aide de Cura 4.6.1 et 3D imprimé dans PLA sur un ultimaker 2+ étendu, un ultimaker 3 étendu et un ultimaker s5.
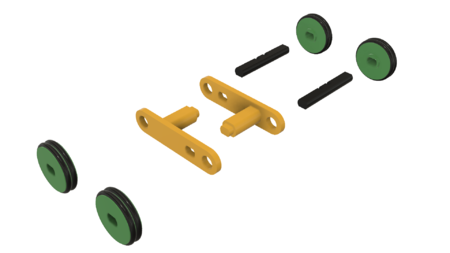
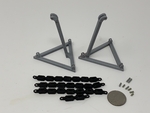
Parties.
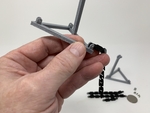
I 3D a imprimé toutes les pièces à une hauteur de couche de 0,15 mm avec 100% rempli. J'ai imprimé un "base.stl...", trois "chaîne (long) .stl", une "chaîne (court) .stl", deux "broches (long) .stl", six "broche (court) .stl" et un "Top.stl".
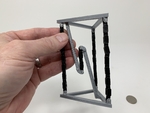
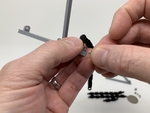
Ce modèle est une impression de précision en raison des petites pièces impliquées (les composants "PIN" ont un diamètre de 2 mm) et les chaînes "Imprimer en place" (tolérance de 0,5 mm). J'ai imprimé toutes les broches en même temps en utilisant un bord pour Hold Down. Une fois imprimé, j'ai retiré les épingles de la bordure et déposé soigneusement l'extrémité de la plaque de construction des broches lisses.
Assemblée.
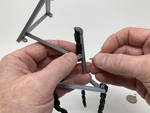
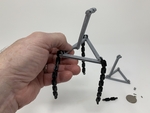
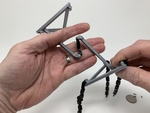
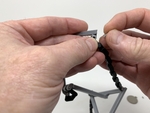
Pour assembler "Tensegrity", j'ai effectué les étapes suivantes:
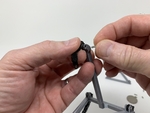
• Attaché une "chaîne (longue) .stl" à "top.stl" Long Chain Mount en utilisant une "broche (courte) .stl".
• Attaché les deux chaînes longues restantes aux supports de chaîne longues supérieures à l'aide de deux autres broches courtes.
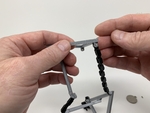
• Attaché "chaîne (court) .stl" à la tour de chaîne courte de l'assemblage supérieur à l'aide d'une "broche (longue) .stl".
• Attaché l'extrémité libre de la chaîne courte à la tour de chaîne courte sur "base.stl" en utilisant une longue broche.
• Attaché les extrémités libres des deux chaînes arrière arrière aux montées de chaîne arrière sur le dessus.
• Attaché l'extrémité libre de la longue chaîne avant au support de chaîne avant en haut.
Et c'est ainsi que j'ai imprimé et assemblé de la "tendance".
J'espère que vous l'avez apprécié!
Designer
Greg ZumwaltDescription du modèle 3D
Un modèle "intégrité tension".J'ai vraiment besoin de sortir de mon rocher plus souvent ...
De nombreuses chaises, tables et modèles LEGO de �...�tendance» se sont présentés dans mon flux de «vidéo suggérée» ces derniers temps et je dois admettre que je n'avais jamais entendu parler de la tension et en tant que tel, je n'avais aucune idée de ce que cela signifiait. J'ai donc regardé quelques-unes des vidéos dans mon flux sur le sujet et j'ai décidé de m'essayer à la conception, à l'impression 3D et à l'assemblage d'un modèle de tendance simple et simple.
Ce modèle de tendance ("intégrité tension") est entièrement imprimé en 3D, y compris les trois chaînes extérieures "imprimées" plus longues "et la chaîne centrale unique" imprimée en place "plus courte. Et qu'est-ce qui rend ces chaînes si importantes? Eh bien, tandis que les trois chaînes extérieures maintiennent le haut et le bas ensemble (compression), en même temps, la chaîne centrale unique éloigne le haut et le bas (tension). Avec une bonne conception de longueur de chaîne, les forces de compression et de tension du modèle sont équilibrées et donc le modèle semble "flotter". Et pourquoi les chaînes imprimées 3D sont-elles plus utiles que la chaîne ou la ficelle? En utilisant Autodesk Fusion 360, j'ai pu concevoir des chaînes imprimées 3D suffisamment précises en longueur pour équilibrer les forces de compression / tension requises par ce modèle, par opposition à l'essai et à l'erreur de l'assemblage / ficelle nécessitant de nombreux ajustements. Et après l'impression et l'assemblage de quelques copies de ce modèle, les chaînes imprimées en 3D se sont en effet révélées beaucoup plus faciles à assembler que mes versions String / Twine, donc je suis resté avec les chaînes.
Comme d'habitude, j'ai probablement oublié un fichier ou deux ou qui sait quoi d'autre, donc si vous avez des questions, n'hésitez pas à demander car je fais beaucoup d'erreurs.
Conçu en utilisant Autodesk Fusion 360, tranché à l'aide de Cura 4.6.1 et 3D imprimé dans PLA sur un ultimaker 2+ étendu, un ultimaker 3 étendu et un ultimaker s5.
Paramètres d'impression du modèle 3D
Matériels et méthodesParties.
I 3D a imprimé toutes les pièces à une hauteur de couche de 0,15 mm avec 100% rempli. J'ai imprimé un "base.stl...", trois "chaîne (long) .stl", une "chaîne (court) .stl", deux "broches (long) .stl", six "broche (court) .stl" et un "Top.stl".
Ce modèle est une impression de précision en raison des petites pièces impliquées (les composants "PIN" ont un diamètre de 2 mm) et les chaînes "Imprimer en place" (tolérance de 0,5 mm). J'ai imprimé toutes les broches en même temps en utilisant un bord pour Hold Down. Une fois imprimé, j'ai retiré les épingles de la bordure et déposé soigneusement l'extrémité de la plaque de construction des broches lisses.
Assemblée.
Pour assembler "Tensegrity", j'ai effectué les étapes suivantes:
• Attaché une "chaîne (longue) .stl" à "top.stl" Long Chain Mount en utilisant une "broche (courte) .stl".
• Attaché les deux chaînes longues restantes aux supports de chaîne longues supérieures à l'aide de deux autres broches courtes.
• Attaché "chaîne (court) .stl" à la tour de chaîne courte de l'assemblage supérieur à l'aide d'une "broche (longue) .stl".
• Attaché l'extrémité libre de la chaîne courte à la tour de chaîne courte sur "base.stl" en utilisant une longue broche.
• Attaché les extrémités libres des deux chaînes arrière arrière aux montées de chaîne arrière sur le dessus.
• Attaché l'extrémité libre de la longue chaîne avant au support de chaîne avant en haut.
Et c'est ainsi que j'ai imprimé et assemblé de la "tendance".
J'espère que vous l'avez apprécié!