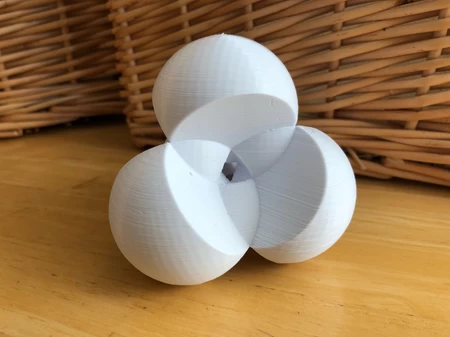
Tres velas en 3D para imprimir
6210 Visualizaciones 2 Me gusta 0 Descargas realizadas Descarga aqui la pieza desde 3dforprint
https://youtu.be/xM-oZDBRcOM
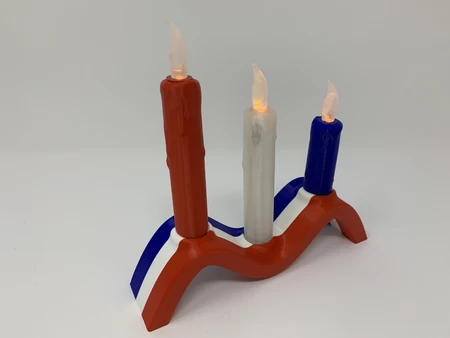
"Tres Velas" en atuendo del cuatro de julio.
Funciona unos días con una c...arga usando tres ledes de lámpara de té rescatados y lentes de llama, un imán, un interruptor de láminas, una batería LiPo de 500 mah y seis piezas impresas en 3D (cinco únicas). Inclínalo hacia atrás y se enciende, inclínalo hacia adelante y se apaga.
Los estamos usando como centros de mesa para nuestra reunión anual del cuatro de julio. Y si celebras el cuatro de julio, ¡te deseamos unas vacaciones seguras!
Diseñado usando Autodesk Fusion 360 y Meshmixer 3.5.474, cortado usando Cura 4.1 e impreso en Ultimaker PLA en un Ultimaker 2 + Extended y un Ultimaker 3 Extended.
He comprado las siguientes piezas:
○ Un cargador USB LiIon/LiPoly (https://www.adafruit.com/product/259)....
○ Una batería LiPo (https://www.adafruit.com/product/1578).
○ Un cable de 2 pines JST PH-Cabezal macho 200 mm (https://www.adafruit.com/product/3814).
○ Un interruptor de pestañas (2 por 12 mm, Interruptor de pestañas Gikfun 20pcs Normalmente abierto Interruptor de inducción Magnética N/O Electromagnético para Arduino (Paquete de 20 piezas) EK1621x2, disponible en línea).
○ Un imán de neodimio (12 mm de diámetro por 3 mm de espesor, tienda de pasatiempos local).
○ Tres rescatados lámpara de té led y llama lenses.(https://www.amazon.com/gp/product/B00T28FWVS/ref=ppx_yo_dt_b_asin_image_o00_s00?ie=UTF8&psc=1).
○ Tres resistencias de 100 ohmios.
Imprimí en 3D las siguientes partes en .altura de la capa de 15m m, relleno del 20%, ningunos soportes:
○ Adaptador de tres ".stl".
○ Una " Base.stl".
○ Una " Vela, Corta.stl".
○ Vela de dos".stl".
○ Una " Cubierta Trasera.stl".
○ Una " Herramienta, Pre-hilo.stl "(opcional, utilizado para ayudar en la limpieza de las roscas en " Base.stl").
Para generar la base tricolor, utilicé la función "Post Procesador" Cura 4.1 (Extensiones Cura, Post Procesamiento, Menú Modificar Código G) para pausar la impresora en las alturas de capa 98 y 196, cambié el color del filamento y luego reanudé la impresión. Siguiendo la orientación de " Base.stl", comencé con azul (para las capas 0 a 97), cambié a blanco (para las capas 98 a 195) y finalmente cambié a rojo.
Cableado y Montaje.
El cableado para "Tres Velas" es bastante sencillo.
○ Batería positiva ( " + " ) se conecta a los ánodos de los tres led (LED1, LED2, LED3).
○ Negativo de la batería ( " - " ) se conecta a un cable del interruptor reed (S1).
○ El cable restante en el interruptor de láminas se conecta a un cable de cada una de las tres resistencias (R1, R2, R3).
○ El cable restante de las tres resistencias se conecta a los cátodos de los tres LED respectivos.
Até y monté "Tres velas" de la siguiente manera:
○ Doblado cuidadosamente un cable del interruptor de pestañas (S1).
○ Soldó el cable negro del cable de 2 pines JST PH al cable recto del interruptor de láminas y un cable negro de 60 mm de longitud de 26 AWG al cable doblado del interruptor de láminas.
○ Deslizó el conjunto del interruptor de pestañas hacia atrás.stl", entonces usando pegamento grueso del cianoacrilato pegué los alambres a la parte posterior para el alivio de tensión.
○ Soldó las tres resistencias de 100 ohmios (R1, R2 y R3) al extremo libre de la longitud de 60 mm del cable negro de 26 AWG.
○ Vela Roscada, Corta.stl " en " Base.stl".
○ Roscó el extremo libre del carro de 26 AWG de alambre negro a través de la base y hasta la vela corta, luego córtela a la longitud necesaria para alcanzar desde el cable libre de la resistencia R1 hasta el cable del cátodo LED.
○ Soldó el extremo de la vela del cable negro de 26 AWG al cable del cátodo LED.
○ Soldó el extremo de la base del cable negro de 26 AWG al cable libre en la resistencia R1.
○ Enhebró el extremo libre del carro de 26 AWG de alambre rojo a través de la base y hasta la vela corta, luego córtela a la longitud necesaria para alcanzar desde el cable rojo del cable de 2 pines JST PH hasta el cable de ánodo LED.
○ Soldó el extremo de la vela del cable rojo de 26 AWG al cable del ánodo LED.
○ Soldó el extremo de la base del cable rojo 26 AWG al cable rojo del cable de 2 pines JST PH.
○ Probó el cableado conectando la batería al cable de 2 pines JST PH y colocando el neodimio cerca del interruptor de láminas y se aseguró de que el LED se iluminara.
○ Presionó una lente de llama recuperada en un adaptador".stl".
○ Presionado el LED en el conjunto de la lente de llama.
○ Presionó el conjunto de lente de llama en la vela.
○ Repite este proceso para las velas restantes.
Cableado expuesto aislado usando cinta eléctrica.
○ Colocó la batería en el conjunto y luego la conectó al cable de 2 pines JST PH para asegurarse de que todos los LED se iluminaran.
○ Colocar el imán de neodimio en la base.
○ Presiona la cubierta trasera en la base.
Para iluminar "Tres Velas" inclínelo hacia atrás, y para extinguirlo inclínelo hacia adelante (puede ser necesario un pequeño grifo para separar el imán del interruptor de láminas).
Y así es como hice "Tres Velas".
Espero que lo disfruten!
Diseñador
Greg ZumwaltDescripción del modelo 3d
Tres Velas en Atuendo del Cuatro de Juliohttps://youtu.be/xM-oZDBRcOM
"Tres Velas" en atuendo del cuatro de julio.
Funciona unos días con una c...arga usando tres ledes de lámpara de té rescatados y lentes de llama, un imán, un interruptor de láminas, una batería LiPo de 500 mah y seis piezas impresas en 3D (cinco únicas). Inclínalo hacia atrás y se enciende, inclínalo hacia adelante y se apaga.
Los estamos usando como centros de mesa para nuestra reunión anual del cuatro de julio. Y si celebras el cuatro de julio, ¡te deseamos unas vacaciones seguras!
Diseñado usando Autodesk Fusion 360 y Meshmixer 3.5.474, cortado usando Cura 4.1 e impreso en Ultimaker PLA en un Ultimaker 2 + Extended y un Ultimaker 3 Extended.
Parametros de impresión 3d
Compra, Imprime y Prepara las Piezas.He comprado las siguientes piezas:
○ Un cargador USB LiIon/LiPoly (https://www.adafruit.com/product/259)....
○ Una batería LiPo (https://www.adafruit.com/product/1578).
○ Un cable de 2 pines JST PH-Cabezal macho 200 mm (https://www.adafruit.com/product/3814).
○ Un interruptor de pestañas (2 por 12 mm, Interruptor de pestañas Gikfun 20pcs Normalmente abierto Interruptor de inducción Magnética N/O Electromagnético para Arduino (Paquete de 20 piezas) EK1621x2, disponible en línea).
○ Un imán de neodimio (12 mm de diámetro por 3 mm de espesor, tienda de pasatiempos local).
○ Tres rescatados lámpara de té led y llama lenses.(https://www.amazon.com/gp/product/B00T28FWVS/ref=ppx_yo_dt_b_asin_image_o00_s00?ie=UTF8&psc=1).
○ Tres resistencias de 100 ohmios.
Imprimí en 3D las siguientes partes en .altura de la capa de 15m m, relleno del 20%, ningunos soportes:
○ Adaptador de tres ".stl".
○ Una " Base.stl".
○ Una " Vela, Corta.stl".
○ Vela de dos".stl".
○ Una " Cubierta Trasera.stl".
○ Una " Herramienta, Pre-hilo.stl "(opcional, utilizado para ayudar en la limpieza de las roscas en " Base.stl").
Para generar la base tricolor, utilicé la función "Post Procesador" Cura 4.1 (Extensiones Cura, Post Procesamiento, Menú Modificar Código G) para pausar la impresora en las alturas de capa 98 y 196, cambié el color del filamento y luego reanudé la impresión. Siguiendo la orientación de " Base.stl", comencé con azul (para las capas 0 a 97), cambié a blanco (para las capas 98 a 195) y finalmente cambié a rojo.
Cableado y Montaje.
El cableado para "Tres Velas" es bastante sencillo.
○ Batería positiva ( " + " ) se conecta a los ánodos de los tres led (LED1, LED2, LED3).
○ Negativo de la batería ( " - " ) se conecta a un cable del interruptor reed (S1).
○ El cable restante en el interruptor de láminas se conecta a un cable de cada una de las tres resistencias (R1, R2, R3).
○ El cable restante de las tres resistencias se conecta a los cátodos de los tres LED respectivos.
Até y monté "Tres velas" de la siguiente manera:
○ Doblado cuidadosamente un cable del interruptor de pestañas (S1).
○ Soldó el cable negro del cable de 2 pines JST PH al cable recto del interruptor de láminas y un cable negro de 60 mm de longitud de 26 AWG al cable doblado del interruptor de láminas.
○ Deslizó el conjunto del interruptor de pestañas hacia atrás.stl", entonces usando pegamento grueso del cianoacrilato pegué los alambres a la parte posterior para el alivio de tensión.
○ Soldó las tres resistencias de 100 ohmios (R1, R2 y R3) al extremo libre de la longitud de 60 mm del cable negro de 26 AWG.
○ Vela Roscada, Corta.stl " en " Base.stl".
○ Roscó el extremo libre del carro de 26 AWG de alambre negro a través de la base y hasta la vela corta, luego córtela a la longitud necesaria para alcanzar desde el cable libre de la resistencia R1 hasta el cable del cátodo LED.
○ Soldó el extremo de la vela del cable negro de 26 AWG al cable del cátodo LED.
○ Soldó el extremo de la base del cable negro de 26 AWG al cable libre en la resistencia R1.
○ Enhebró el extremo libre del carro de 26 AWG de alambre rojo a través de la base y hasta la vela corta, luego córtela a la longitud necesaria para alcanzar desde el cable rojo del cable de 2 pines JST PH hasta el cable de ánodo LED.
○ Soldó el extremo de la vela del cable rojo de 26 AWG al cable del ánodo LED.
○ Soldó el extremo de la base del cable rojo 26 AWG al cable rojo del cable de 2 pines JST PH.
○ Probó el cableado conectando la batería al cable de 2 pines JST PH y colocando el neodimio cerca del interruptor de láminas y se aseguró de que el LED se iluminara.
○ Presionó una lente de llama recuperada en un adaptador".stl".
○ Presionado el LED en el conjunto de la lente de llama.
○ Presionó el conjunto de lente de llama en la vela.
○ Repite este proceso para las velas restantes.
Cableado expuesto aislado usando cinta eléctrica.
○ Colocó la batería en el conjunto y luego la conectó al cable de 2 pines JST PH para asegurarse de que todos los LED se iluminaran.
○ Colocar el imán de neodimio en la base.
○ Presiona la cubierta trasera en la base.
Para iluminar "Tres Velas" inclínelo hacia atrás, y para extinguirlo inclínelo hacia adelante (puede ser necesario un pequeño grifo para separar el imán del interruptor de láminas).
Y así es como hice "Tres Velas".
Espero que lo disfruten!
