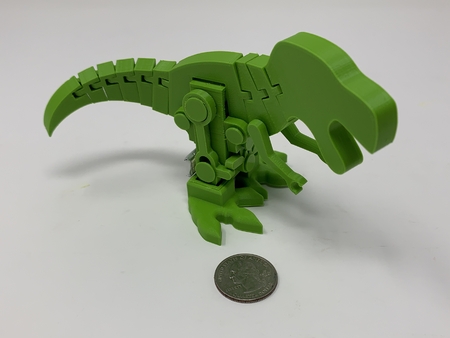
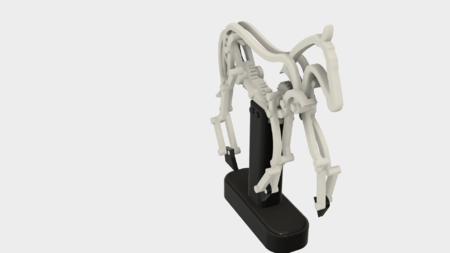
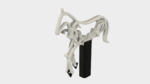
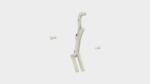
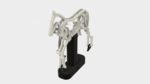
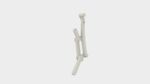
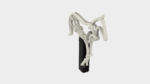
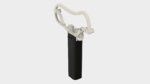
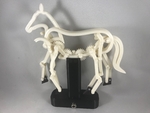
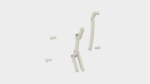
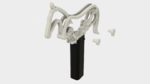
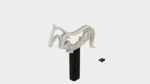
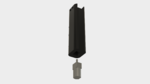
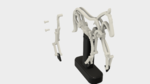
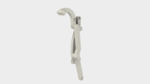
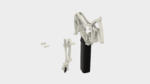
Horse, prototype 3D for print


23925 Views 1 Likes 1 Downloads Download the piece here from 3dforprint
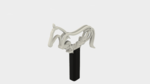
"Horse, Prototype" is a test fixture for an upcoming project I'm working on.... I designed this as a test for the leg, head and tail movements of a horse in motion. The model is small enough to print on most 3D printers, but by being small, it requires parts that are also quite small which as a result require high precision during printing, filing and assembly. The design also uses 4mm threads thus a 4mm by .7 tap and die may be necessary to clean up the threaded parts.
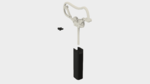
A word of caution, the motor used in this design, while relatively inexpensive, is quite noisy at 6vdc, thus this isn't a model for the night stand!
As usual, I probably forgot a file or two or who knows what else, so if you have any questions, please do not hesitate to ask as I do make mistakes in plenty.
Designed using Autodesk Fusion 360, sliced using Cura 3.2.1 and printed in PLA on both an Ultimaker 2+ Extended and an Ultimaker 3 Extended.
I've include the file "Images.zip" which includes photos and cad images of the steps involved. I've also inc...luded the file "STLs.zip" which includes all the parts.
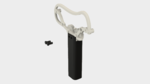
I purchased a 6vdc 300rpm gear motor (available on line, 33x12mm 300RPM Metal Mini DC 6V Gearbox Gearwheel Motor Mini Reduce Speed Geared Electric Motor), a 6vdc wall mount power supply (available online), and a phono jack (available online) for the power supply to power Horse, Prototype.
I've included the file "Horse Parts.htm.zip" which contains the parts list and print parameters I used to print Horse, Prototype.
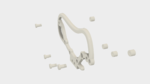
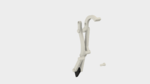
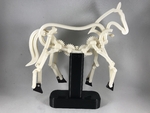
Horse, Prototype is a high precision print and build. Prior to starting assembly, test fit and trim, file, sand, etc. all parts as necessary for smooth movement of moving surfaces, and tight fit for non moving surfaces. Depending on the colors you chose and your printer settings, more or less trimming, filing and/or sanding may be required. Carefully file all edges that contacted the build plate to make absolutely sure that all build plate "ooze" is removed and that all edges are smooth. I used small jewelers files and plenty of patience to perform this step.
And again, Horse, Prototype uses threaded assembly, so a 4mm by .7 tap and die may be needed to clean the threads.
During assembly, make sure that gears, joints and articulated assemblies rotate / operate easily. While the screws should be snug, they should not be overtightened causing a joint or gear to not operate freely. I used petroleum jelly on the gear train and between the rotating contact surfaces.
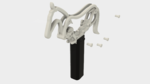
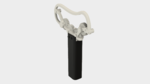
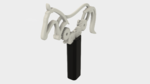
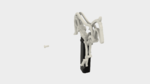
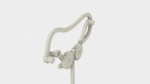
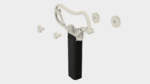
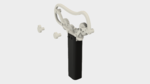
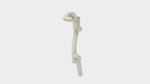
Assemble the Body and Motor Housing.
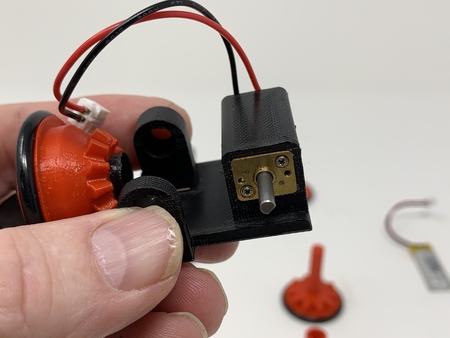
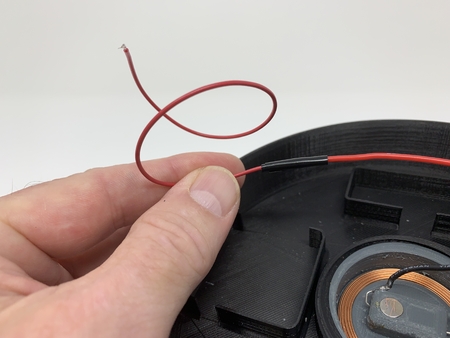
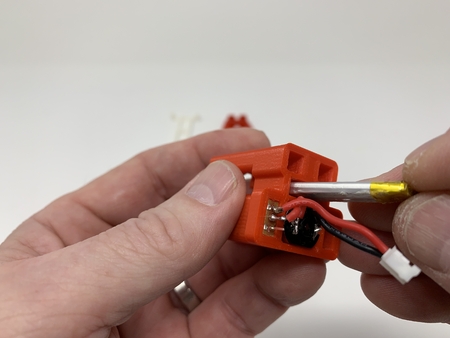
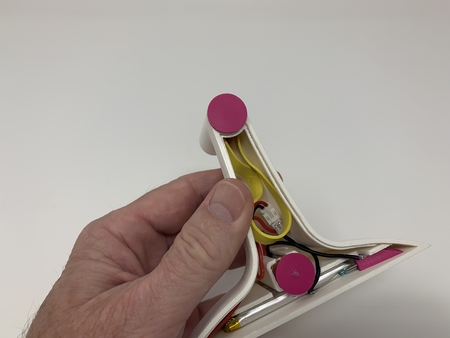
Solder a short piece of red wire to the gear motor "+" terminal, and a short piece of black wire to the gear motor "-" terminal.
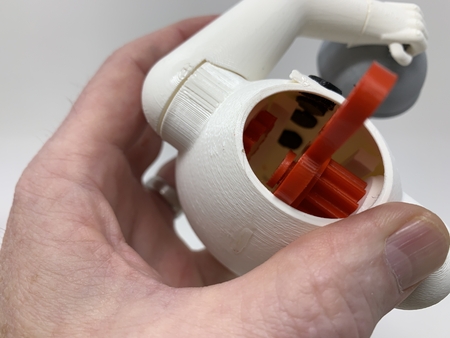
Press the gear motor fully into the bottom of "Housing Motor.stl".
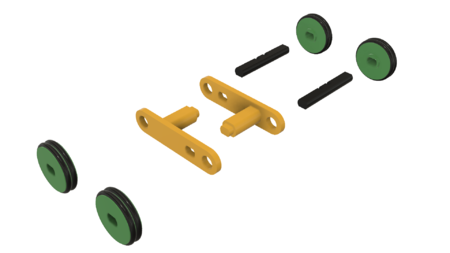
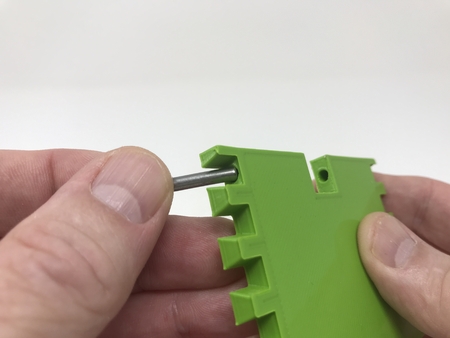
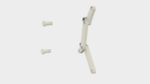
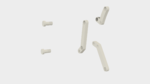
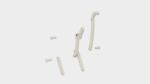
Attach the 4 "Spacer Body.stl" to "Body Right.stl" using 4 "Screw, 4 by 3mm, 4.4mm Shoulder.stl".
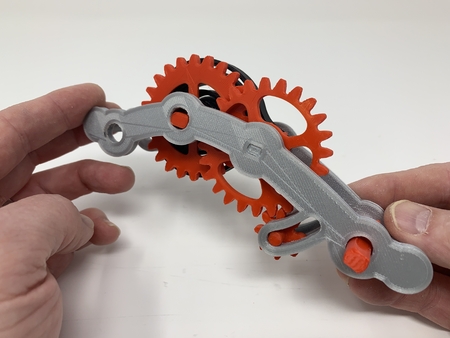
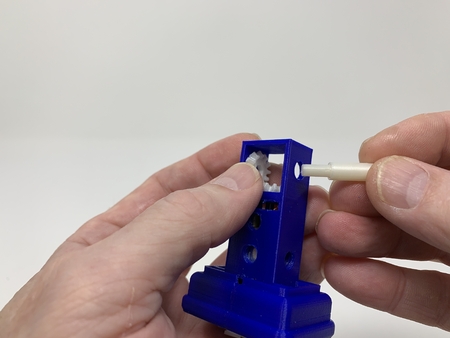
Position the 2 "Gear Idler, (22 Teeth).stl" onto the 2 body spacers as shown, position "Gear Worm.stl" between the gears as shown. Mate the assembly to the motor housing by sliding the worm gear into the motor housing and engage the worm gear with the motor shaft (you may need to rotate the worm gear in order to align it with the motor shaft), then attach the assembly to the motor housing using 2 "Screw, 4 by 3.8mm, 4.4mm Shoulder.stl".
Attach the 2 "Gear, (22 Teeth).stl" to body assembly using 1 "Cam Front.stl" for the front gear and 1 "Cam Rear.stl" for the rear gear. Make sure both cams are pointing straight up.
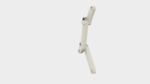
Position "Head.stl" and "Tail.stl" on the body, then attach "Body Left.stl" to the motor housing using 2 "Screw, 4 by 3.8mm, 4.4mm Shoulder.stl".
Attach the body left side to the body right side using 4 "Screw, 4 by 3mm, 4.4mm Shoulder.stl".
Press the remaining "Cam Front.stl" and "Cam Rear.stl" to the assembly. Make sure these cams are rotated 180 degrees from the respective counter parts (e.g. pointing straight down).
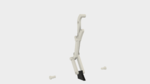
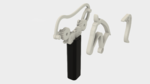
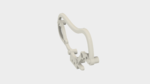
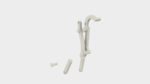
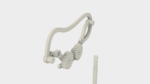
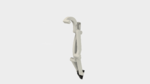
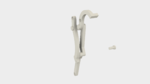
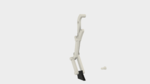
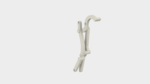
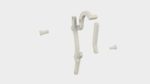
Assemble and Attach the Front Legs.
Begin by assembling the right front leg.
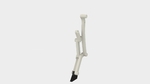
Attach "Arm Front Right.stl" and "Leg Front Lower Rear.stl" to "Leg Front Upper Rear.stl" using 2 "Screw, 4 by 3.8mm, 4.4mm Shoulder.stl".
Attach "Leg Front Upper Front.stl" to the assembly using 2 ""Screw, 4 by 3.8mm, 4.4mm Shoulder.stl".
Attach "Leg Front Lower Front.stl" to the assembly using 1 "Screw, 4 by 3.8mm, 4.4mm Shoulder.stl".
Attach "Hoof Front.stl" to the assembly using 2 "Screw, 4 by 3.8mm, 4.4mm Shoulder.stl".
Attach the right front leg assembly to the body assembly using 2 "Screw, 4 by 3.8mm, 4.4mm Shoulder.stl". Make sure the head is positioned above the bracket on "Arm Front Right.stl".
Assemble the left front leg as a mirror image of the right front leg, then attach it to the assembly using 2 "Screw, 4 by 3.8mm, 4.4mm Shoulder.stl", making sure the head is positioned above the bracket on "Arm Front Left.stl".
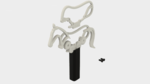
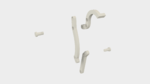
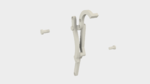
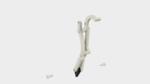
Assemble and Attach the Rear Legs.
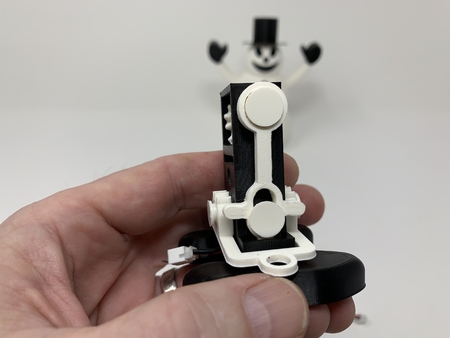
At this point, I pressed "Base.stl" onto the motor housing for support during the final steps.
Begin by assembling the right rear leg.
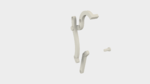
Attach "Arm Rear.stl" and "Leg Rear Lower Front.stl" to "Leg Rear Upper Front.stl" using 2 "Screw, 4 by 3.8mm, 4.4mm Shoulder.stl".
Attach "Leg Rear Upper Rear Right.stl" and "Leg Rear Lower Rear.stl" to the assembly using 3 "Screw, 4 by 3.8mm, 4.4mm Shoulder.stl".
Attach "Hoof Rear.stl" to the assembly using 2 "Screw, 4 by 3.8mm, 4.4mm Shoulder.stl".
Attach the right rear leg assembly to the body assembly using 2 "Screw, 4 by 3.8mm, 4.4mm Shoulder.stl". Make sure the tail arm is positioned below the bracket on "Leg Rear Upper Rear Right.stl".
Assemble the left rear leg as a mirror image of the right rear leg, then attach it to the assembly using 2 "Screw, 4 by 3.8mm, 4.4mm Shoulder.stl", making sure the tail arm is positioned below the bracket on "Leg Rear Upper Rear Left.stl".
Final Touches.
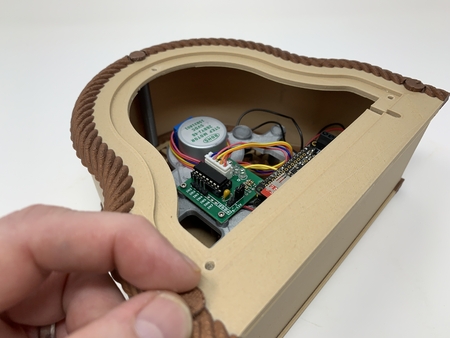
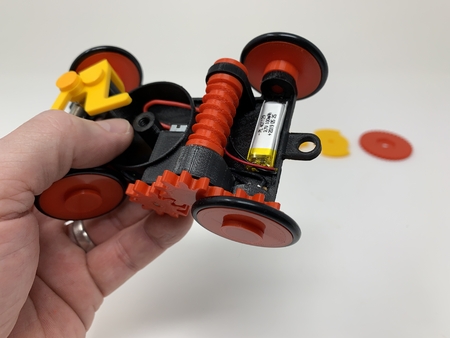
I attached a phono plug to the base, then wired the motor red wire to the phono plug tip connector, and the motor black wire to the phono ring connector. This configuration, when used with the power supply I chose, causes the worm gear to rotate clockwise (when viewed from the top of the model).
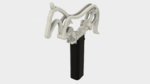
That's how I printed and assembled "Horse, Prototype"!
Hope you like it!
Designer
Greg Zumwalt3d model description
A prototype horse automata that I'm using to test an upcoming design."Horse, Prototype" is a test fixture for an upcoming project I'm working on.... I designed this as a test for the leg, head and tail movements of a horse in motion. The model is small enough to print on most 3D printers, but by being small, it requires parts that are also quite small which as a result require high precision during printing, filing and assembly. The design also uses 4mm threads thus a 4mm by .7 tap and die may be necessary to clean up the threaded parts.
A word of caution, the motor used in this design, while relatively inexpensive, is quite noisy at 6vdc, thus this isn't a model for the night stand!
As usual, I probably forgot a file or two or who knows what else, so if you have any questions, please do not hesitate to ask as I do make mistakes in plenty.
Designed using Autodesk Fusion 360, sliced using Cura 3.2.1 and printed in PLA on both an Ultimaker 2+ Extended and an Ultimaker 3 Extended.
3d model print parameters
Purchase, Print and Prepare the Parts.I've include the file "Images.zip" which includes photos and cad images of the steps involved. I've also inc...luded the file "STLs.zip" which includes all the parts.
I purchased a 6vdc 300rpm gear motor (available on line, 33x12mm 300RPM Metal Mini DC 6V Gearbox Gearwheel Motor Mini Reduce Speed Geared Electric Motor), a 6vdc wall mount power supply (available online), and a phono jack (available online) for the power supply to power Horse, Prototype.
I've included the file "Horse Parts.htm.zip" which contains the parts list and print parameters I used to print Horse, Prototype.
Horse, Prototype is a high precision print and build. Prior to starting assembly, test fit and trim, file, sand, etc. all parts as necessary for smooth movement of moving surfaces, and tight fit for non moving surfaces. Depending on the colors you chose and your printer settings, more or less trimming, filing and/or sanding may be required. Carefully file all edges that contacted the build plate to make absolutely sure that all build plate "ooze" is removed and that all edges are smooth. I used small jewelers files and plenty of patience to perform this step.
And again, Horse, Prototype uses threaded assembly, so a 4mm by .7 tap and die may be needed to clean the threads.
During assembly, make sure that gears, joints and articulated assemblies rotate / operate easily. While the screws should be snug, they should not be overtightened causing a joint or gear to not operate freely. I used petroleum jelly on the gear train and between the rotating contact surfaces.
Assemble the Body and Motor Housing.
Solder a short piece of red wire to the gear motor "+" terminal, and a short piece of black wire to the gear motor "-" terminal.
Press the gear motor fully into the bottom of "Housing Motor.stl".
Attach the 4 "Spacer Body.stl" to "Body Right.stl" using 4 "Screw, 4 by 3mm, 4.4mm Shoulder.stl".
Position the 2 "Gear Idler, (22 Teeth).stl" onto the 2 body spacers as shown, position "Gear Worm.stl" between the gears as shown. Mate the assembly to the motor housing by sliding the worm gear into the motor housing and engage the worm gear with the motor shaft (you may need to rotate the worm gear in order to align it with the motor shaft), then attach the assembly to the motor housing using 2 "Screw, 4 by 3.8mm, 4.4mm Shoulder.stl".
Attach the 2 "Gear, (22 Teeth).stl" to body assembly using 1 "Cam Front.stl" for the front gear and 1 "Cam Rear.stl" for the rear gear. Make sure both cams are pointing straight up.
Position "Head.stl" and "Tail.stl" on the body, then attach "Body Left.stl" to the motor housing using 2 "Screw, 4 by 3.8mm, 4.4mm Shoulder.stl".
Attach the body left side to the body right side using 4 "Screw, 4 by 3mm, 4.4mm Shoulder.stl".
Press the remaining "Cam Front.stl" and "Cam Rear.stl" to the assembly. Make sure these cams are rotated 180 degrees from the respective counter parts (e.g. pointing straight down).
Assemble and Attach the Front Legs.
Begin by assembling the right front leg.
Attach "Arm Front Right.stl" and "Leg Front Lower Rear.stl" to "Leg Front Upper Rear.stl" using 2 "Screw, 4 by 3.8mm, 4.4mm Shoulder.stl".
Attach "Leg Front Upper Front.stl" to the assembly using 2 ""Screw, 4 by 3.8mm, 4.4mm Shoulder.stl".
Attach "Leg Front Lower Front.stl" to the assembly using 1 "Screw, 4 by 3.8mm, 4.4mm Shoulder.stl".
Attach "Hoof Front.stl" to the assembly using 2 "Screw, 4 by 3.8mm, 4.4mm Shoulder.stl".
Attach the right front leg assembly to the body assembly using 2 "Screw, 4 by 3.8mm, 4.4mm Shoulder.stl". Make sure the head is positioned above the bracket on "Arm Front Right.stl".
Assemble the left front leg as a mirror image of the right front leg, then attach it to the assembly using 2 "Screw, 4 by 3.8mm, 4.4mm Shoulder.stl", making sure the head is positioned above the bracket on "Arm Front Left.stl".
Assemble and Attach the Rear Legs.
At this point, I pressed "Base.stl" onto the motor housing for support during the final steps.
Begin by assembling the right rear leg.
Attach "Arm Rear.stl" and "Leg Rear Lower Front.stl" to "Leg Rear Upper Front.stl" using 2 "Screw, 4 by 3.8mm, 4.4mm Shoulder.stl".
Attach "Leg Rear Upper Rear Right.stl" and "Leg Rear Lower Rear.stl" to the assembly using 3 "Screw, 4 by 3.8mm, 4.4mm Shoulder.stl".
Attach "Hoof Rear.stl" to the assembly using 2 "Screw, 4 by 3.8mm, 4.4mm Shoulder.stl".
Attach the right rear leg assembly to the body assembly using 2 "Screw, 4 by 3.8mm, 4.4mm Shoulder.stl". Make sure the tail arm is positioned below the bracket on "Leg Rear Upper Rear Right.stl".
Assemble the left rear leg as a mirror image of the right rear leg, then attach it to the assembly using 2 "Screw, 4 by 3.8mm, 4.4mm Shoulder.stl", making sure the tail arm is positioned below the bracket on "Leg Rear Upper Rear Left.stl".
Final Touches.
I attached a phono plug to the base, then wired the motor red wire to the phono plug tip connector, and the motor black wire to the phono ring connector. This configuration, when used with the power supply I chose, causes the worm gear to rotate clockwise (when viewed from the top of the model).
That's how I printed and assembled "Horse, Prototype"!
Hope you like it!