Marblevator aire en 3D para imprimir


3322 Visualizaciones 1 Me gusta 0 Descargas realizadas Descarga aqui la pieza desde 3dforprint
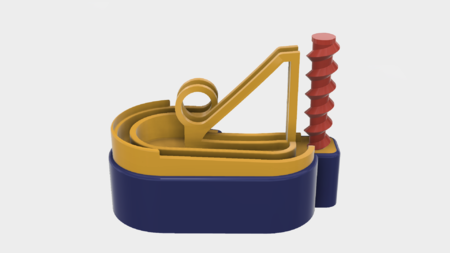
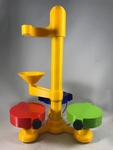
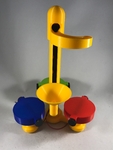
"Marblevator Aire" es la última en mi "Marblevator de la Serie" de mármol máquinas.
Muchos fans de la... Marblevators de la Serie me han enviado los enlaces a los vídeos de mármol máquinas que son verdaderamente sorprendentes. Un par de los videos incluidos los diseños de la incorporación de los "tambores", donde el mármol rebota en una superficie del tambor y en una captura de reciclaje. Algunos de los Marblevator fans, fue aún más lejos y me desafió para el diseño de un impreso en 3D Marblevator que incluyen tambores y, bueno, yo estaba indeciso. Sin embargo, cuando mi esposa y yo recientemente visitó la "Paul Boyer Museo de Animación Tallas" (http://www.kansastravel.org/boyergallery.htm), finalmente me convenció de que yo debería excepto el reto.
El señor Boyer ha creado algo absolutamente impresionante autómatas, uno de los cuales es casi increíble de mármol de la máquina de la incorporación de 6 tambor de cabezas! Disfrutamos de nuestra visita al museo, y recomiendo hacer el ligero desvío al norte de la I-70 en Kansas para visitar este pequeño pero maravilloso museo que muestra su extraordinaria artesanía.
Si desea experimentar con diferentes tambor de cabeza diámetros (incluido el tambor de la cabeza es de 50 mm) y la superficie del tambor de espesores (incluido el tambor de cabeza .4mm), he incluido el archivo "Marblevator Aire Tambor v0.f3d", que es una de Autodesk Fusion 360 de exportación de el tambor de diseño de la cabeza.
Algunas notas sobre mi experiencia en el diseño, montaje y pruebas de Marblevator Aire. De mármol de la máquina de la incorporación de la batería es difícil de adaptar, operar y mantener; uno esta pequeño, impresas en PLA, es aún más difícil. Este mármol de la máquina funciona mejor en un suave, sólido, nivel de superficie, tales como el granito o el mármol. He encontrado que el granito y el mármol proveedores fueron felices para darme piezas de chatarra sin costo (especialmente después de que yo les mostró el prototipo Marblevator Aire de vídeo), y pequeñas plazas de están disponibles para la compra online. Completar un Marblevator de Aire requiere un par de no-impresos en 3D de elementos como se describe en el siguiente paso, y el impreso en 3D las piezas pueden ser un reto para imprimir (el tambor de la cabeza de la superficie es sólo .De 4mm de espesor y requiere de un .1 mm de la primera capa de espesor). La asamblea es bastante fácil (la instalación del motor en la torre puede ser complicado), pero la alineación requiere de tiempo y mucha paciencia.
Como de costumbre, probablemente olvidó de un archivo o dos o quién sabe qué otra cosa, así que si usted tiene alguna pregunta, por favor no dude en preguntar como hago errores en la abundancia.
Diseñado utilizando Autodesk Fusion 360, rodajas de uso de Cura 2.6.2, e impresas en PLA en una Ultimaker 2+ Extendida y una Ultimaker 3 Extendida.
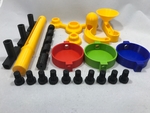
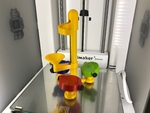
Marblevator Aire requiere de un pequeño motor de engranajes ("DC 6V 30RPM de 3 mm de Eje Mini Metal d...e la rueda dentada del Motor del Engranaje de GA12-N20"), una fuente de alimentación variable (1.5 a 6VCD), al menos 10 8 mm rodamientos de bolas (consulte "Alineación y de Prueba") y el alambre.
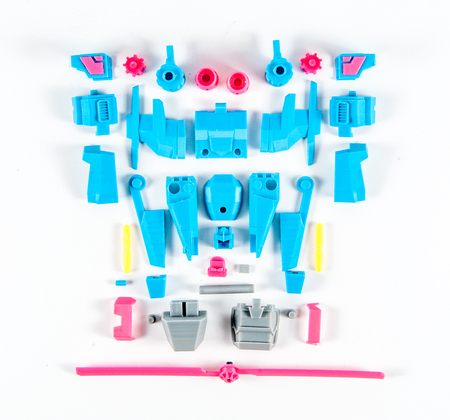
Imprimí todas las partes en una Ultimaker 2+ Extendida y una Ultimaker 3 Extendido en .1 mm de resolución vertical. He adjuntado un archivo PDF que contiene el nombre, count, relleno, borde, balsa y soporte de configuración para cada una de las partes. Tenga en cuenta que el tambor de cabezas se imprimen con un espesor inicial de .1mm (como opuesto a la configuración predeterminada .26mm). Antes del montaje, compruebe el ajuste y recorte, archivo, arena, etc. todas las piezas que sean necesarias para el movimiento suave de las superficies en movimiento, y ajuste apretado para no mover las superficies. Dependiendo de los colores que elegiste y la configuración de la impresora, más o menos cortar, limar y/o lijado puede ser requerido. Cuidadosamente todos los bordes que estaban en contacto con la placa de construcción para asegurarnos de que todos placa de construcción "cieno" es retirado y que todos los bordes son lisos. He utilizado los pequeños joyeros archivos y un montón de paciencia para realizar este paso.
Este modelo utiliza M8 by1 rosca de montaje y puede requerir un M8 por 1 toque para limpiar los orificios roscados.
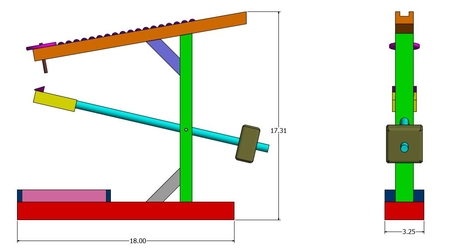
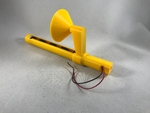
2) Montar la Torre.
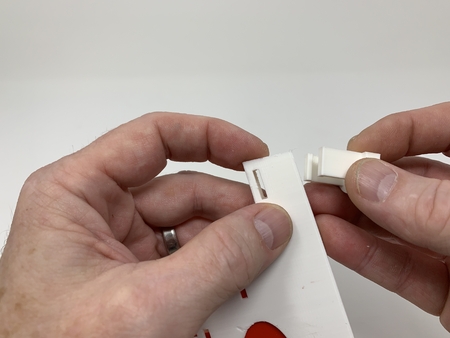
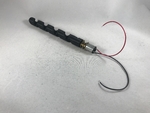
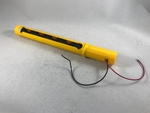
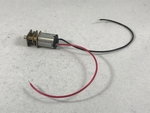
Iniciar la torre de montaje por soldadura de 6" longitud de cable rojo al positivo ("+") bornes del motor, y una longitud de 6" de cable negro al negativo ("-") de terminales del motor.
Pulse "Barrena.stl" sobre el eje motor. Esta es la broca de la asamblea.
Deslice la barrena de la asamblea en la Torre.stl", alambres de primera. "Pescado" de los cables por el lado de la ranura en "de la Torre.stl", a continuación, coloque cuidadosamente el motor y de prensa en el motor de la ranura en "de la Torre.stl". Conecte la fuente de alimentación a los cables y asegúrese de que la broca gira fácilmente en la torre.
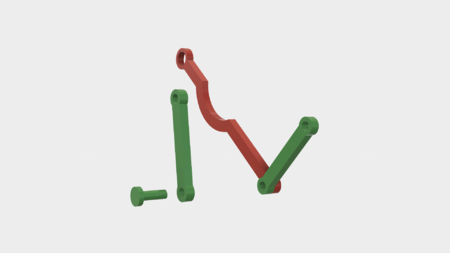
Alinee la ranura en la Entrada".stl" con el superior de la torre "clave", luego deslice Entrada".stl" todo el camino hacia abajo de la torre a la baja de la clave y totalmente asiento en la repisa.
Alinee la ranura en "Salir.stl" con el superior de la torre, luego presione completamente en su posición.
Esta es la torre de la asamblea.
3) Montar la Batería.
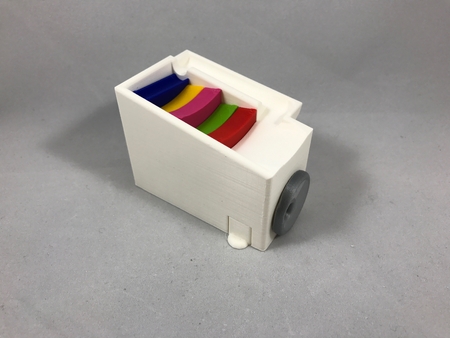
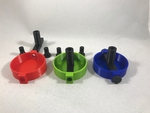
Cuidadosamente la posición de una "Base del cilindro.stl" en un "Tambor de Cabeza.stl", a continuación, fíjela en su lugar con dos "de la Perilla.stl".
Repita este proceso para el resto de los dos tambores.
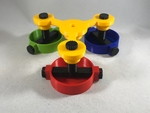
4) Montaje Final.
Coloque cada uno de los tres tambor de asambleas en cada uno de los tres tambor posiciones de Base.stl" y garantizar cada uno en su lugar con una "Perilla.stl".
Lugar de la torre de montaje en el orificio del centro de la Base".stl", alinee el embudo de Entrada".stl" exactamente entre dos de el tambor del arma, a continuación, fije la torre de la asamblea en el lugar con el final de la "Perilla.stl".
5) la Alineación y la Prueba.
Para alinear y operar Marblevator de Aire, coloque en un sólido, nivel de superficie en una ubicación en la que residen.
Iniciar el procedimiento de alineación mediante la colocación de un rodamiento de bolas en el inicio de la salida de la pista, vamos a rodar por la pista y caer a la primera superficie del tambor a continuación. Si se golpea el centro de la superficie del tambor, ¡genial! Pero más que probable es que la tierra fuera del centro que requiere cuidado de rotación de la torre de la asamblea para alinear la salida de la pista para que la bola de rodamiento hace huelga el centro de la superficie del tambor. Una vez alineados correctamente, apriete la torre de la asamblea de la perilla para fijar firmemente la torre de la asamblea en la posición.
Luego, utilizando la rotación y los ajustes de tono de la primera tambor, seguir rodando una bola de rodamiento hacia abajo de la salida de la pista, permitiendo a la huelga de la superficie de la primera tambor, entonces el objetivo de la primera de tambor hasta que el cojinete de bola golpea el centro de la segunda superficie del tambor. Una vez alineados, apriete los tres mandos para mantener la orientación.
Luego, utilizando la rotación y los ajustes de tono de la segunda tambor, seguir rodando la bola de rodamiento hacia abajo de la salida de la pista, permitiendo a la huelga de la superficie de la primera tambor, luego de la superficie del segundo tambor. El objetivo de la segunda tambor hasta que el cojinete de bola golpea el centro de la tercera superficie del tambor. Una vez alineados, apriete los tres mandos para mantener la orientación.
Por último, el uso de la rotación y los ajustes de tono de la tercera tambor, seguir rodando la bola de rodamiento hacia abajo de la salida de la pista, permitiendo a la huelga el primer tambor, el segundo tambor, y el tercer tambor. El objetivo de la tercera tambor hasta que el cojinete de bola golpea a la entrada del centro de embudo en la Entrada".stl". Una vez alineados, apriete los tres mandos para mantener la orientación.
Aplicar la potencia del motor, a continuación, uno por uno, agregar el 10 rodamientos de bolas para la entrada de embudo (la masa de la bola rodamientos proporciona la energía necesaria para empujar un mármol en la barrena). Reloj de los rodamientos de bolas como que ronda el circuito y hacer cualquier minuto final los ajustes necesarios. Mientras mi Marblevator Aires han operado durante horas sin perder un cojinete de bolas, sucede. Para aumentar la fiabilidad, si tienen o tienen acceso a una precisa balanza electrónica, la compra de 20 o más rodamientos de bolas y pesarlos en el fin de encontrar la 10 con el más cercano de coincidencia de pesos.
Felicitaciones, estás acabado!
Espero que lo disfruten!
Diseñador
Greg ZumwaltDescripción del modelo 3d
La última de mi Marblevator de la Serie"Marblevator Aire" es la última en mi "Marblevator de la Serie" de mármol máquinas.
Muchos fans de la... Marblevators de la Serie me han enviado los enlaces a los vídeos de mármol máquinas que son verdaderamente sorprendentes. Un par de los videos incluidos los diseños de la incorporación de los "tambores", donde el mármol rebota en una superficie del tambor y en una captura de reciclaje. Algunos de los Marblevator fans, fue aún más lejos y me desafió para el diseño de un impreso en 3D Marblevator que incluyen tambores y, bueno, yo estaba indeciso. Sin embargo, cuando mi esposa y yo recientemente visitó la "Paul Boyer Museo de Animación Tallas" (http://www.kansastravel.org/boyergallery.htm), finalmente me convenció de que yo debería excepto el reto.
El señor Boyer ha creado algo absolutamente impresionante autómatas, uno de los cuales es casi increíble de mármol de la máquina de la incorporación de 6 tambor de cabezas! Disfrutamos de nuestra visita al museo, y recomiendo hacer el ligero desvío al norte de la I-70 en Kansas para visitar este pequeño pero maravilloso museo que muestra su extraordinaria artesanía.
Si desea experimentar con diferentes tambor de cabeza diámetros (incluido el tambor de la cabeza es de 50 mm) y la superficie del tambor de espesores (incluido el tambor de cabeza .4mm), he incluido el archivo "Marblevator Aire Tambor v0.f3d", que es una de Autodesk Fusion 360 de exportación de el tambor de diseño de la cabeza.
Algunas notas sobre mi experiencia en el diseño, montaje y pruebas de Marblevator Aire. De mármol de la máquina de la incorporación de la batería es difícil de adaptar, operar y mantener; uno esta pequeño, impresas en PLA, es aún más difícil. Este mármol de la máquina funciona mejor en un suave, sólido, nivel de superficie, tales como el granito o el mármol. He encontrado que el granito y el mármol proveedores fueron felices para darme piezas de chatarra sin costo (especialmente después de que yo les mostró el prototipo Marblevator Aire de vídeo), y pequeñas plazas de están disponibles para la compra online. Completar un Marblevator de Aire requiere un par de no-impresos en 3D de elementos como se describe en el siguiente paso, y el impreso en 3D las piezas pueden ser un reto para imprimir (el tambor de la cabeza de la superficie es sólo .De 4mm de espesor y requiere de un .1 mm de la primera capa de espesor). La asamblea es bastante fácil (la instalación del motor en la torre puede ser complicado), pero la alineación requiere de tiempo y mucha paciencia.
Como de costumbre, probablemente olvidó de un archivo o dos o quién sabe qué otra cosa, así que si usted tiene alguna pregunta, por favor no dude en preguntar como hago errores en la abundancia.
Diseñado utilizando Autodesk Fusion 360, rodajas de uso de Cura 2.6.2, e impresas en PLA en una Ultimaker 2+ Extendida y una Ultimaker 3 Extendida.
Parametros de impresión 3d
1) la Compra, Imprimir y Preparar las Piezas.Marblevator Aire requiere de un pequeño motor de engranajes ("DC 6V 30RPM de 3 mm de Eje Mini Metal d...e la rueda dentada del Motor del Engranaje de GA12-N20"), una fuente de alimentación variable (1.5 a 6VCD), al menos 10 8 mm rodamientos de bolas (consulte "Alineación y de Prueba") y el alambre.
Imprimí todas las partes en una Ultimaker 2+ Extendida y una Ultimaker 3 Extendido en .1 mm de resolución vertical. He adjuntado un archivo PDF que contiene el nombre, count, relleno, borde, balsa y soporte de configuración para cada una de las partes. Tenga en cuenta que el tambor de cabezas se imprimen con un espesor inicial de .1mm (como opuesto a la configuración predeterminada .26mm). Antes del montaje, compruebe el ajuste y recorte, archivo, arena, etc. todas las piezas que sean necesarias para el movimiento suave de las superficies en movimiento, y ajuste apretado para no mover las superficies. Dependiendo de los colores que elegiste y la configuración de la impresora, más o menos cortar, limar y/o lijado puede ser requerido. Cuidadosamente todos los bordes que estaban en contacto con la placa de construcción para asegurarnos de que todos placa de construcción "cieno" es retirado y que todos los bordes son lisos. He utilizado los pequeños joyeros archivos y un montón de paciencia para realizar este paso.
Este modelo utiliza M8 by1 rosca de montaje y puede requerir un M8 por 1 toque para limpiar los orificios roscados.
2) Montar la Torre.
Iniciar la torre de montaje por soldadura de 6" longitud de cable rojo al positivo ("+") bornes del motor, y una longitud de 6" de cable negro al negativo ("-") de terminales del motor.
Pulse "Barrena.stl" sobre el eje motor. Esta es la broca de la asamblea.
Deslice la barrena de la asamblea en la Torre.stl", alambres de primera. "Pescado" de los cables por el lado de la ranura en "de la Torre.stl", a continuación, coloque cuidadosamente el motor y de prensa en el motor de la ranura en "de la Torre.stl". Conecte la fuente de alimentación a los cables y asegúrese de que la broca gira fácilmente en la torre.
Alinee la ranura en la Entrada".stl" con el superior de la torre "clave", luego deslice Entrada".stl" todo el camino hacia abajo de la torre a la baja de la clave y totalmente asiento en la repisa.
Alinee la ranura en "Salir.stl" con el superior de la torre, luego presione completamente en su posición.
Esta es la torre de la asamblea.
3) Montar la Batería.
Cuidadosamente la posición de una "Base del cilindro.stl" en un "Tambor de Cabeza.stl", a continuación, fíjela en su lugar con dos "de la Perilla.stl".
Repita este proceso para el resto de los dos tambores.
4) Montaje Final.
Coloque cada uno de los tres tambor de asambleas en cada uno de los tres tambor posiciones de Base.stl" y garantizar cada uno en su lugar con una "Perilla.stl".
Lugar de la torre de montaje en el orificio del centro de la Base".stl", alinee el embudo de Entrada".stl" exactamente entre dos de el tambor del arma, a continuación, fije la torre de la asamblea en el lugar con el final de la "Perilla.stl".
5) la Alineación y la Prueba.
Para alinear y operar Marblevator de Aire, coloque en un sólido, nivel de superficie en una ubicación en la que residen.
Iniciar el procedimiento de alineación mediante la colocación de un rodamiento de bolas en el inicio de la salida de la pista, vamos a rodar por la pista y caer a la primera superficie del tambor a continuación. Si se golpea el centro de la superficie del tambor, ¡genial! Pero más que probable es que la tierra fuera del centro que requiere cuidado de rotación de la torre de la asamblea para alinear la salida de la pista para que la bola de rodamiento hace huelga el centro de la superficie del tambor. Una vez alineados correctamente, apriete la torre de la asamblea de la perilla para fijar firmemente la torre de la asamblea en la posición.
Luego, utilizando la rotación y los ajustes de tono de la primera tambor, seguir rodando una bola de rodamiento hacia abajo de la salida de la pista, permitiendo a la huelga de la superficie de la primera tambor, entonces el objetivo de la primera de tambor hasta que el cojinete de bola golpea el centro de la segunda superficie del tambor. Una vez alineados, apriete los tres mandos para mantener la orientación.
Luego, utilizando la rotación y los ajustes de tono de la segunda tambor, seguir rodando la bola de rodamiento hacia abajo de la salida de la pista, permitiendo a la huelga de la superficie de la primera tambor, luego de la superficie del segundo tambor. El objetivo de la segunda tambor hasta que el cojinete de bola golpea el centro de la tercera superficie del tambor. Una vez alineados, apriete los tres mandos para mantener la orientación.
Por último, el uso de la rotación y los ajustes de tono de la tercera tambor, seguir rodando la bola de rodamiento hacia abajo de la salida de la pista, permitiendo a la huelga el primer tambor, el segundo tambor, y el tercer tambor. El objetivo de la tercera tambor hasta que el cojinete de bola golpea a la entrada del centro de embudo en la Entrada".stl". Una vez alineados, apriete los tres mandos para mantener la orientación.
Aplicar la potencia del motor, a continuación, uno por uno, agregar el 10 rodamientos de bolas para la entrada de embudo (la masa de la bola rodamientos proporciona la energía necesaria para empujar un mármol en la barrena). Reloj de los rodamientos de bolas como que ronda el circuito y hacer cualquier minuto final los ajustes necesarios. Mientras mi Marblevator Aires han operado durante horas sin perder un cojinete de bolas, sucede. Para aumentar la fiabilidad, si tienen o tienen acceso a una precisa balanza electrónica, la compra de 20 o más rodamientos de bolas y pesarlos en el fin de encontrar la 10 con el más cercano de coincidencia de pesos.
Felicitaciones, estás acabado!
Espero que lo disfruten!