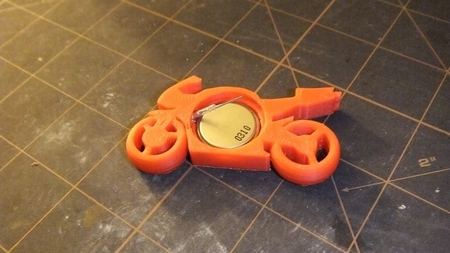
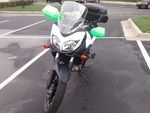
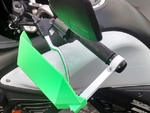
Motorcycle hand guards and mounts for vstrom 650 (and others) 3D for print

4631 Views 1 Likes 0 Downloads Download the piece here from 3dforprint
It is far from perfect, but it is better than nothing and a great start!
DO NOT expect these to protect your levers in the event of a tip-over. I wouldn't even expect this design to handle well off road. They were designed with only the intention of keeping the weather off my hands on cold morning commutes and prevent pain when riding in the rain on the freeway.
These parts are still a work in progress
As I continue to ride year-round with mine, I may make changes to improve performance or durability. Feel free to remix as you like, I just ask that you give credit where credit is due.
SeeMeCNC
Printer:
Rostock MAX
Rafts:
No
Supports:
No
Resolution:
0.3 mm
Infill:
30-50%
Notes:
These parts are ...BIG! I printed one shield in about 6 hours at 0.3 mm at nearly 75 mm/s in PLA. It took alot of extra cooling but I finally got them to turn out.
The Shields have been designed so that the overhangs aren't too extreme and no part should require supports. (supports waste too much print time, and I hate them.)
Shells should be thick and infill should be more than less. The design of these guards requires stiff and strong parts to install properly. If the part is too thin/weak or the plastic is too soft or heavy, you will have a bad time with bending and bouncing at 50+ mph. The following plastics worked GREAT for me and I took alot of time picking them out for each part. I would strongly recommend you print the parts with similar material. Otherwise, you might have less than acceptable results.
The shields were printed in PLA. The parts are too big for ABS and my printer (no heat chamber) and ABS failed and cracked. I really wanted the bright green so I went with HB PLA Neon Green 1 KG (amazon sells it cheap and it is prime eligible!)
The "gaskets" are designed to wrap around the handle bar ends and go underneath the mounts to prevent the mounts from scratching the paint and also to provide some squishy substraight for a more secure fitting. I printed using some cheap clear TPU I also found on Amazon. You can use something like ninja flex if you like, but is must be REALLY flexible!
The brackets/mounts need to be very strong and ridged. I used ESUN PETG to get a good solid part that would print easily and not warp as much as ABS. This made tolerances and sizing turn out much better when installing all the parts on the bike.
If you use ABS, you will probably need to scale the STLs, since these were designed and CADed with tolerances expecting the shrinking and fit of the above materials.
It's not perfect, but it is a start and it is better than nothing!
Post-Printing
Installation
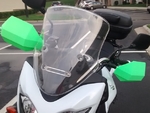
1. Insert the flat end of the mount into the square opening on the Shield. You will need to do this for the clutch side and the break side shields. 2. Insert nut into gap in mount. 3. Insert long bolt with washer through the front of the shield into the middle of the front of the mount and tighten into the already inserted nut from step 2. 4. Insert short bolt into rounded end of mount with a washer on both sides. Secure loosely with a nut 5. Wrap the TPU insulating gasket around the handlebar end weight. make sure the ridges in the gasket face AWAY from the metal. 6. Place the mount into position on the bar end weight so that the mount rests completely between the ridges in the TPU gasket and flush against the handle bar. 7. adjust the guard into position and tighten the bolt and nut assembly nearest the handle bars. Be careful not too over tighten. The gasket should provide a bit of extra cushion to get a good strong fix to the handle bards without needing to apply much presser to the mount or its hardware.
Important Fitting and Sizing Note!
The Shields MAY print 1/8 of an inch too long depending on your Windshield setting. Mine bump the windshield if I turn the bars full lock left or right. Not a big issue as the guards will move and bend when they bump. For me, I don't turn full lock very often so it isn't a big deal. If you plan on using these guards, keep that in mind. You may want to tweak the Shield STLs to fit your bike better.
It kinda goes without saying... but I am going to say it anyway...
PRINT AT YOUR OWN RISK! I have designed this thingy and release it publicly with no guarantee or insurance of its fiction, performance, or safety. I am not a professional Mechanical Engineer or Motorcycle Parts Manufacture. I am a hobbyist that had a problem I wanted to fix, and want to share that fix with anyone else that might need it too. Using this thingy may cause injury or death (so does motorcycling but we all still do it). I just want everyone that wants to use this to be smart about it! My first failed prints and designs rendered some functions of the bike more difficult (like shifting and turning). I wanted to get most of that stuff sorted before I released these files, but I can't guarantee that you don't experience a failure or two of your own! Be smart! Ride Safe! Wear your gear!
Designer
t3chkommie3d model description
I was looking for a simple set of hand guards to take the wind off my hands in the winter and maybe handle a few bugs/rocks/rain in the summer. I coul...dn't find anything else online that I could remix, so I spent MANY hours with FreeCAD and my Rostock Max V2 printing out test parts and testing the strength and rigidity of various plastics. This Thingy is a result of those many many hours of design and printing!It is far from perfect, but it is better than nothing and a great start!
DO NOT expect these to protect your levers in the event of a tip-over. I wouldn't even expect this design to handle well off road. They were designed with only the intention of keeping the weather off my hands on cold morning commutes and prevent pain when riding in the rain on the freeway.
These parts are still a work in progress
As I continue to ride year-round with mine, I may make changes to improve performance or durability. Feel free to remix as you like, I just ask that you give credit where credit is due.
3d model print parameters
Printer brand:SeeMeCNC
Printer:
Rostock MAX
Rafts:
No
Supports:
No
Resolution:
0.3 mm
Infill:
30-50%
Notes:
These parts are ...BIG! I printed one shield in about 6 hours at 0.3 mm at nearly 75 mm/s in PLA. It took alot of extra cooling but I finally got them to turn out.
The Shields have been designed so that the overhangs aren't too extreme and no part should require supports. (supports waste too much print time, and I hate them.)
Shells should be thick and infill should be more than less. The design of these guards requires stiff and strong parts to install properly. If the part is too thin/weak or the plastic is too soft or heavy, you will have a bad time with bending and bouncing at 50+ mph. The following plastics worked GREAT for me and I took alot of time picking them out for each part. I would strongly recommend you print the parts with similar material. Otherwise, you might have less than acceptable results.
The shields were printed in PLA. The parts are too big for ABS and my printer (no heat chamber) and ABS failed and cracked. I really wanted the bright green so I went with HB PLA Neon Green 1 KG (amazon sells it cheap and it is prime eligible!)
The "gaskets" are designed to wrap around the handle bar ends and go underneath the mounts to prevent the mounts from scratching the paint and also to provide some squishy substraight for a more secure fitting. I printed using some cheap clear TPU I also found on Amazon. You can use something like ninja flex if you like, but is must be REALLY flexible!
The brackets/mounts need to be very strong and ridged. I used ESUN PETG to get a good solid part that would print easily and not warp as much as ABS. This made tolerances and sizing turn out much better when installing all the parts on the bike.
If you use ABS, you will probably need to scale the STLs, since these were designed and CADed with tolerances expecting the shrinking and fit of the above materials.
It's not perfect, but it is a start and it is better than nothing!
Post-Printing
Installation
1. Insert the flat end of the mount into the square opening on the Shield. You will need to do this for the clutch side and the break side shields. 2. Insert nut into gap in mount. 3. Insert long bolt with washer through the front of the shield into the middle of the front of the mount and tighten into the already inserted nut from step 2. 4. Insert short bolt into rounded end of mount with a washer on both sides. Secure loosely with a nut 5. Wrap the TPU insulating gasket around the handlebar end weight. make sure the ridges in the gasket face AWAY from the metal. 6. Place the mount into position on the bar end weight so that the mount rests completely between the ridges in the TPU gasket and flush against the handle bar. 7. adjust the guard into position and tighten the bolt and nut assembly nearest the handle bars. Be careful not too over tighten. The gasket should provide a bit of extra cushion to get a good strong fix to the handle bards without needing to apply much presser to the mount or its hardware.
Important Fitting and Sizing Note!
The Shields MAY print 1/8 of an inch too long depending on your Windshield setting. Mine bump the windshield if I turn the bars full lock left or right. Not a big issue as the guards will move and bend when they bump. For me, I don't turn full lock very often so it isn't a big deal. If you plan on using these guards, keep that in mind. You may want to tweak the Shield STLs to fit your bike better.
It kinda goes without saying... but I am going to say it anyway...
PRINT AT YOUR OWN RISK! I have designed this thingy and release it publicly with no guarantee or insurance of its fiction, performance, or safety. I am not a professional Mechanical Engineer or Motorcycle Parts Manufacture. I am a hobbyist that had a problem I wanted to fix, and want to share that fix with anyone else that might need it too. Using this thingy may cause injury or death (so does motorcycling but we all still do it). I just want everyone that wants to use this to be smart about it! My first failed prints and designs rendered some functions of the bike more difficult (like shifting and turning). I wanted to get most of that stuff sorted before I released these files, but I can't guarantee that you don't experience a failure or two of your own! Be smart! Ride Safe! Wear your gear!