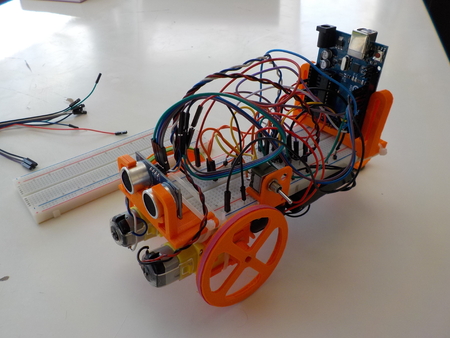
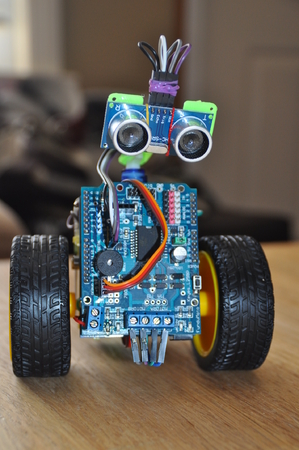
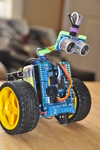
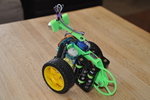
Scru-fe: simple c++ robot with ultra-sonic sensor for education: arduino uno obstacle avoidance maze programming 3D for print


7250 Views 3 Likes 0 Downloads Download the piece here from 3dforprint
I plan on using this design to promote the need for a realistic way to teach ele...mentary and middle school students how programming can be simple and fun without the need for expensive kits. Please share/print/code and keep the resources flowing for education!
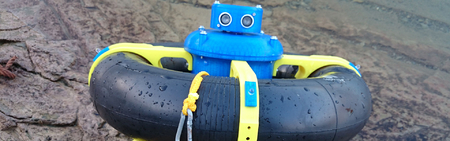
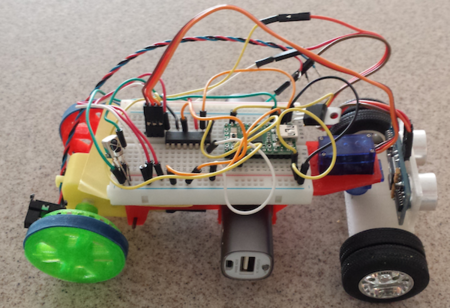
This Robot build started when my two year old daughter fell in love with an old ultrasonic robot that I built in elementary school twenty five years ago. It's missing parts and no longer works, but she has treated it with love since she was one year old. For her third birthday, I set out to make a sub $50 Robot with easily replaceable parts (see B.O.M. in instructions) that we could make together. The fact that no individual part costs more than $10 and that all parts are easily found or open source gives me the hopes that SCRU-FE will be passed down to her children with all her great memories.
My daughter adores this Robot. She named him Scruffy, so I made up a silly acronym that fits his silly appearance.
-Printed Body
-Printed Servo Arm
-Printed Sensor Mount
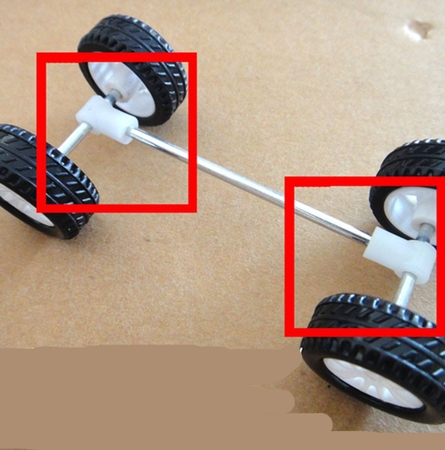
-(2) Printed Wheel Halves
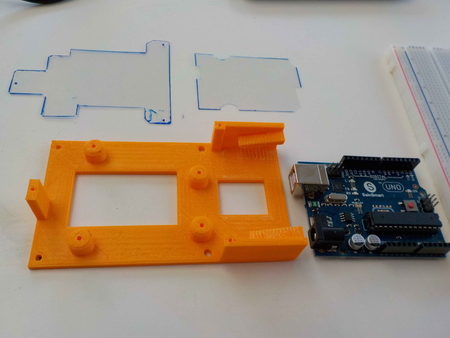
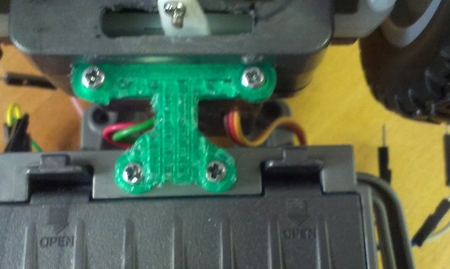
-Arduino UNO
-UNO Motor shield (I use the... L298P with buzzer, Ping and servo inputs)
-Two "Smart Car" Gearmotors and wheels
-Two 3AA Battery holders
-SG-90 9g Micro servo set
-HC-SR04 Ultrasonic sensor
-200mm female/female 4 pin cable
-High Amperage toggle switch (15A or better still looking for a good source can skip and take a battery out to shut the power off I burnt through a few 5A switches already :()
-(4) 25mm sections of wire for motors
-(2) F623 bearings (wheel)
-(4) M3x25mm socket capscrew (motors)
-(1) M3x15mm socket capscrew (neck)
-(1) M3x20mm socket capscrew (wheel)
-(4) M3x8mm flat head socket capscrew --(batteries)
-(4) M3x6mm socket capscrew (UNO)
-(6) M3 washers (wheel)
-(10) M3 nylon locking nuts
-several small rubber bands
optional: (3) 12mm long M3 coupler nuts to make internal assembly easier (replaces 6 m3 locking nuts, (4) 12mm (6mm threaded) m3 standoff nuts for the arduino board to give it a more professional look
Tools Needed:
-2mm allen key
-2.5mm allen key
-2-3mm phillips screwdriver
-2-3mm slotted screwdriver
-5.5mm wrench
-small needle nose plies
-tweezers (ESD-15 if possible)
-Soldering iron with smal tip and solder
-small drill
-1.5mm or 1/6" drill bit
-3mm or 1/8" drill bit
-drill bit for chosen toggle switch
Building tips:
After printing the body drill out all holes with a 3mm drill bit except for the UNO mounting holes. On my prints the M3x6mm bolts self threaded in to the plastic itself. If this doesn't work, use 8mm bolts and nylon locking nuts instead.
The wheels need 3 washers or 2mm spacers on either side to allow for clearance from the lock nuts that hold the battery box on. If there is not enough clearance you can use a regular M3 nuts for the battery box or add more washers between the wheel and the body.
Code: the sample code included is a quick working code, however I am no master at C++ nor Arduino so please use it as an example only.
Designer
rtheiss3d model description
S.C.R.U.-F.E.: Simple C++ Robot with Ultrasonic-sensor for EducationI plan on using this design to promote the need for a realistic way to teach ele...mentary and middle school students how programming can be simple and fun without the need for expensive kits. Please share/print/code and keep the resources flowing for education!
This Robot build started when my two year old daughter fell in love with an old ultrasonic robot that I built in elementary school twenty five years ago. It's missing parts and no longer works, but she has treated it with love since she was one year old. For her third birthday, I set out to make a sub $50 Robot with easily replaceable parts (see B.O.M. in instructions) that we could make together. The fact that no individual part costs more than $10 and that all parts are easily found or open source gives me the hopes that SCRU-FE will be passed down to her children with all her great memories.
My daughter adores this Robot. She named him Scruffy, so I made up a silly acronym that fits his silly appearance.
3d model print parameters
Bill Of Materials-Printed Body
-Printed Servo Arm
-Printed Sensor Mount
-(2) Printed Wheel Halves
-Arduino UNO
-UNO Motor shield (I use the... L298P with buzzer, Ping and servo inputs)
-Two "Smart Car" Gearmotors and wheels
-Two 3AA Battery holders
-SG-90 9g Micro servo set
-HC-SR04 Ultrasonic sensor
-200mm female/female 4 pin cable
-High Amperage toggle switch (15A or better still looking for a good source can skip and take a battery out to shut the power off I burnt through a few 5A switches already :()
-(4) 25mm sections of wire for motors
-(2) F623 bearings (wheel)
-(4) M3x25mm socket capscrew (motors)
-(1) M3x15mm socket capscrew (neck)
-(1) M3x20mm socket capscrew (wheel)
-(4) M3x8mm flat head socket capscrew --(batteries)
-(4) M3x6mm socket capscrew (UNO)
-(6) M3 washers (wheel)
-(10) M3 nylon locking nuts
-several small rubber bands
optional: (3) 12mm long M3 coupler nuts to make internal assembly easier (replaces 6 m3 locking nuts, (4) 12mm (6mm threaded) m3 standoff nuts for the arduino board to give it a more professional look
Tools Needed:
-2mm allen key
-2.5mm allen key
-2-3mm phillips screwdriver
-2-3mm slotted screwdriver
-5.5mm wrench
-small needle nose plies
-tweezers (ESD-15 if possible)
-Soldering iron with smal tip and solder
-small drill
-1.5mm or 1/6" drill bit
-3mm or 1/8" drill bit
-drill bit for chosen toggle switch
Building tips:
After printing the body drill out all holes with a 3mm drill bit except for the UNO mounting holes. On my prints the M3x6mm bolts self threaded in to the plastic itself. If this doesn't work, use 8mm bolts and nylon locking nuts instead.
The wheels need 3 washers or 2mm spacers on either side to allow for clearance from the lock nuts that hold the battery box on. If there is not enough clearance you can use a regular M3 nuts for the battery box or add more washers between the wheel and the body.
Code: the sample code included is a quick working code, however I am no master at C++ nor Arduino so please use it as an example only.