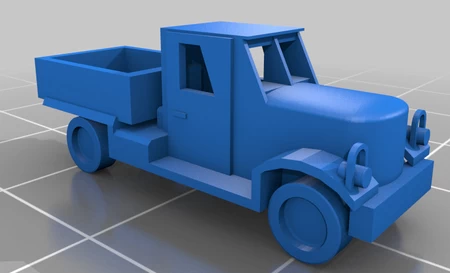
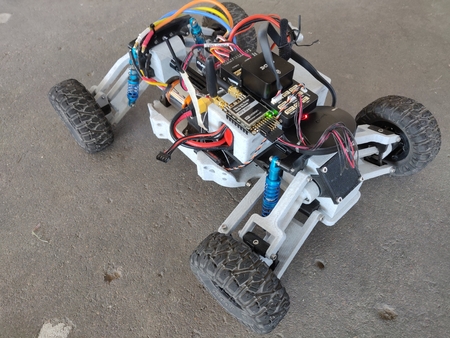
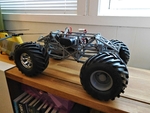
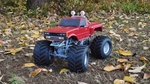
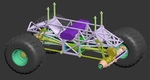
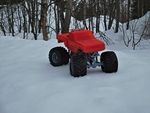
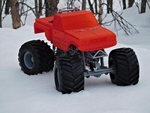
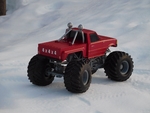
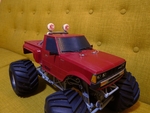
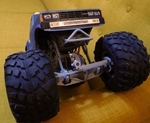
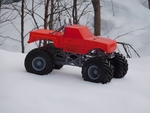
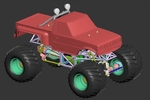
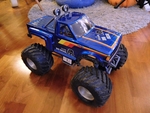
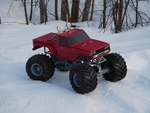
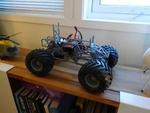
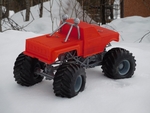
Fully printable monster truck 3D for print


3445 Views 2 Likes 1 Downloads Download the piece here from 3dforprint
If you want to support my work you can use any of the Ebay or Banggood-links below before making purchases.
Videos:
https://youtu.be/mVA5D9kVJJs
https://youtu.be/9wNiFeGisZw
https://youtu.be/AO-AkMLZNDA
https://youtu.be/2taKQ4_r750
https://youtu.be/wBgna8vqM7A
https://youtu.be/CZGQl6PWfFM
https://youtu.be/f0mxxbsc6S8
https://youtu.be/uLqwb3P9NfM
https://youtu.be/4p0nPPbaKH8
https://youtu.be/VDS8F1Fntyc
https://youtu.be/_6eOmHweF8k
https://youtu.be/253u5Jxf34w
Extra accessories:
Mega truck wheels for it: https://cults3d.com/en/3d-model/various/mega-truck-tires-for-the-ursa-1-12-scale-monster-truck
Van body: https://cults3d.com/en/3d-model/various/80-s-van-body-for-the-ursa-monster-truck
Assembly notes:
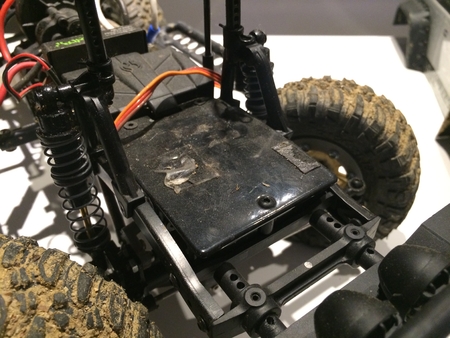
-Tighten the suspension arm clamps around the axle balls until they allow some movement, but not too tight. The ball joint needs to be able to move with suspension travel. -The axle gearbox halves may have some uglyness in the top where the 7mm bearing goes. Just remove any excess plastic threads and stuff the bearing in there. I've done it to many units without failure. I might improve this part of the design later on.
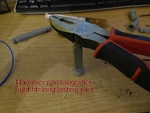
-Apply a small amount of grease to the inside of all drive joints so that the plastic knuckles don't melt from friction. I use cheap bicycle lithium grease. Any grease will do. The drive shafts and drive knuckles can be a little tight. They will bed in. Adding 2x13 mm steel pins throuhg the holes in the ends greatly improve their longevity and torquen handling.
-Apply grease to all gears. This prevents melting and keeps them working for long. I made closed gearboxes so that they could be greased without too much contamination. I use cheap bicycle lithium grease. Any grease will do.
-The gears will bed in if they feel rough in the beginning. Most of the gears seem to be very strong and show no signs of overloading. The differential bevel gears can break with very rough use if they are made from PLA. I eventually printed them from Taulman 910 nylon, which survived my torture tests.
-The smallest differential gears need small shafts to hold them in place. Make these short pieces from 1,8-2mm steel rods to fit in the diff gear.
-Ball bearings can be a tight fit, depending on how accurate your printer prints. The holes are designed slightly oversize. Just press them in there or carefully hammer with something that ensures the force hits the outside race. :)
-The lower links flex when the car rolls. This is by design and works well and acts as an anti roll bar function.
-Some parts have alternative parts so that the builder can create variations and change the look of the truck. Parts marked SWB are short wheelbase options, MWB are medium wheelbase options, and LWB are long wheelbase options. LWB looks more modern while SWB looks old school. Mix and match front and back as you like.
-The screws all thread into the plastic parts without any metal nuts. It may be difficult to screw them in the first time.
-Though the hardware list calls for machine screws, similarly sized self tapping screws will work fine in most cases. The exception being where the part is supposed to pivot on the screw, like the spindles and suspension link hinges. The length can also be different than the recommended in many cases as the holes are usually much deeper than necessary.
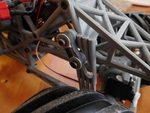
-The rear steering servo needs to be reversed. If it can not be reversed in the radio the longer servo link can be used instead by connecting to the top servo arm instead of the bottom.
-The diff lock gear is not recommended for jumps and high speed bashing because it increases the load on the whole drive train.
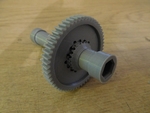
-Some illustrations show an older diff variant with five little sattelite gears while the newer stronger version has four gears. Otherwise they are the same.
Required hardware:
-Minimum 2 channel transmitter and receiver. Cheap:
This is better because you can mix the steering in programming
-540 or 380 motor and ESC. The prototype uses a 21t GoolRC brushed motor for overload testing. I recommend a minimum of 35T
The best ESC for it is the Hobbywing Quicrun 80A "Crawler Brushed" ESC which can be set up to run with reduced brake and reduced punch which extends the gear life considerably: )
-Metal gear servos. Maximum 23mm body length. Corona 843mg is HIGHLY recommended
These also work well, but are very noticeably weaker
-Six cell Sub-C ni-mh battery or 2S hard body lipo (https://www.banggood.com/Giant-Power-7_4V-6000mAh-2S-65C-Lipo-Battery-T-Plug-Hardcase-Pack-p-1080409.html?p=HD240528697332015103&custlinkid=822350), or saddle pack for the newest saddle frame (recommended). Any small 2s lipo that will fit will work. It's a low power car.
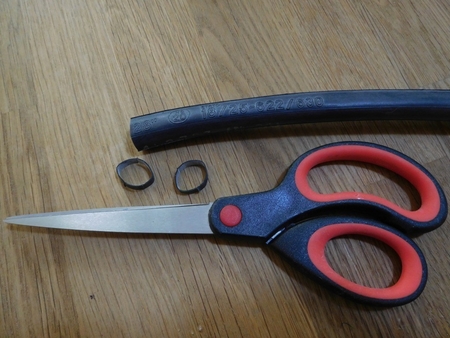
-The springs are made from regular road bicycle tubes. Cut them as wide as you need to get the necessary tension. The butyl is very durable and won't rot. I used one of my old punctured tubes. I also use these rubber bands to hold the battery in place
-In addition to the printable body you can use other bodies. I ordered this body which fits well
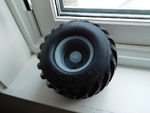
-Four monster tires. Printing the printable tires is possible but is probably more expensive than buying them, and less flexible by far. I use the chevron version of the two in the following links
-7 3mmx19mm carbon fiber, steel or brass shafts for the diffs and live axle gearboxes
-2mm steel rod for the pin drive shafts and diff bevel gears
-4 to 8 3x7x3 ball bearings
-20 12x18x4 ball bearings. https://rover.ebay.com/rover/1/711-53200-19255-0/1?ff3=4&toolid=11800&pub=5575353675&campid=5338226872&mpre=https%3A%2F%2Fwww.ebay.com%2Fitm%2F5-10-20-pcs-Thin-wall-Ball-Bearing-6000-2RS-To-6904-2RS-Rubber-Shielded-Bearings%2F302178407515
-44 M2x8 screws - differential gearbox assembly, upper four link clamp and steering link assembly. 24 of them for assembly of the two piece wheels.
-2 M2.5x22 screws - For mounting a 380 sie motor.
-22 M3x8 screws - Main frame assembly and steering spindle assembly.
-8 M3x12 screws - Lower suspension link and upper rubber band posts.
-6 M3x22 screws (M3x24 can also be used) - 540 Motor mount and lower rubber band posts.
-4 M4x20 screws - For the wheels.
-An assortment of screws is recommended.
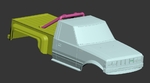
Body01.stl - Front of Datsun Big Bear body.
Body02.stl - Middle of Datsun Big Bear body.
Body02-windows.stl - Middle of Datsun Big Bear body with window cutouts.
Body03.stl - Rear of Datsun Big Bear body.
Body04.stl - Body posts for Datsun Big Bear body.
Body05.stl - Front of Datsun Big Bear body.
Mirror01.stl - Mirrors for the Datsun Big Bear body.
Bodypost01.STL - Shortest body post for lexan bodies.
Bodypost02.STL - Medium body post for lexan bodies.
Bodypost03.STL - Long body post for lexan bodies.
Bodypost04.STL - Extra long body post for lexan bodies.
Bodypost05.STL - Strengthened medium body post for lexan bodies.
Bodypost05.STL - Strengthened extra long body post for lexan bodies.
CGB-380.STL - Central gearbox and pinion for 380 size motors.
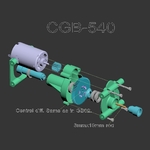
CGB-540.STL - Central gearbox and pinion for 540 size motors.
CGB-gears.STL - Central gearbox gears.
Difflock02.STL - Optional locking "gears" for all diffs.
GB03.stl - Live axle gearbox housing. Front and rear are the same.
GB03-axles.stl - Long internal axles.
GB03-gears.STL - Live axle gearbox gears.
GB03-input.stl - Input coupling and bevel gear for the live axle gearbox.
GB03-input-onepiece.stl - Input coupling and bevel gear in one piece. Pause the print and insrt bearings before the gear portion.
Spindle01.STL - Steering spindles for the outer ends of the live axles.
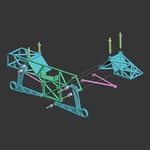
Frame01.stl - Basic main frame sides.
Frame01-sidemount - Main frame sides with saddle pack mounts on the sides for lower CG.
Frame01-split01 and 02.stl - Basic main frame sides, split up to fit tiny printers.
Frame02.stl - Front and rear frame pieces. "Triangle" version.
Frame03.stl - Front and rear frame pieces. "Tall cage" version
Frame04.stl - Front and rear frame pieces. "No cage" version.
Frame05.stl - Front and rear frame pieces. "Low cage" version.
Rollbar02.stl - Rollbar.
Rollbar03.stl - Rollbar with light holders.
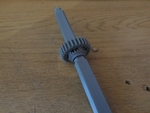
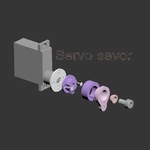
Servosaver01.STL - Basic servo saver for installing onto a servo arm or disc.
Servosaver02.STL - Splined servo saver for installing onto a small servo spline.
Servosaver03.STL - Splined servo saver for installing onto a large servo spline.
Steeringlink01.STL - Steering links
Steeringlink02.STL - Offset steering link in case it's needed to line up, for example when using a servo saver.
Steeringlink03.STL - New and improved steering link with ball linkage to the servo.
Suspension01-SWB.stl - Suspension parts for short wheelbase, type 1.
Suspension01-MWB.stl - Suspension parts for medium wheelbase, type 1.
Suspension01-LWB.stl - Suspension parts for long wheelbase, type 1.
Suspension02-SWB.stl - Suspension parts for short wheelbase, type 2.
Suspension02-MWB.stl - Suspension parts for medium wheelbase, type 2.
Suspension02-LWB.stl - Suspension parts for long wheelbase, type 2.
Suspension03.stl - Lower suspension bushing and rubber band flanges for the spring assembly.
Wheel01.stl - Monster truck wheel. Narrow type. Recommended for bought tires.
Wheel02.stl - Monster truck wheel. Wide type. Fits wide printed tires.
TireLeft.STL - Wide printable left tire. 83 mm width. Fits wide wheel.
TireRight.STL - Wide printable right tire. 83 mm width.Fits wide wheel.
TireLeft-narrow.STL - Narrow printable left tire. 73 mm width. Fits narrow wheel.
TireRight-narrow.STL - Narrow printable right tire. 73 mm width. Fits narrow wheel.
The prototype was made exclusively from PLA.
For the body I recommend printing with one perimeter only, and about 2% light infill (rectilinear or "fast" infills that don't cross over on every layer). The nose piece needs to have a plane to support the detail in the grille at 105 mm. The rear piece also needs a plane to support detail when it gets to 168.8 mm to support the inset pieces of the tail gate. I changed from 2% to 10% at these points, and added a few full layers to give support.
For longevity, the bevel gears in the axle differentials can be printed from a tougher material, like Taulman 910 nylon. I did this to mine after a severe braking and acceleration test session killed the PLA gears. The central differential is fine in PLA.
I printed just about everything with 30% infill. Wheels 15%. I recommend printing the spindles at 100%. Up the infill if you have problems.
Good layer adhesion is very important for many parts, so no skimping on the temperature.
Designer
TAHUSTVEDT3d model description
Fully printable monster truck with four link suspension and four wheel drive and steering with three differentials. I wanted a monster truck that actu...ally looks like a monster truck, and not a truggy with large wheels.If you want to support my work you can use any of the Ebay or Banggood-links below before making purchases.
Videos:
https://youtu.be/mVA5D9kVJJs
https://youtu.be/9wNiFeGisZw
https://youtu.be/AO-AkMLZNDA
https://youtu.be/2taKQ4_r750
https://youtu.be/wBgna8vqM7A
https://youtu.be/CZGQl6PWfFM
https://youtu.be/f0mxxbsc6S8
https://youtu.be/uLqwb3P9NfM
https://youtu.be/4p0nPPbaKH8
https://youtu.be/VDS8F1Fntyc
https://youtu.be/_6eOmHweF8k
https://youtu.be/253u5Jxf34w
Extra accessories:
Mega truck wheels for it: https://cults3d.com/en/3d-model/various/mega-truck-tires-for-the-ursa-1-12-scale-monster-truck
Van body: https://cults3d.com/en/3d-model/various/80-s-van-body-for-the-ursa-monster-truck
Assembly notes:
-Tighten the suspension arm clamps around the axle balls until they allow some movement, but not too tight. The ball joint needs to be able to move with suspension travel. -The axle gearbox halves may have some uglyness in the top where the 7mm bearing goes. Just remove any excess plastic threads and stuff the bearing in there. I've done it to many units without failure. I might improve this part of the design later on.
-Apply a small amount of grease to the inside of all drive joints so that the plastic knuckles don't melt from friction. I use cheap bicycle lithium grease. Any grease will do. The drive shafts and drive knuckles can be a little tight. They will bed in. Adding 2x13 mm steel pins throuhg the holes in the ends greatly improve their longevity and torquen handling.
-Apply grease to all gears. This prevents melting and keeps them working for long. I made closed gearboxes so that they could be greased without too much contamination. I use cheap bicycle lithium grease. Any grease will do.
-The gears will bed in if they feel rough in the beginning. Most of the gears seem to be very strong and show no signs of overloading. The differential bevel gears can break with very rough use if they are made from PLA. I eventually printed them from Taulman 910 nylon, which survived my torture tests.
-The smallest differential gears need small shafts to hold them in place. Make these short pieces from 1,8-2mm steel rods to fit in the diff gear.
-Ball bearings can be a tight fit, depending on how accurate your printer prints. The holes are designed slightly oversize. Just press them in there or carefully hammer with something that ensures the force hits the outside race. :)
-The lower links flex when the car rolls. This is by design and works well and acts as an anti roll bar function.
-Some parts have alternative parts so that the builder can create variations and change the look of the truck. Parts marked SWB are short wheelbase options, MWB are medium wheelbase options, and LWB are long wheelbase options. LWB looks more modern while SWB looks old school. Mix and match front and back as you like.
-The screws all thread into the plastic parts without any metal nuts. It may be difficult to screw them in the first time.
-Though the hardware list calls for machine screws, similarly sized self tapping screws will work fine in most cases. The exception being where the part is supposed to pivot on the screw, like the spindles and suspension link hinges. The length can also be different than the recommended in many cases as the holes are usually much deeper than necessary.
-The rear steering servo needs to be reversed. If it can not be reversed in the radio the longer servo link can be used instead by connecting to the top servo arm instead of the bottom.
-The diff lock gear is not recommended for jumps and high speed bashing because it increases the load on the whole drive train.
-Some illustrations show an older diff variant with five little sattelite gears while the newer stronger version has four gears. Otherwise they are the same.
Required hardware:
-Minimum 2 channel transmitter and receiver. Cheap:
This is better because you can mix the steering in programming
-540 or 380 motor and ESC. The prototype uses a 21t GoolRC brushed motor for overload testing. I recommend a minimum of 35T
The best ESC for it is the Hobbywing Quicrun 80A "Crawler Brushed" ESC which can be set up to run with reduced brake and reduced punch which extends the gear life considerably: )
-Metal gear servos. Maximum 23mm body length. Corona 843mg is HIGHLY recommended
These also work well, but are very noticeably weaker
-Six cell Sub-C ni-mh battery or 2S hard body lipo (https://www.banggood.com/Giant-Power-7_4V-6000mAh-2S-65C-Lipo-Battery-T-Plug-Hardcase-Pack-p-1080409.html?p=HD240528697332015103&custlinkid=822350), or saddle pack for the newest saddle frame (recommended). Any small 2s lipo that will fit will work. It's a low power car.
-The springs are made from regular road bicycle tubes. Cut them as wide as you need to get the necessary tension. The butyl is very durable and won't rot. I used one of my old punctured tubes. I also use these rubber bands to hold the battery in place
-In addition to the printable body you can use other bodies. I ordered this body which fits well
-Four monster tires. Printing the printable tires is possible but is probably more expensive than buying them, and less flexible by far. I use the chevron version of the two in the following links
-7 3mmx19mm carbon fiber, steel or brass shafts for the diffs and live axle gearboxes
-2mm steel rod for the pin drive shafts and diff bevel gears
-4 to 8 3x7x3 ball bearings
-20 12x18x4 ball bearings. https://rover.ebay.com/rover/1/711-53200-19255-0/1?ff3=4&toolid=11800&pub=5575353675&campid=5338226872&mpre=https%3A%2F%2Fwww.ebay.com%2Fitm%2F5-10-20-pcs-Thin-wall-Ball-Bearing-6000-2RS-To-6904-2RS-Rubber-Shielded-Bearings%2F302178407515
-44 M2x8 screws - differential gearbox assembly, upper four link clamp and steering link assembly. 24 of them for assembly of the two piece wheels.
-2 M2.5x22 screws - For mounting a 380 sie motor.
-22 M3x8 screws - Main frame assembly and steering spindle assembly.
-8 M3x12 screws - Lower suspension link and upper rubber band posts.
-6 M3x22 screws (M3x24 can also be used) - 540 Motor mount and lower rubber band posts.
-4 M4x20 screws - For the wheels.
-An assortment of screws is recommended.
Body01.stl - Front of Datsun Big Bear body.
Body02.stl - Middle of Datsun Big Bear body.
Body02-windows.stl - Middle of Datsun Big Bear body with window cutouts.
Body03.stl - Rear of Datsun Big Bear body.
Body04.stl - Body posts for Datsun Big Bear body.
Body05.stl - Front of Datsun Big Bear body.
Mirror01.stl - Mirrors for the Datsun Big Bear body.
Bodypost01.STL - Shortest body post for lexan bodies.
Bodypost02.STL - Medium body post for lexan bodies.
Bodypost03.STL - Long body post for lexan bodies.
Bodypost04.STL - Extra long body post for lexan bodies.
Bodypost05.STL - Strengthened medium body post for lexan bodies.
Bodypost05.STL - Strengthened extra long body post for lexan bodies.
CGB-380.STL - Central gearbox and pinion for 380 size motors.
CGB-540.STL - Central gearbox and pinion for 540 size motors.
CGB-gears.STL - Central gearbox gears.
Difflock02.STL - Optional locking "gears" for all diffs.
GB03.stl - Live axle gearbox housing. Front and rear are the same.
GB03-axles.stl - Long internal axles.
GB03-gears.STL - Live axle gearbox gears.
GB03-input.stl - Input coupling and bevel gear for the live axle gearbox.
GB03-input-onepiece.stl - Input coupling and bevel gear in one piece. Pause the print and insrt bearings before the gear portion.
Spindle01.STL - Steering spindles for the outer ends of the live axles.
Frame01.stl - Basic main frame sides.
Frame01-sidemount - Main frame sides with saddle pack mounts on the sides for lower CG.
Frame01-split01 and 02.stl - Basic main frame sides, split up to fit tiny printers.
Frame02.stl - Front and rear frame pieces. "Triangle" version.
Frame03.stl - Front and rear frame pieces. "Tall cage" version
Frame04.stl - Front and rear frame pieces. "No cage" version.
Frame05.stl - Front and rear frame pieces. "Low cage" version.
Rollbar02.stl - Rollbar.
Rollbar03.stl - Rollbar with light holders.
Servosaver01.STL - Basic servo saver for installing onto a servo arm or disc.
Servosaver02.STL - Splined servo saver for installing onto a small servo spline.
Servosaver03.STL - Splined servo saver for installing onto a large servo spline.
Steeringlink01.STL - Steering links
Steeringlink02.STL - Offset steering link in case it's needed to line up, for example when using a servo saver.
Steeringlink03.STL - New and improved steering link with ball linkage to the servo.
Suspension01-SWB.stl - Suspension parts for short wheelbase, type 1.
Suspension01-MWB.stl - Suspension parts for medium wheelbase, type 1.
Suspension01-LWB.stl - Suspension parts for long wheelbase, type 1.
Suspension02-SWB.stl - Suspension parts for short wheelbase, type 2.
Suspension02-MWB.stl - Suspension parts for medium wheelbase, type 2.
Suspension02-LWB.stl - Suspension parts for long wheelbase, type 2.
Suspension03.stl - Lower suspension bushing and rubber band flanges for the spring assembly.
Wheel01.stl - Monster truck wheel. Narrow type. Recommended for bought tires.
Wheel02.stl - Monster truck wheel. Wide type. Fits wide printed tires.
TireLeft.STL - Wide printable left tire. 83 mm width. Fits wide wheel.
TireRight.STL - Wide printable right tire. 83 mm width.Fits wide wheel.
TireLeft-narrow.STL - Narrow printable left tire. 73 mm width. Fits narrow wheel.
TireRight-narrow.STL - Narrow printable right tire. 73 mm width. Fits narrow wheel.
3d model print parameters
All parts are supposed to be printed in the orientation they open. No support should be necessary. The live axle gearboxes have cylindrical support bu...ilt in, which is easy to break off after printing.The prototype was made exclusively from PLA.
For the body I recommend printing with one perimeter only, and about 2% light infill (rectilinear or "fast" infills that don't cross over on every layer). The nose piece needs to have a plane to support the detail in the grille at 105 mm. The rear piece also needs a plane to support detail when it gets to 168.8 mm to support the inset pieces of the tail gate. I changed from 2% to 10% at these points, and added a few full layers to give support.
For longevity, the bevel gears in the axle differentials can be printed from a tougher material, like Taulman 910 nylon. I did this to mine after a severe braking and acceleration test session killed the PLA gears. The central differential is fine in PLA.
I printed just about everything with 30% infill. Wheels 15%. I recommend printing the spindles at 100%. Up the infill if you have problems.
Good layer adhesion is very important for many parts, so no skimping on the temperature.