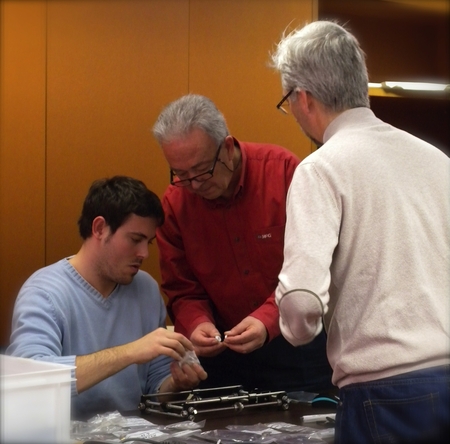
Prusa compact extruder rework 3D for print
6034 Views 1 Likes 0 Downloads Download the piece here from 3dforprint
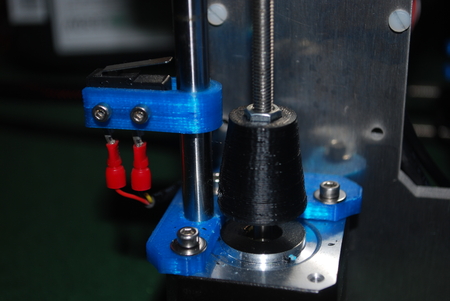
My printer is a P...rusa i3 box-frame. However, the printed parts I bought to make it (my first printer) included the x carriage and Wades extruder from here: http://www.thingiverse.com/thing:119616.
I was pretty happy with this setup until I realised that the nozzle was more than 0.1 mm closer to the bed when positioned at the x center of the bed than it was at the x edges of the bed, making tramming to better than 0.1 mm impossible. Eventually, after trying many things, I determined that the cause of this problem was the flex in the (8 mm) x rods combined with the centre of mass of the heavy Wades extruder being well forward of the x rods and the nozzle also being well forward of the x rods.
As a result I decided to print a new extruder and mount that would move the nozzle as close as possible to the bottom x rod and also move the center of mass closer to the x rods.
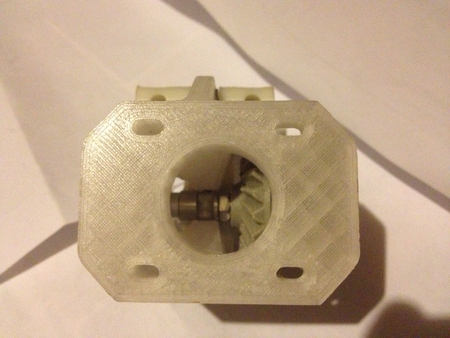
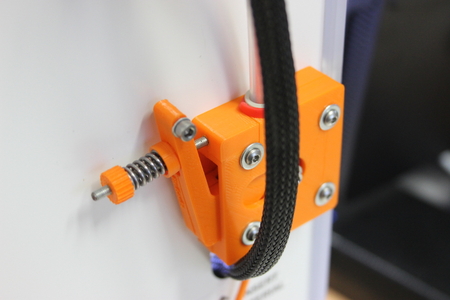
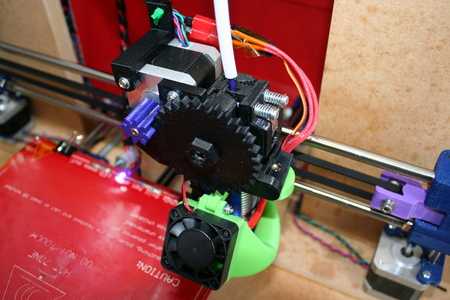
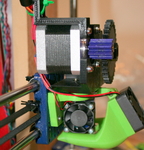
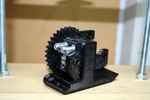
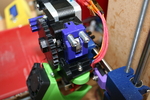
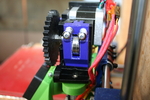
I use 3 mm filament and I also like to use a light weight (250 gm) stepper on the (non-Bowden) extruder to keep the x carriage total mass down, so I need a reasonably large gear ratio (1:4) and a Mk8 hobbed gear to get enough torque. Prusa’s compact extruder from the prusa-vanilla repo looked simple and light (M5 rod and 625ZZ bearings) apart from needing a big stepper, so I redesigned it to use a 8 to 32 gear ratio (up from 8 to 24). To move the center of mass as close as possible to the x rods I raised the motor so that it could extend over the top of the x carriage.
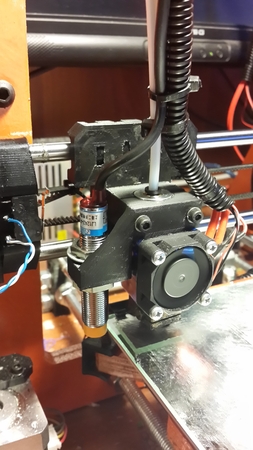
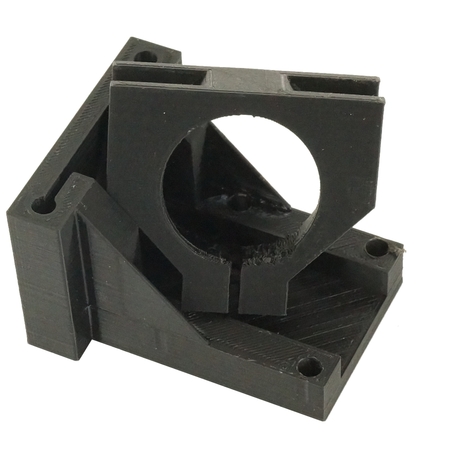
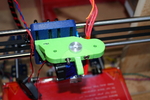
I did not want to change the x carriage because it is really smooth with no slop, so I designed a mount ( based on http://www.thingiverse.com/thing:148536) to attach my E3D v6 directly to the carriage as high as possible, and offset to keep the centre of mass close to the centre of the carriage in the x direction. I then bolt the extruder to this mount using normal 50 mm spaced groovemount holes on the extruder.
Note that one of the M4 bolts used to attach the mount to the carriage is also used to hold the hot-end in place.
I can now tram accurately across the whole
200x200 build plate.
I print these parts with Kisslicer medium support (in ABS).
The mount is designed to be a tight fit on an E3Dv6 and is probably too tight for an E3Dv5, for which the extruder_cyl2_height parameter needs to be reduced. The mount should be printed with a 0.2 mm layer height.
I use a 0.26 layer height for the extruder and idler.
When assembling the extruder, don't tighten the nuts each side of the front-most bearing against the bearing. This is because the bearing ID will be a bit larger than the shaft diameter, so the chances are that the bearing will not be centered exactly on the shaft, causing the shaft to wobble as it rotates. Best to leave the front bearing a bit loose, like the back one has to be. I pack out the shaft where the hobbed gear is with a few layers of aluminium foil before mounting the gear, to center it.
Sources also available here: https://github.com/spinorkit/Prusa3-vanilla
- 2 x 625ZZ bearings
- 1 x 608ZZ bearing
- 1 x M8 x 25mm grub screw
- 1 x M5 bolt or threaded rod
- 2 x M3 40 mm bolts
- 2... x springs
- 2 x M3 20 mm bolts
- 4 x M3 nuts
- 4 x M4 bolts
- 4x M4 nuts
Designer
spinorkit3d model description
Reworked to give 4:1 gear ratio with nozzle as close as possible to bottom x rod and centre of mass as close as possible to x rods.My printer is a P...rusa i3 box-frame. However, the printed parts I bought to make it (my first printer) included the x carriage and Wades extruder from here: http://www.thingiverse.com/thing:119616.
I was pretty happy with this setup until I realised that the nozzle was more than 0.1 mm closer to the bed when positioned at the x center of the bed than it was at the x edges of the bed, making tramming to better than 0.1 mm impossible. Eventually, after trying many things, I determined that the cause of this problem was the flex in the (8 mm) x rods combined with the centre of mass of the heavy Wades extruder being well forward of the x rods and the nozzle also being well forward of the x rods.
As a result I decided to print a new extruder and mount that would move the nozzle as close as possible to the bottom x rod and also move the center of mass closer to the x rods.
I use 3 mm filament and I also like to use a light weight (250 gm) stepper on the (non-Bowden) extruder to keep the x carriage total mass down, so I need a reasonably large gear ratio (1:4) and a Mk8 hobbed gear to get enough torque. Prusa’s compact extruder from the prusa-vanilla repo looked simple and light (M5 rod and 625ZZ bearings) apart from needing a big stepper, so I redesigned it to use a 8 to 32 gear ratio (up from 8 to 24). To move the center of mass as close as possible to the x rods I raised the motor so that it could extend over the top of the x carriage.
I did not want to change the x carriage because it is really smooth with no slop, so I designed a mount ( based on http://www.thingiverse.com/thing:148536) to attach my E3D v6 directly to the carriage as high as possible, and offset to keep the centre of mass close to the centre of the carriage in the x direction. I then bolt the extruder to this mount using normal 50 mm spaced groovemount holes on the extruder.
Note that one of the M4 bolts used to attach the mount to the carriage is also used to hold the hot-end in place.
I can now tram accurately across the whole
200x200 build plate.
I print these parts with Kisslicer medium support (in ABS).
The mount is designed to be a tight fit on an E3Dv6 and is probably too tight for an E3Dv5, for which the extruder_cyl2_height parameter needs to be reduced. The mount should be printed with a 0.2 mm layer height.
I use a 0.26 layer height for the extruder and idler.
When assembling the extruder, don't tighten the nuts each side of the front-most bearing against the bearing. This is because the bearing ID will be a bit larger than the shaft diameter, so the chances are that the bearing will not be centered exactly on the shaft, causing the shaft to wobble as it rotates. Best to leave the front bearing a bit loose, like the back one has to be. I pack out the shaft where the hobbed gear is with a few layers of aluminium foil before mounting the gear, to center it.
Sources also available here: https://github.com/spinorkit/Prusa3-vanilla
3d model print parameters
- 1 x MK8 hobbed gear- 2 x 625ZZ bearings
- 1 x 608ZZ bearing
- 1 x M8 x 25mm grub screw
- 1 x M5 bolt or threaded rod
- 2 x M3 40 mm bolts
- 2... x springs
- 2 x M3 20 mm bolts
- 4 x M3 nuts
- 4 x M4 bolts
- 4x M4 nuts